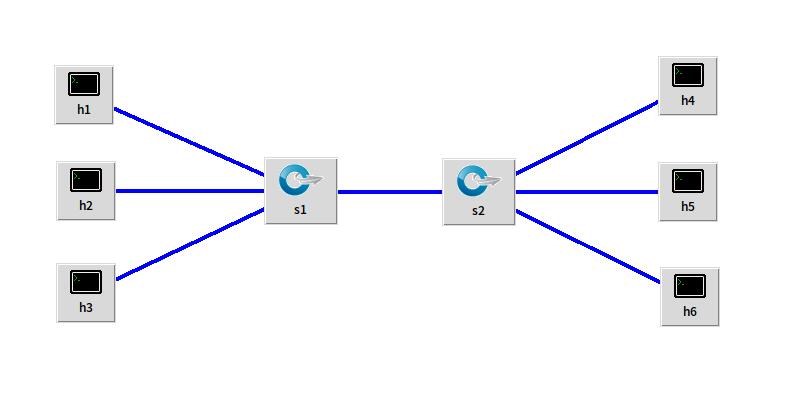
1.实验拓扑
 - 构建拓扑代码
```
from mininet.topo import Topo
from mininet.net import Mininet
from mininet.node import RemoteController,CPULimitedHost
from mininet.link import TCLink
from mininet.util import dumpNodeConnections
- 构建拓扑代码
```
from mininet.topo import Topo
from mininet.net import Mininet
from mininet.node import RemoteController,CPULimitedHost
from mininet.link import TCLink
from mininet.util import dumpNodeConnections
class MyTopo( Topo ):
"Simple topology example."
def __init__( self ):
    "Create custom topo."

    Topo.__init__( self )
switchs = []
    for i in range(2):
        sw = self.addSwitch("s{}".format(i + 1))
        switchs.append(sw)

self.addLink(switchs[0], switchs[1],4,4)

count = 1
    for sw in switchs:
        for i in range(3):
            h = self.addHost("h{}".format(count))
            self.addLink(sw, h,i+1,1)
            count += 1
topos = { 'mytopo': ( lambda: MyTopo() ) }
- 构建成功
<img src="https://img2018.cnblogs.com/blog/1794540/201912/1794540-20191204184642618-661837331.png" width = 80% height = 80% />
- 查看端口连接情况
<img src="https://img2018.cnblogs.com/blog/1794540/201912/1794540-20191204184655602-1440268115.png" width = 80% height = 80% />

- 连接ryu控制器
<img src="https://img2018.cnblogs.com/blog/1794540/201912/1794540-20191204184910524-418658521.png" width = 80% height = 80% />

##2.使用Ryu的REST API下发流表实现和第2次实验同样的VLAN
- 交换机2流表:
curl -X POST -d '{
"dpid": 2,
"priority":1,
"match":{
"in_port":1
},
"actions":[
{
"type": "PUSH_VLAN",
"ethertype": 33024
},
{
"type": "SET_FIELD",
"field": "vlan_vid",
"value": 4096
},
{
"type": "OUTPUT",
"port": 4
}
]
}' http://127.0.0.1:8080/stats/flowentry/add
curl -X POST -d '{
"dpid": 2,
"priority":1,
"match":{
"in_port":2
},
"actions":[
{
"type": "PUSH_VLAN",
"ethertype": 33024
},
{
"type": "SET_FIELD",
"field": "vlan_vid",
"value": 4097
},
{
"type": "OUTPUT",
"port": 4
}
]
}' http://127.0.0.1:8080/stats/flowentry/add
curl -X POST -d '{
"dpid": 2,
"priority":1,
"match":{
"in_port":3
},
"actions":[
{
"type": "PUSH_VLAN",
"ethertype": 33024
},
{
"type": "SET_FIELD",
"field": "vlan_vid",
"value": 4098
},
{
"type": "OUTPUT",
"port": 4
}
]
}' http://127.0.0.1:8080/stats/flowentry/add
curl -X POST -d '{
"dpid": 2,
"priority":1,
"match":{
"dl_vlan": "0"
},
"actions":[
{
"type": "POP_VLAN",
},
{
"type": "OUTPUT",
"port": 1
}
]
}' http://localhost:8080/stats/flowentry/add
curl -X POST -d '{
"dpid": 2,
"priority":1,
"match":{
"dl_vlan": "1"
},
"actions":[
{
"type": "POP_VLAN",
},
{
"type": "OUTPUT",
"port": 2
}
]
}' http://localhost:8080/stats/flowentry/add
curl -X POST -d '{
"dpid": 2,
"priority":1,
"match":{
"dl_vlan": "2"
},
"actions":[
{
"type": "POP_VLAN",
},
{
"type": "OUTPUT",
"port": 3
}
]
}' http://localhost:8080/stats/flowentry/add
- 交换机1流表参照交换机1

- 运行结果
<img src="https://img2018.cnblogs.com/blog/1794540/201912/1794540-20191204190938550-2091190450.png" width = 80% height = 80% />
- 查看流表
sudo ovs-ofctl -O OpenFlow13 dump-flows s1
<img src="https://img2018.cnblogs.com/blog/1794540/201912/1794540-20191204191602015-1424344179.png" width = 80% height = 80% />
sudo ovs-ofctl -O OpenFlow13 dump-flows s2
<img src="https://img2018.cnblogs.com/blog/1794540/201912/1794540-20191204191626033-993990499.png" width = 80% height = 80% />

- pingall查看主机连通情况
<img src="https://img2018.cnblogs.com/blog/1794540/201912/1794540-20191204191957866-1322921491.png" width = 40% height = 40% />

- 查看图形界面
<img src="https://img2018.cnblogs.com/blog/1794540/201912/1794540-20191204192259240-1510893616.png" width = 100% height = 100% />


##3.对比两种方法,写出你的实验体会
- 本次实验不用安装软件真是太开心了,果然做的很快
- ryu可以一次性下发流表,相比ovs-ofctl简单易懂很多,通用性更高。