一.概述
Edgex foundry是一个Linux 基金会运营的开源边缘计算物联网软件框架项目,该项目的核心是基于与硬件和操作系统完全无关的参考软件平台建立的互操作框架,使能即插即用的组件生态系统,统一市场,加速物联网方案的部署。EdgeX Foundry 使有意参与的各方在开放与互操作的物联网方案中自由协作,无论他们是使用公开标准或私有方案。
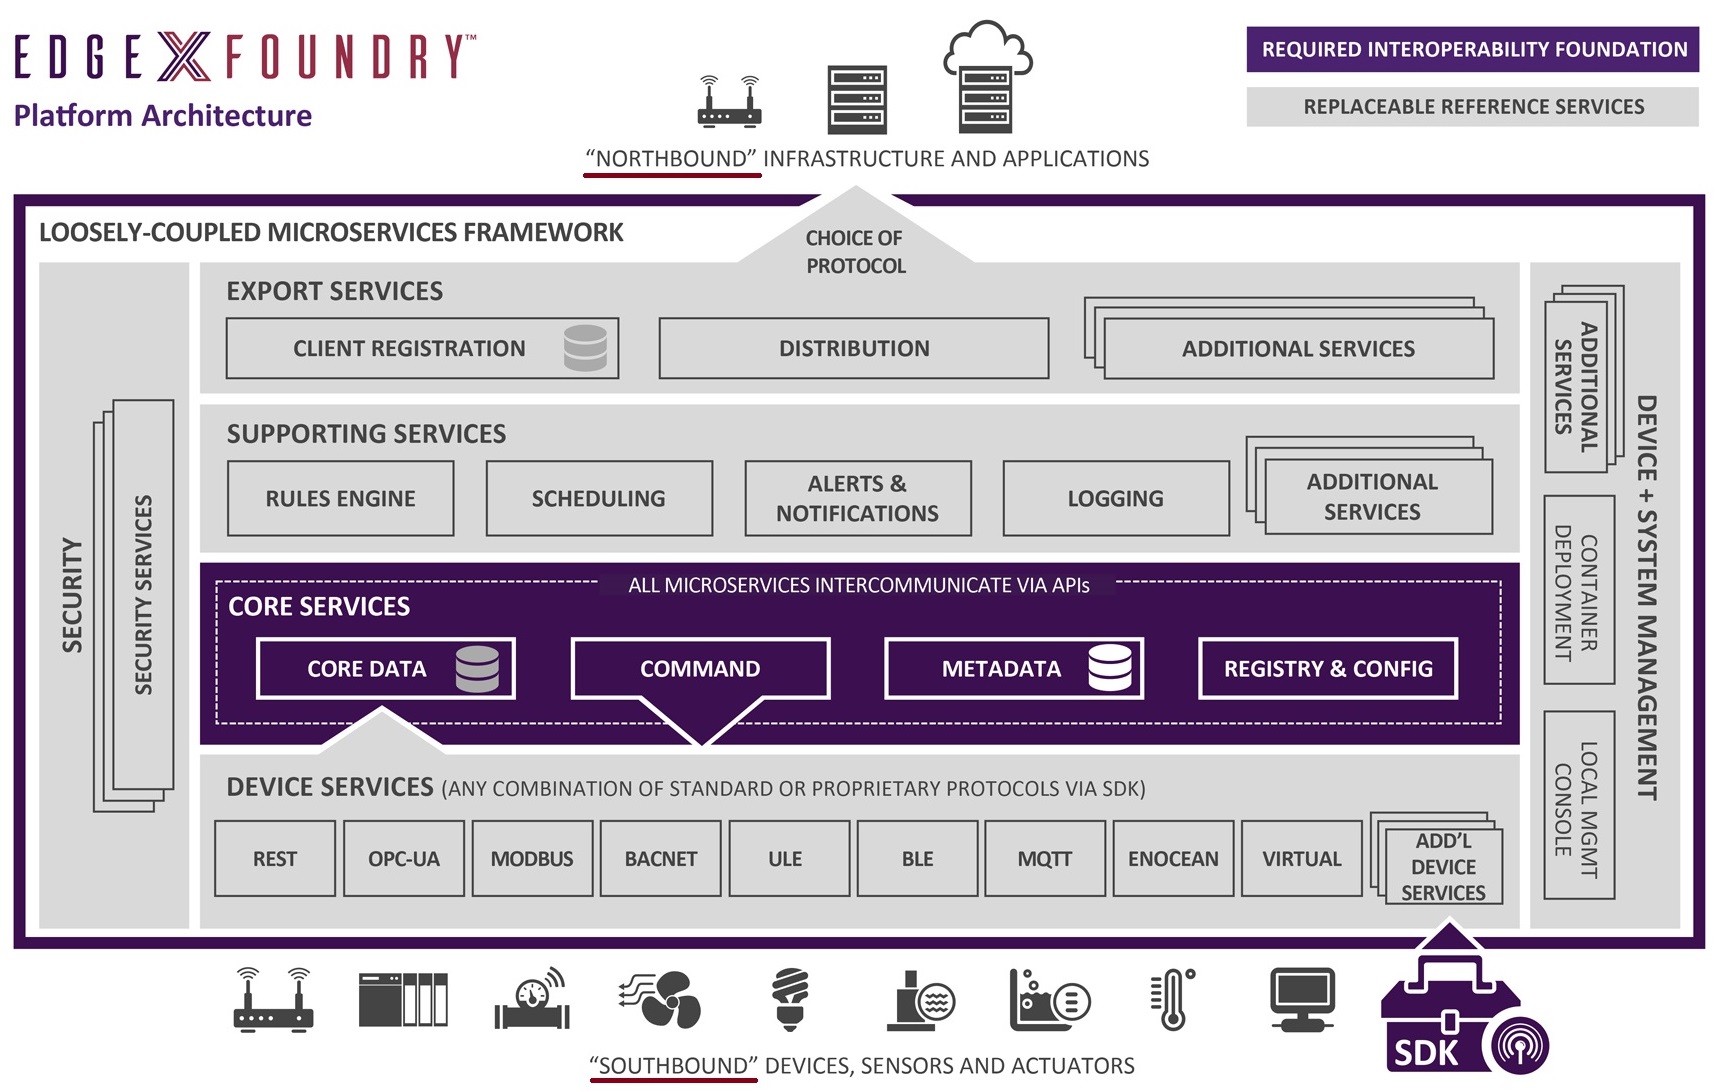
EdgeX Foundry微服务集合构成了四个微服务层及两个增强的基础系统服务,四个微服务层包含了从物理域数据采集到信息域数据处理等一系列的服务,另外两个基础系统服务为该四个服务层提供支撑服务。
四个微服务层从物理层到应用层依次为:设备服务层(device service),核心服务层(core service),支持服务层(supporting service),开放服务层(export service)。
两个增强基础服务:security和system Management。

在edgex中区分南北向:South Side和North Side:
South Side:All IoT 设备、传感器、执行器等数据的来源端。
North Side:云端(the Cloud),数据在这里存储、汇聚、分析、整合等。

二.Core Services
核心服务层包含下列组件:
Core data:负责采集南向设备层数据,并向北向服务提供数据服务。a persistence repository and associated management service for data collected from the south side objects.
Command:负责向南向设备发送命令。a service that facilitates and controls actuation requests from the north side to the south side.
Metadata:负责设备自身能力描述,提供配置新设备并将它们与其拥有的设备服务配对的功能。
a repository and associated management service of metadata about the objects that are connected to EdgeX Foundry. Provides the capability to provision new devices and pair them with their owning device services.
Registry&config:负责服务注册与发现,为其他EdgeX Foundry微服务提供关于EdgeX Foundry内相关服务的信息,包括微服务配置属性。采用开源consul实现。
provides other EdgeX Foundry microservices with information about associated services within EdgeX Foundry and microservices configuration properties (i.e. - a repository of initialization values).
Registry&config微服务向EdgeX Foundry框架范围的微服务提供集中式管理,主要包含两个方面:
Edgex Foundry框架范围内所有微服务的配置参数与操作参数;
Edgex Foundry框架范围内所有微服务的位置与状态;
当每个edgex微服务启动时,都应该向registry&config注册自己,以便registry&config之后可以ping其他微服务以准确获取相关微服务的健康状况,从而为edgex或第三方提供权威的微服务状态信息。
三.Supporting Services
支持服务(SS)层包含广泛的微服务,该层微服务主要提供边缘分析服务和智能分析服务。 此外,该层还为EdgeXmicorservices提供支持功能,如日志记录,调度和数据清理(清理)。
规则引擎,警报和通知微服务 在SS层内,因为它们在Core Services层上运行。 本地分析功能(目前仅以简单的规则引擎实现基本的分析功能)也位于此层。
四.Export Services
在必要情况下,EdgeX Foundry需要可以独立于其他系统运行。Edgex Foundry所依存的网关通常会在独立非联网环境下部署,同时监管一组传感器或设备。当网关在不联网环境下运行时,其监管的传感器及设备是不受外界环境监管或控制的。因此EdgeX Foundry在不连接北向应用的情况下,是可以长时间独立运行的。不过EdgeX Foundry收集的数据总归还是需要定期或不定期的传输给北向应用(通常为云端系统)。开放服务层就是为实现数据的传输。开放服务层提供了一组微服务实现以下功能:
● 北向应用可以在网关注册,并获取其感兴趣的南向设备的数据;
● 通知数据何时被发往何地;
● 通知数据传输格式;
本层提供的微服务:
Client Registration
Distribution
五.Device Services
设备服务层负责与南向设备交互。设备服务是与南向设备或物联网对象交互的边缘连接器,包括各种传感器、执行器等。
设备服务可以同时服务于一个或多个设备(传感器,致动器等)。 DS管理的“设备”可能不是简单的单一物理设备。它可能是EdgeX Foundry的另一个网关(以及该网关的所有设备),设备管理器或设备聚合器,充当设备或设备集合。
设备服务层的微服务通过每个物联网对象本身的协议与设备,传感器,执行器和其他物联网对象进行通信。DS层将由IoT对象生成和传递的数据转换为常见的EdgeX Foundry数据结构,并将转换后的数据发送到Core Services Layer以及EdgeX Foundry其他层的其他微服务。
六.系统服务层
系统服务包含安全基础服务和系统管理服务,目前服务不完善。
七.应用
可通过edgex提供的容器体验edgex服务,参照https://docs.edgexfoundry.org/Ch-Walkthrough.html。
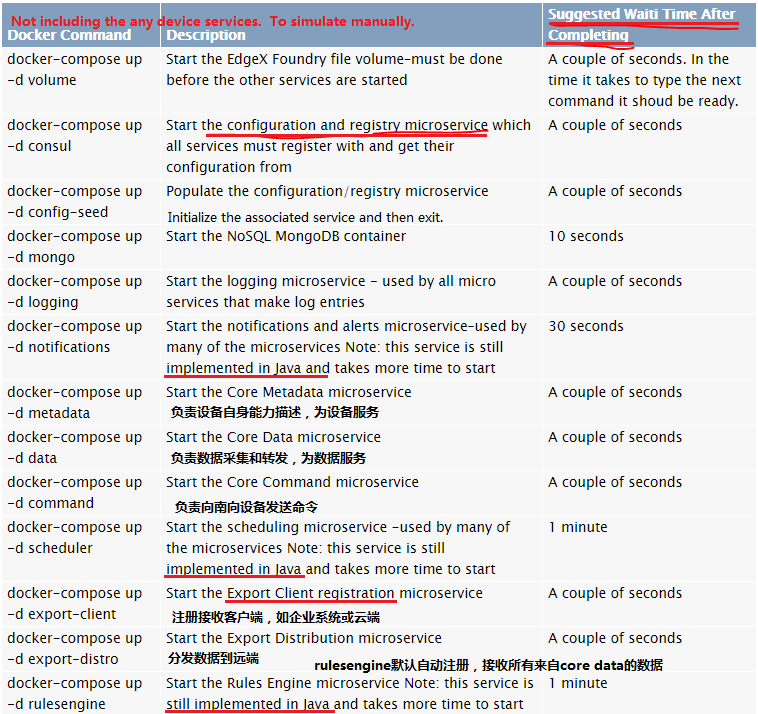
1)安装完docker和docker-compose后,执行如下命令完成镜像下载和启动:
wget https://raw.githubusercontent.com/edgexfoundry/developer-scripts/master/compose-files/docker-compose.yml
docker-compose up -d

一段时间后,所有相关服务都启动成功:
~/edgex/0.7.1_docker$ docker-compose up -d
Creating network "071_docker_edgex-network" with driver "bridge"
Creating edgex-support-rulesengine ... done
Creating edgex-files               ... done
Creating edgex-core-consul         ... done
Creating edgex-mongo               ... done
Creating edgex-config-seed         ... done
Creating edgex-support-logging     ... done
Creating edgex-core-data             ... done
Creating edgex-support-notifications ... done
Creating edgex-core-metadata         ... done
Creating edgex-export-client         ... done
Creating edgex-core-command          ... done
Creating edgex-support-scheduler     ... done
Creating edgex-export-distro         ... done
~/edgex/0.7.1_docker$ docker-compose ps
           Name                          Command               State                                                     Ports
------------------------------------------------------------------------------------------------------------------------------------------
edgex-config-seed             /bin/sh -c /edgex/cmd/conf ...   Exit 0
edgex-core-command            /core-command --consul --p ...   Up       0.0.0.0:48082->48082/tcp
edgex-core-consul             docker-entrypoint.sh agent ...   Up       8300/tcp, 8301/tcp, 8301/udp, 8302/tcp, 8302/udp,
 0.0.0.0:8400->8400/tcp, 0.0.0.0:8500->8500/tcp,0.0.0.0:8600->8600/tcp, 8600/udp
edgex-core-data               /core-data --consul --prof ...   Up       0.0.0.0:48080->48080/tcp, 0.0.0.0:5563->5563/tcp
edgex-core-metadata           /core-metadata --consul -- ...   Up       0.0.0.0:48081->48081/tcp, 48082/tcp
edgex-export-client           /export-client --consul -- ...   Up       0.0.0.0:48071->48071/tcp
edgex-export-distro           /export-distro --consul -- ...   Up       0.0.0.0:48070->48070/tcp, 0.0.0.0:5566->5566/tcp
edgex-files                   /bin/sh -c /usr/bin/tail - ...   Up
edgex-mongo                   docker-entrypoint.sh /bin/ ...   Up       0.0.0.0:27017->27017/tcp
edgex-support-logging         /support-logging --consul  ...   Up       0.0.0.0:48061->48061/tcp
edgex-support-notifications   /support-notifications --c ...   Up       0.0.0.0:48060->48060/tcp
edgex-support-rulesengine     /bin/sh -c java -jar -Djav ...   Up       0.0.0.0:48075->48075/tcp
edgex-support-scheduler       /support-scheduler --consu ...   Up       0.0.0.0:48085->48085/tcp
consul服务对外提供web服务,可通过hostip:8500访问管理服务。
此外,edgex有专门的ui项目:https://github.com/edgexfoundry/edgex-ui-go,运行如下命令启动:
docker run -it -d -p 4000:4000 --name edgex-ui-go edgexfoundry/docker-edgex-ui-go:0.1.1
可通过hostip:4000访问,user/passwd均为admin。
2)参考https://docs.edgexfoundry.org/Ch-Walkthrough.html进行API walkthrough测试,将例子API中localhost改为主机的IP地址,比如 http://localhost:48081/api/v1/addressable 修改为
http://192.168.134.144:48081/api/v1/addressable。
可在主机192.168.134.144上搭建mosquitto服务器,并订阅主题a/b/c:
mosquitto_sub -t a/b/c
在Register an Export Client时需要将mqtt broker配置为上文搭建的mosquitto代理服务器,MQTT topic配置为 a/b/c:
POST to http://192.168.134.144:48071/api/v1/registration
{"name":"MyMQTTTopic","addressable":{"name":"MyMQTTBroker","protocol":"TCP","address":"192.168.134.144","port":1883,"publisher":"EdgeXExportPublisher","user":"wang","password":"mypass","topic":"a/b/c"},"format":"JSON","enable":true,"destination":"MQTT_TOPIC"}
发送数据:
POST to http://192.168.134.144:48080/api/v1/event
{"device":"countcamera1","readings":[{"name":"humancount","value":"12"},{"name":"caninecount","value":"30"}]}
mosquitto也会接受到相应数据:
{"id":"5cd13e6b0e3608000187ec7e","pushed":0,"device":"countcamera1","created":1557216875909,"mo,"event":null,"readings":[{"id":"5cd13e6b0e3608000187ec7f","pushed":0,"created":1557216875909,"ntcamera1","name":"humancount","value":"12"},{"id":"5cd13e6b0e3608000187ec80","pushed":0,"created":0,"device":"countcamera1","name":"caninecount","value":"30"}]}
八.Walk Through
1.准备工作
安装docker、docker-compose,并成功拉取edgex相关官方镜像,执行如下命令停止并清除edgex容器及数据。
docker-compose down
sudo rm /var/lib/docker/volumes/docker_* -rf
systemctl restart docker
2.启动edgex相关服务,不启动任何device相关服务(包含device-virtual)。
可通过修改docker-compose.yml注释掉Device Services、UIs、Tooling所有服务。
docker-compose up -d
主机IP地址为192.168.134.144,可通过如下命令确认edgex容器中目前没有设备数据:
# curl http://192.168.134.144:48080/api/v1/event
[]
3.注册设备服务和设备的地址
注册设备服务:
POSTtohttp://192.168.134.144:48081/api/v1/addressable
BODY:{"name":"camera control","protocol":"HTTP","address":"172.20.0.1","port":49977,"path":"/cameracontrol","publisher":"none","user":"none","password":"none","topic":"none"}
注册设备:
POSTtohttp://192.168.134.144:48081/api/v1/addressable
BODY:{"name":"camera1 address","protocol":"HTTP","address":"172.20.0.1","port":49999,"path":"/camera1","publisher":"none","user":"none","password":"none","topic":"none"}
注意:修改了主机IP和docker IP,需要根据测试环境配置。docker IP指向edgex docker容器的gateway,可通过docker inspect edgex-mongo查看。
POST成功后,会收到注册ID,形如:
5cd4e6479f8fc2000172aba4
可通过 GET to http://192.168.134.144:48081/api/v1/addressable获取刚注册的信息。
4.注册数据描述
注册humancount、caninecount、depth、duration、cameraerror数据,用于描述设备相关数据及错误。
POSTtohttp://192.168.134.144:48080/api/v1/valuedescriptor
BODY:{"name":"humancount","description":"people count","min":"0","max":"100","type":"I","uomLabel":"count","defaultValue":"0","formatting":"%s","labels":["count","humans"]}
POSTtohttp://192.168.134.144:48080/api/v1/valuedescriptor
BODY:{"name":"caninecount","description":"dog count","min":"0","max":"100","type":"I","uomLabel":"count","defaultValue":"0","formatting":"%s","labels":["count","canines"]}
POSTtohttp://192.168.134.144:48080/api/v1/valuedescriptor
BODY:{"name":"depth","description":"scan distance","min":"1","max":"10","type":"I","uomLabel":"feet","defaultValue":"1","formatting":"%s","labels":["scan","distance"]}
POSTtohttp://192.168.134.144:48080/api/v1/valuedescriptor
BODY:{"name":"duration","description":"time between events","min":"10","max":"180","type":"I","uomLabel":"seconds","defaultValue":"10","formatting":"%s","labels":["duration","time"]}
POSTtohttp://192.168.134.144:48080/api/v1/valuedescriptor
BODY:{"name":"cameraerror","description":"error response message from a camera","min":"","max":"","type":"S","uomLabel":"","defaultValue":"error","formatting":"%s","labels":["error","message"]}
同样返回注册ID。
5.注册设备Profile
Device Profile定义设备,包含设备类型、设备数据、设备支持的命令等。
POSTtohttp://192.168.134.144:48081/api/v1/deviceprofile/uploadfile
No headers
FORM-DATA:
key: “file”
value: EdgeX_CameraMonitorProfile.yml
同样返回注册ID。
6.注册设备服务
POSTtohttp://192.168.134.144:48081/api/v1/deviceservice
BODY:{"name":"camera control device service","description":"Manage human and dog counting cameras","labels":["camera","counter"],"adminState":"unlocked","operatingState":"enabled","addressable":{"name":"camera control"}}
7.模拟设备
POSTtohttp://192.168.134.144:48081/api/v1/device
BODY:{"name":"countcamera1","description":"human and dog counting camera #1","adminState":"unlocked","operatingState":"enabled","addressable":{"name":"camera1 address"},"labels":["camera","counter"],"location":"","service":{"name":"camera control device service"},"profile":{"name":"camera monitor profile"}}
8.核实设备和服务
GETtohttp://192.168.134.144:48081/api/v1/deviceservice
GETtohttp://192.168.134.144:48081/api/v1/device
返回注册的设备和服务。
9.执行命令
列出设备支持的命令:
GETtohttp://192.168.134.144:48082/api/v1/device/name/countcamera1
GET to http://192.168.134.144:48082/api/v1/device
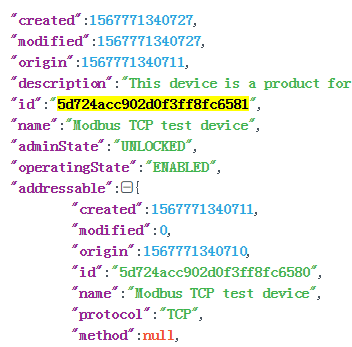
device id如下图标注:

列出设备支持的数据:
GETtohttp://192.168.134.144:48080/api/v1/valuedescriptor
核对当前没有数据发送或接受到:
GETtohttp://192.168.134.144:48080/api/v1/event/count
修改depth:
PUTtohttp://localhost:48082/api/v1/device/<systemspecificdeviceid>/command/<systemspecificcommandid>
PUT to http://192.168.134.144:48082/api/v1/device/5cd4ec699f8fc2000172abad/command/5cd4eaeb9f8fc2000172aba8
BODY:{"depth":"9"}
因为没有设备,执行失败,可通过log确认程序执行过:
dockerlogsedgex-core-command
INFO: 2019/05/10 03:34:37 Issuing PUT command to: http://172.20.0.1:49977/api/v1/devices/5cd4ec699f8fc2000172abad/scandepth
ERROR: 2019/05/10 03:34:37 Put http://172.20.0.1:49977/api/v1/devices/5cd4ec699f8fc2000172abad/scandepth: dial tcp 172.20.0.1:49977: getsockopt: connection refused
10.发送数据
模拟发送数据:
POSTtohttp://192.168.134.144:48080/api/v1/event
BODY:{"device":"countcamera1","readings":[{"name":"humancount","value":"5"},{"name":"caninecount","value":"3"}]}
读取数据:
GETtohttp://192.168.134.144:48080/api/v1/event/device/countcamera1/10
GET to http://192.168.134.144:48080/api/v1/event/count
GET to http://192.168.134.144:48080/api/v1/reading/name/humancount/10
11.注册远端接收客户端
主机搭建mosquitto服务器,并监听a/b/c主题。
POST to http://192.168.134.144:48071/api/v1/registration
{"name":"MyMQTTTopic","addressable":{"name":"MyMQTTBroker","protocol":"TCP","address":"192.168.134.144","port":1883,"publisher":"EdgeXExportPublisher","user":"wang","password":"mypass","topic":"a/b/c"},"format":"JSON","enable":true,"destination":"MQTT_TOPIC"}
此时发送的数据moquitto也会接收到相关数据。
参考:
3.edgex容器https://hub.docker.com/u/edgexfoundry/
6. https://github.com/edgexfoundry/docker-edgex-mongo mongo容器制作
7. https://github.com/edgexfoundry/docker-edgex-volume volume容器制作
8. EdgeX Foundry在流媒体领域中的应用 vmare中国研发中心 微信公众号