【前面的话】书接上文,本文的某些知识依赖我的上一篇文章:SpringCloud之Eureka,如果没有看过可以先移步去看一下。另外在微服务架构中,业务都会被拆分成一个个独立的服务,服务与服务的通讯是基于http restful的。Spring cloud有两种服务调用方式,一种是ribbon+restTemplate,另一种是feign。在这一篇文章首先讲解下基于ribbon+rest。
壹、Ribbon简介
-
ribbon是一个负载均衡客户端,可以很好的控制htt和tcp的一些行为。Feign默认集成了ribbon。
-
ribbon 已经默认实现了这些配置bean:
IClientConfig ribbonClientConfig: DefaultClientConfigImpl

IRule ribbonRule: ZoneAvoidanceRule

IPing ribbonPing: NoOpPing

ServerList ribbonServerList: ConfigurationBasedServerList

ServerListFilter ribbonServerListFilter: ZonePreferenceServerListFilter

ILoadBalancer ribbonLoadBalancer: ZoneAwareLoadBalancer
贰、准备工作
- 新建一个ribbon子工程lovin-ribbon-client,用于后面的操作。下面是主要的pom依赖
<parent>
        <artifactId>lovincloud</artifactId>
        <groupId>com.eelve.lovincloud</groupId>
        <version>1.0-SNAPSHOT</version>
    </parent>
    <modelVersion>4.0.0</modelVersion>

    <artifactId>lovin-ribbon-client</artifactId>
    <packaging>jar</packaging>
    <name>ribbonclient</name>
    <version>0.0.1</version>
    <description>ribbon的client</description>

    <dependencies>
        <dependency>
            <groupId>org.springframework.cloud</groupId>
            <artifactId>spring-cloud-starter-netflix-eureka-client</artifactId>
        </dependency>
        <dependency>
            <groupId>org.springframework.boot</groupId>
            <artifactId>spring-boot-starter-security</artifactId>
        </dependency>
        <dependency>
            <groupId>org.springframework.boot</groupId>
            <artifactId>spring-boot-starter-web</artifactId>
        </dependency>
        <dependency>
            <groupId>org.springframework.cloud</groupId>
            <artifactId>spring-cloud-starter-netflix-ribbon</artifactId>
        </dependency>
    </dependencies>

    <build>
        <plugins>
            <plugin>
                <groupId>org.springframework.boot</groupId>
                <artifactId>spring-boot-maven-plugin</artifactId>
            </plugin>
        </plugins>
    </build>
- 这里为了安全,我这里还是添加spring-boot-starter-security
server:
  port: 8805   # 服务端口号
spring:
  application:
    name: lovinribbonclient     # 服务名称
  security:
    basic:
      enabled: true
    user:
      name: lovin
      password: ${REGISTRY_SERVER_PASSWORD:lovin}
eureka:
  client:
    serviceUrl:
      defaultZone: http://lovin:lovin@localhost:8881/eureka/   # 注册到的eureka服务地址
- 配置spring-boot-starter-security,这里为了方便我这里放开所有请求
package com.eelve.lovin.cofig;

import org.springframework.context.annotation.Configuration;
import org.springframework.core.annotation.Order;
import org.springframework.security.config.annotation.web.builders.HttpSecurity;
import org.springframework.security.config.annotation.web.configuration.WebSecurityConfigurerAdapter;

/**
 * @ClassName SecurityConfig
 * @Description TDO
 * @Author zhao.zhilue
 * @Date 2019/8/16 14:12
 * @Version 1.0
 **/
@Configuration
@Order(0)
public class WebSecurityConfig extends WebSecurityConfigurerAdapter {

    @Override
    protected void configure(HttpSecurity http) throws Exception {
        http.authorizeRequests().anyRequest().permitAll()
                .and().csrf().disable();
    }
}
- 然后向程序的ioc容器中注入一个bean: restTemplate;并通过@LoadBalanced注解表明这个restRemplate开启负载均衡的功能。
package com.eelve.lovin;

import org.springframework.boot.SpringApplication;
import org.springframework.boot.autoconfigure.SpringBootApplication;
import org.springframework.cloud.client.discovery.EnableDiscoveryClient;
import org.springframework.cloud.client.loadbalancer.LoadBalanced;
import org.springframework.context.annotation.Bean;
import org.springframework.web.client.RestTemplate;

/**
 * @ClassName LovinRibbonClientApplication
 * @Description TDO
 * @Author zhao.zhilue
 * @Date 2019/8/15 16:59
 * @Version 1.0
 **/
@SpringBootApplication
@EnableDiscoveryClient
public class LovinRibbonClientApplication {

    public static void main(String[] args) {
        SpringApplication.run(LovinRibbonClientApplication.class,args);
    }

    @Bean
    @LoadBalanced
    RestTemplate restTemplate() {
        return new RestTemplate();
    }
}
- 然后编写一个HelloService
package com.eelve.lovin.service;

import org.springframework.beans.factory.annotation.Autowired;
import org.springframework.stereotype.Service;
import org.springframework.web.client.RestTemplate;

/**
 * @ClassName HelloService
 * @Description TDO
 * @Author zhao.zhilue
 * @Date 2019/8/15 17:02
 * @Version 1.0
 **/
@Service
public class HelloService {
    @Autowired
    RestTemplate restTemplate;

    public String getHello() {
        //这里的**lovineurkaclient**是我上一篇文章新建的eureka客户端的名称
        return restTemplate.getForObject("http://lovineurkaclient/hello",String.class);
    }
}
- 再编写一个HelloController
package com.eelve.lovin.controller;

import com.eelve.lovin.service.HelloService;
import org.springframework.beans.factory.annotation.Autowired;
import org.springframework.web.bind.annotation.RequestMapping;
import org.springframework.web.bind.annotation.RestController;

/**
 * @ClassName HelloController
 * @Description TDO
 * @Author zhao.zhilue
 * @Date 2019/8/15 17:05
 * @Version 1.0
 **/
@RestController
public class HelloController {

    @Autowired
    HelloService helloService;

    @RequestMapping("hello")
    public String hello(){
        return helloService.getHello();
    }
}
叁、启动测试
- 依次启动eureka的服务端和两个客户端,以及新建的lovin-ribbon-client
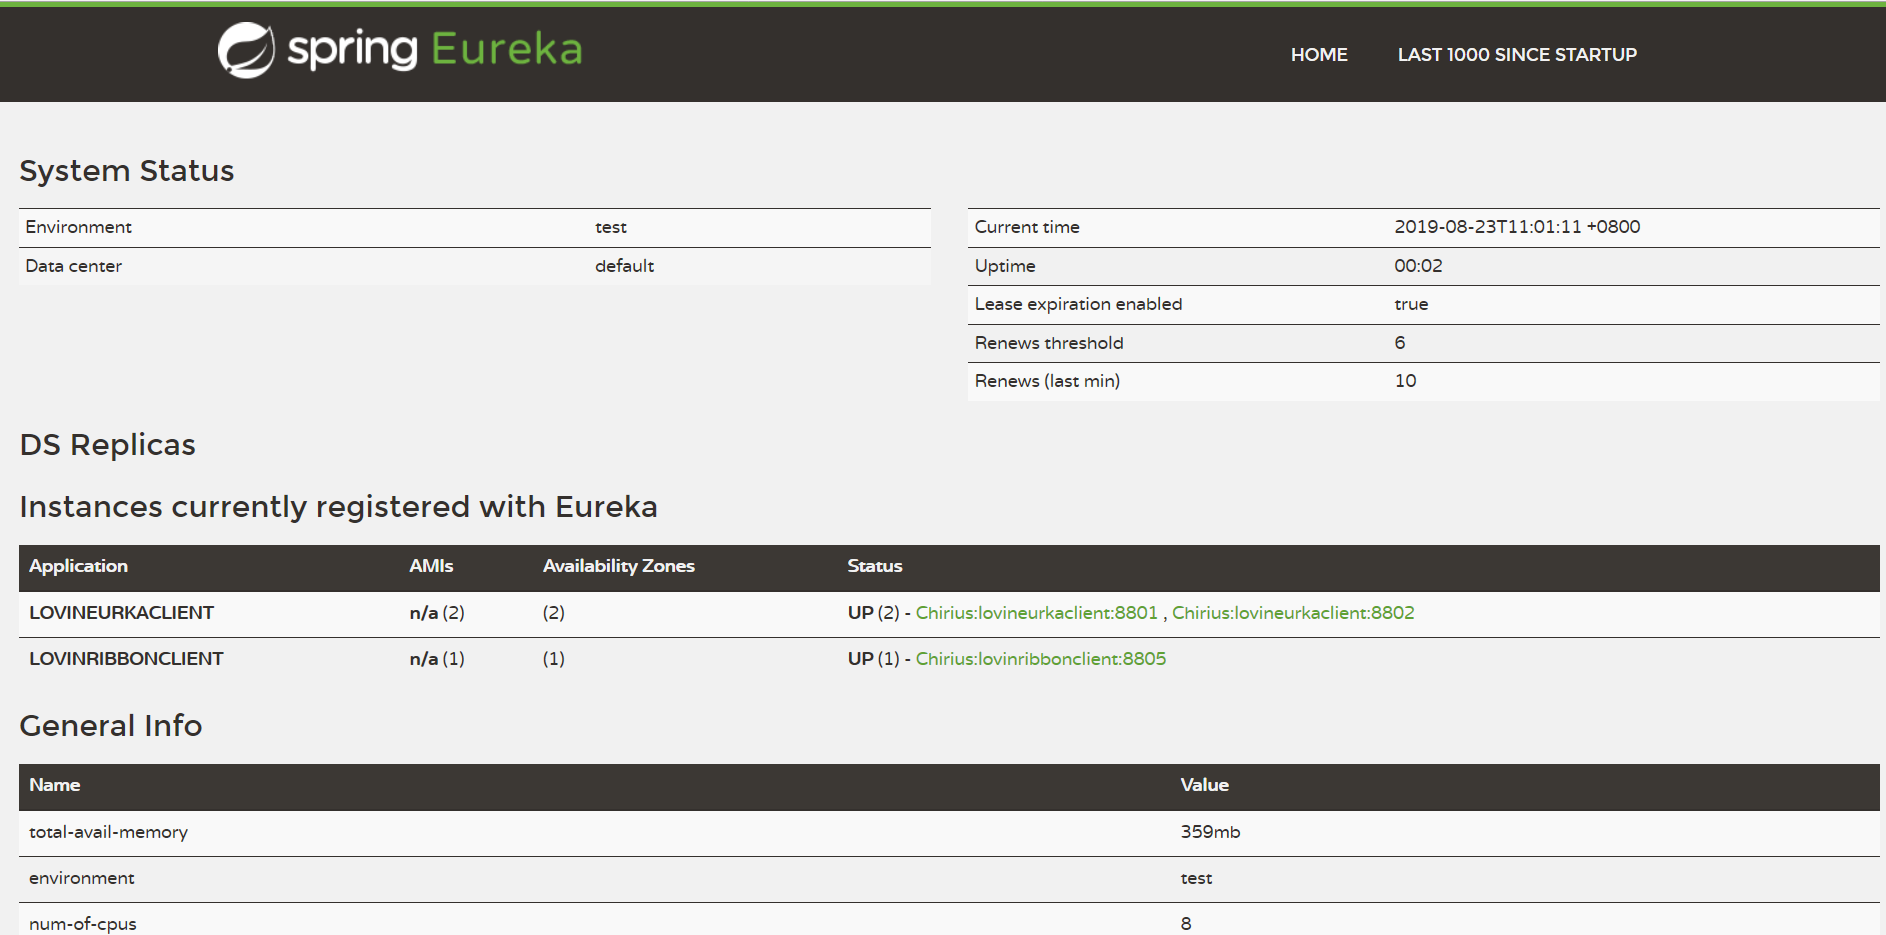
我们可以看到服务已经全部启动成功 - 然后访问http://localhost:8805/hello

我们可以看到已经可以通过ribbon调到我们建立的eureka客户端了 - 再次请求接口观察返回
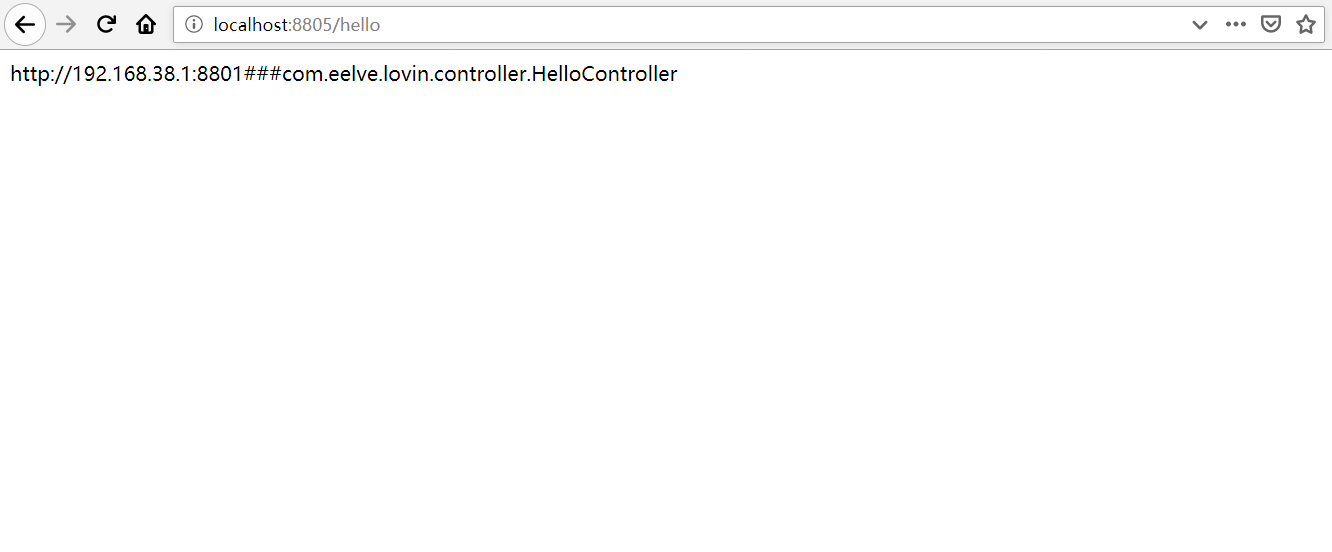
我们可以看到我们调到了通过ribbon负载的另外一个接口了,到这里我们就已经弄好了一个简单的ribbon负载。
肆、网络架构
- 我们可以看到我们调用的服务不再是像再上一篇文章中的直接访问对应的服务,而是通过Ribbon的负载均衡的去调用的,而且这里说明一点,Ribbon的默认机制是轮询。
