静态资源处理
ResouceProperties类设置了静态资源有关的参数,指向了项目会寻找的资源的文件夹
以下四个目录存放的静态资源可以被识别
"classpath:/META-INF/resources/"
"classpath:/resources/"
"classpath:/static/"
"classpath:/public/"
也可以自定义静态资源路径
spring.resources.static-locations=classpath:/coding/
自定义了静态文件路径后原来的自动配置路径失效
网站图标
SpringBoot会在静态资源文件夹中查找favicon.ico,将其作为网站的图标
可以关闭默认图标
spring.mvc.favicon.enabled=false
在自己的静态资源放一个自定义的favicon.ico即可
模板引擎Thymeleaf
Thymeleaf是SpringBoot推荐的模板引擎
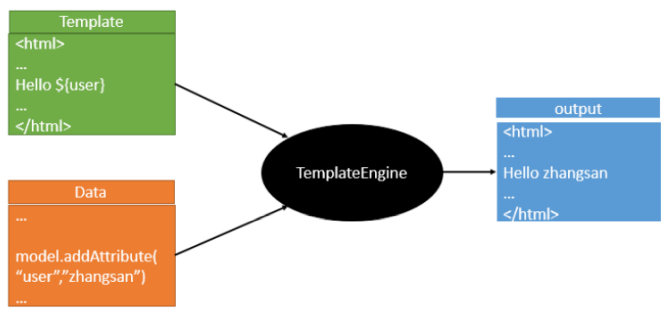
模板引擎的作用就是我们写一个页面模板,模板里面有一个表达式动态获取值,这些动态数据就是我们在后台封装的数据,我们把这个模板和这些数据交给模板引擎,模板引擎把表达式解析出来并把它填充到指定位置,最终生成一个完整的页面。
SpringBoot的Thymeleaf依赖
<dependency>
            <groupId>org.springframework.boot</groupId>
            <artifactId>spring-boot-starter-thymeleaf</artifactId>
</dependency>
通过thymeleaf的自动配置类ThymeleafProperties可以看出默认前缀和后缀
@ConfigurationProperties(
prefix = "spring.thymeleaf"
)
    public class ThymeleafProperties {
    private static final Charset DEFAULT_ENCODING;
    public static final String DEFAULT_PREFIX = "classpath:/templates/";
    public static final String DEFAULT_SUFFIX = ".html";
    private boolean checkTemplate = true;
    private boolean checkTemplateLocation = true;
    private String prefix = "classpath:/templates/";
    private String suffix = ".html";
    private String mode = "HTML";
    private Charset encoding;
}
把html页面放在类路径下的templates文件夹下,themeleaf就可以帮我们自动渲染。(类路径在SpringBoot里一般指resources文件夹)
在html文件中导入命名空间约束,方便查看
<html lang="en" xmlns:th="http://www.thymeleaf.org">
SpringBoot自动配置好了SpringMVC,其ContentNegotiatingViewResolvers就是组合了所有的视图解析器,@EnableWebMvc将WebMvcConfigurationSupport组件导入进来,会使所有的SpringMVC自动配置都失效
Swagger在线测试API
SpringBoot集成Swagger==>springfox
导入依赖
<dependency>
            <groupId>io.springfox</groupId>
            <artifactId>springfox-swagger-ui</artifactId>
            <version>2.7.0</version>
</dependency>
<dependency>
            <groupId>io.springfox</groupId>
            <artifactId>springfox-swagger2</artifactId>
            <version>2.7.0</version>
</dependency>
编写swagger配置类
@Configuration
@EnableSwagger2
public class SwaggerConfig {
}
访问:http://localhost:8080/swagger-ui.html
配置Swagger
Swagger的实例是Docket,通过配置Docket来配置Swagger
 @Bean
    public Docket docket(){
        return new Docket(DocumentationType.SWAGGER_2).apiInfo(apiInfo());
    }
    //配置文档信息
    private ApiInfo apiInfo() {
        Contact contact = new Contact("联系人名字", "http://xxx.xxx.com/联系人访问链接", "联系人邮箱");
        return new ApiInfo(
                "Swagger学习", // 标题
                "学习演示如何配置Swagger", // 描述
                "v1.0", // 版本
                "http://terms.service.url/组织链接", // 组织链接
                contact, // 联系人信息
                "Apach 2.0 许可", // 许可
                "许可链接", // 许可连接
                new ArrayList<>()// 扩展
        );
    }
配置扫描接口
swagger通过Docket的select()方法配置如何扫描接口
//通过select()方法来配置扫描接口,通过RequestHandlerSeletors配置如何扫描接口,path()配置如何通过path过滤
    @Bean
    public Docket docket(){
        return new Docket(DocumentationType.SWAGGER_2).apiInfo(apiInfo()).select().apis(RequestHandlerSelectors.basePackage("com.deng.controller")).paths(PathSelectors.ant("/test/**")).build();
    }
配置Swagger开关
通过enable(boolean flag)配置是否启用Swagger
动态配置当项目处于test、dev环境时显示swagger,处于prod时不显示
@Bean
    public Docket docket(Environment environment){
        // 设置要显示swagger的环境
        Profiles of = Profiles.of("dev", "test");
        // 判断当前是否处于该环境
        // 通过 enable() 接收此参数判断是否要显示
        boolean b = environment.acceptsProfiles(of);
        return new Docket(DocumentationType.SWAGGER_2).apiInfo(apiInfo()).enable(b).select().apis(RequestHandlerSelectors.basePackage("com.deng.controller")).paths(PathSelectors.ant("/test/**")).build();
    }
配置API分组
@Bean
public Docket docket(Environment environment) {
return new Docket(DocumentationType.SWAGGER_2).apiInfo(apiInfo())
.groupName("hello") // 配置分组
// 省略配置....
}
实体配置
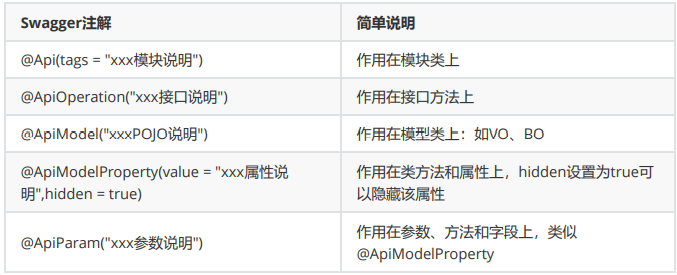
为实体添加注释
@ApiModel("用户实体")
public class User {
   @ApiModelProperty("用户名")
   public String username;
   @ApiModelProperty("密码")
   public String password;
}
异步任务
使用@Async来告诉Spring该方法是一个异步方法,并且要在主启动类上添加@EnableAsync开启异步注解功能
@Service
public class AsyncService {
    @Async
    public void hello(){
        try {
            Thread.sleep(3000);
        } catch (InterruptedException e) {
            e.printStackTrace();
        }
        System.out.println("数据处理中....");
    }
}
@EnableAsync
@SpringBootApplication
public class TestApplication {
    public static void main(String[] args) {
        SpringApplication.run(TestApplication.class, args);
    }
}
使用异步任务,SpringBoot会自己开一个线程池进行调用。
定时任务
Spring提供了两个接口TaskExecutor接口和TaskScheduler接口,两个注解@EnableScheduling和@Scheduled来实现定时任务
cron表达式
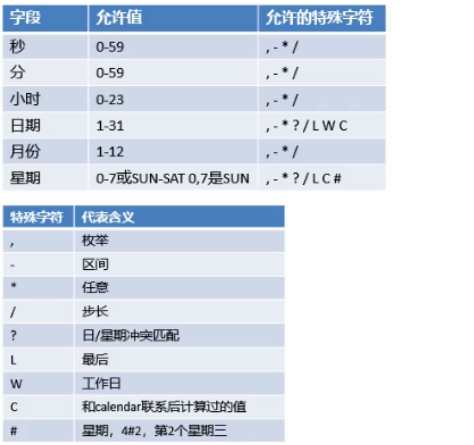
@Service
public class ScheduledService {
   //秒 分 时 日 月 周几
   //0 * * * * MON-FRI
   //注意cron表达式的用法;
   @Scheduled(cron = "0 * * * * 0-7")
   public void hello(){
       System.out.println("hello.....");
   }
}
@EnableScheduling //开启基于注解的定时任务
@SpringBootApplication
public class SpringbootTaskApplication {
    public static void main(String[] args) {
        SpringApplication.run(SpringbootTaskApplication.class, args);
    }
}
邮件任务
Springboot也做了邮件支持
导入依赖
 <dependency>
            <groupId>org.springframework.boot</groupId>
            <artifactId>spring-boot-starter-mail</artifactId>
 </dependency>
它引入了jakarta.mail依赖
配置文件:
spring:
    mail:
      username: 1780403059@qq.com
      password: dwxsw3.1415926hh
      host: smtp.qq.com
      properties:
        mail:
          smtp:
            ssl:
              enable: true
@Autowired
    JavaMailSenderImpl mailSender;
    @Test
    public void test2(){
        SimpleMailMessage mailMessage=new SimpleMailMessage();
        mailMessage.setSubject("你好啊!");
        mailMessage.setText("我爱你!");
        mailMessage.setTo("1780403059@qq.com");
        mailMessage.setFrom("1780403059@qq.com");
        mailSender.send(mailMessage);
    }