第一次用SSM+Jedis搭建web项目,SSM引用之前随笔:http://www.cnblogs.com/duniang/p/8334983.html,在这记录一下。
一、redis安装
这里不记录详细过程,只记录大概流程也就是比较重要的步骤。
1、redis推荐安装在Linux系统下,因此紧随潮流,安装虚拟机(VMware)、Linux系统(CentOS)。
2、电脑主系统是Windows因此为了方便,在Windows系统安装SecureCRT来链接Linux系统。
3、下载redis压缩包:http://www.redis.cn/download.html
4、安装redis需要gcc环境,因此Linux系统中需要安装gcc环境:yum install gcc-c++
5、解压redis压缩包,安装redis:(命令突然想不起来了,以后有机会在补上吧)
6、安装redis完成后,这时启动redis是属于前端启动,说直白点就是启动后命令窗口就无法操作了(需Ctrl+c退出)。前端启动很不方便,因此需要设置成后端启动:
- 进入之前解压后redis的文件copy文件(redis.conf)到redis安装路径,(此处截图做个标记)
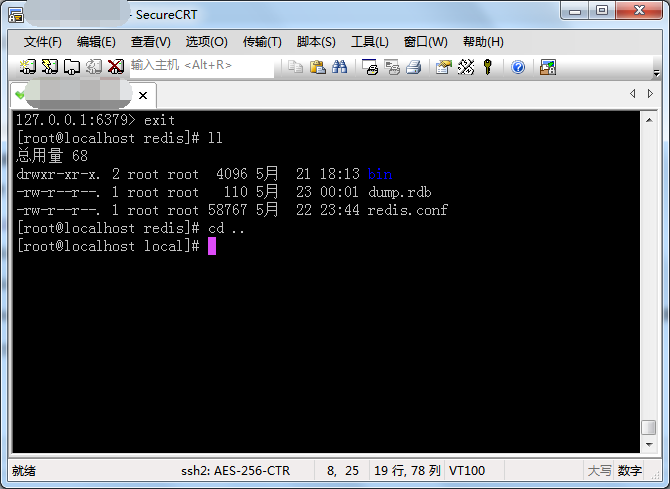
-
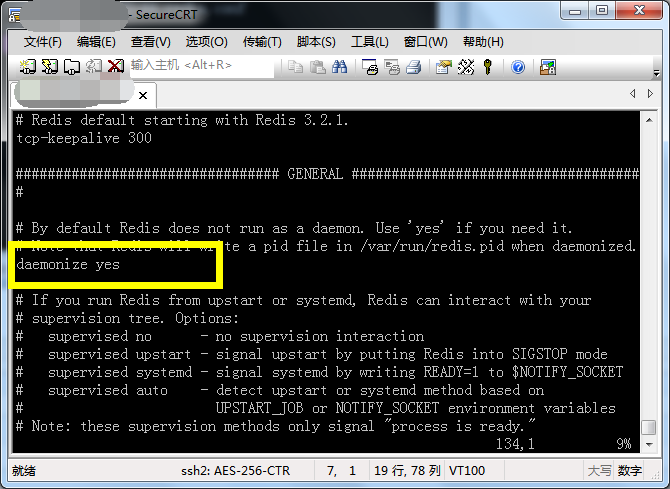
修改redis.conf文件 daemonize yes(大概在100+行):
-
- 最后测试, 注意命令需要携带redis.conf文件(不然它是不会解析redis.conf文件的): ./bin/redis-server ./redis.conf
二、pom.xml
添加Jedis的jar包,此处记录一下,之前报错的时候搜bug有一点意外收获:jedis包括2.4.1,2.5.1等高版本的JedisPoolConfig没有maxActive属性。
1     <dependency>
2       <groupId>redis.clients</groupId>
3       <artifactId>jedis</artifactId>
4       <version>2.9.0</version>
5     </dependency>
三、redis.properties
redis配置有好多,我没有仔细查,只是记录一下各位前辈常用的一下配置
 1 ##########################
 2 ## redis缓存配置
 3 ##########################
 4 # redis主机IP
 5 redis.host=redisIP地址
 6 # redis端口
 7 redis.port=6379
 8 # 链接超时
 9 # redis.timeout=2000
10 # 密码
11 # redis.password=root
12 # 指定redis数据库
13 # redis.database=2
14
15 ##########################
16 ## redis连接池配置
17 ##########################
18 # 最大连接数
19 redis.maxTotal=30
20 # 最大空闲连接数
21 redis.maxIdle=10
22 # 获取链接最大等待毫秒
23 redis.maxWaitMillis=1000
24 # 获取链接时检查有效性
25 redis.testOnBorrow=true
26
27 # 在空闲时监测有效性
28 # redis.testWhileIdle=true
29 # 链接耗尽时是否阻塞
30 # redis.blockWhenExhausted=true
31 # 每次释放链接的最大数目
32 # redis.numTestsPerEvictionRun=1024
33 # 释放链接的扫描间隔(毫秒)
34 # redis.timeBetweenEvictionRunsMillis=30000
35 # 最小空闲时间
36 # redis.minEvictableIdleTimeMillis=1800000
37 # 链接空闲多久后释放
38 # redis.softMinEvictableIdleTimeMillis=10000
四、applicationContext-Redis.xml
第一个项目不要多复杂,能跑起来就可以,所以没有配置过多。
 1 <?xml version="1.0" encoding="UTF-8"?>
 2 <beans xmlns="http://www.springframework.org/schema/beans"
 3        xmlns:xsi="http://www.w3.org/2001/XMLSchema-instance"
 4        xsi:schemaLocation="http://www.springframework.org/schema/beans http://www.springframework.org/schema/beans/spring-beans.xsd">
 5
 6     <!-- 导入redis.properties -->
 7     <bean id="propertyConfig" class="org.springframework.beans.factory.config.PropertyPlaceholderConfigurer">
 8         <property name="location" value="classpath:redis.properties" />
 9     </bean>
10
11     <!-- redis 数据源 -->
12     <bean id="poolConfig" class="redis.clients.jedis.JedisPoolConfig">
13         <!-- 定义最大连接数 -->
14         <property name="maxTotal" value="${redis.maxTotal}" />
15         <!-- 定义最大空闲链接数 -->
16         <property name="maxIdle" value="${redis.maxIdle}" />
17         <!-- 定义最长等待时间 -->
18         <property name="maxWaitMillis" value="${redis.maxWaitMillis}" />
19         <!-- 在获取连接时检查是否有效性 -->
20         <property name="testOnBorrow" value="${redis.testOnBorrow}" />
21     </bean>
22
23     <!-- redis 链接池 -->
24     <bean id="jedisPool" class="redis.clients.jedis.JedisPool" destroy-method="destroy" depends-on="poolConfig">
25         <!-- redis 主机IP -->
26         <constructor-arg name="host" value="${redis.host}" />
27         <!-- redis 端口 -->
28         <constructor-arg name="port" value="${redis.port}" />
29         <!-- 加载JedisPool配置信息 -->
30         <constructor-arg name="poolConfig" ref="poolConfig" />
31     </bean>
32
33
34 </beans>
五、单元测试
关键代码
 1  @Test
 2     public void testJedisClient() {
 3         // 定义redis连接池
 4         JedisPool jedisPool = null;
 5         // 定义redis实例
 6         Jedis jedis = null;
 7         try {
 8             // 映射redis配置文件
 9             ApplicationContext applicationContext =
10                     new ClassPathXmlApplicationContext("classpath:applicationContext-Redis.xml");
11             // 获取redis连接池
12             jedisPool = (JedisPool) applicationContext.getBean("jedisPool");
13             // 获取redis实例
14             jedis = jedisPool.getResource();
15             // 存值
16             jedis.set("name", "rose");
17             // 取值
18             String name = jedis.get("name");
19             // 输出控制台
20             System.out.println(name);
21         }catch (Exception e){
22             e.printStackTrace();
23         }finally {
24             // 释放资源
25             if(jedis != null)
26                 jedis.close();
27             }
28             if(jedisPool != null){
29                 jedisPool.close();
30             }
31         }
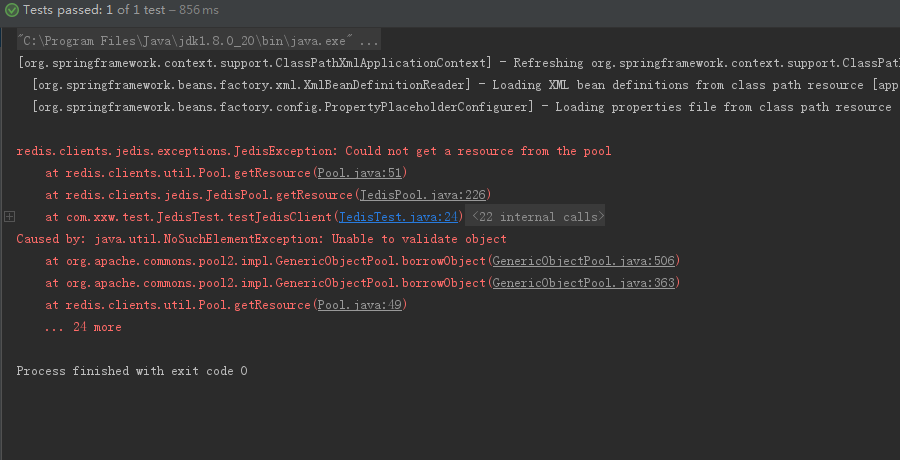
六、bug
写程序吗哪有不出bug的,记录一下:
解决方案:
首先这个异常中文的大概意思就是:无法从连接池中获取链接。
仔细一思考感觉不对啊,我才刚启动,怎么可能连接池就没链接呢。
于是百度,发现触发这个异常似乎有很多种情况,不过都和我的不匹配,不过最后终于凭借10几年的百度经验,还是找到了。
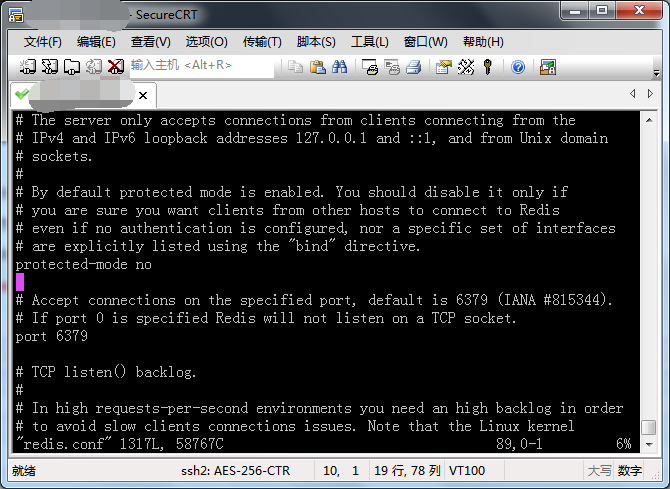
就是需要将redis.conf中的这个配置(protected-mode设为no),protected-mode是redis 3.2 之后加入的新特性,它的大概作用就是禁止公网访问redis cache。
接下来修改一下redis.conf,大概在redis.conf文件100行左右:
OK 成功了,嘿嘿嘿~~~