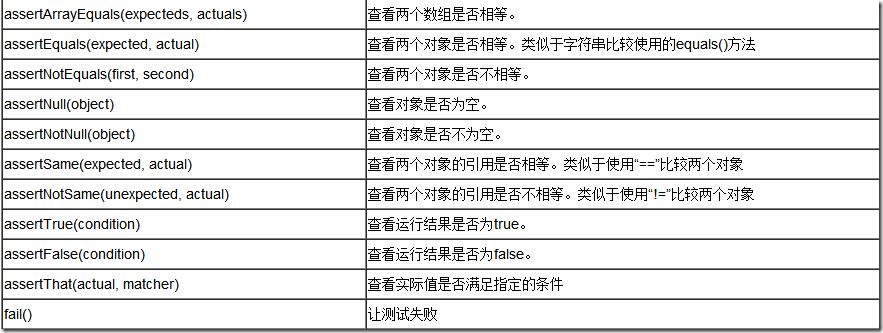
一. 断言核心方法
示例代码:
package com.test;

import org.junit.Assert;
import org.junit.Test;

/**
* @Title: testAssert.java
* @Package com.test
* @Description: junit中常见的断言
* @author lky
* @date 2015年10月17日 上午9:15:59
* @version V1.0
 */
public class testAssert {

    /**
    * @Title: testAssertByteArrayEqual
    * @Description: 判断字节数组是否相等
     */
    @Test
    public void testAssertByteArrayEqual(){
        Assert.assertArrayEquals("byteArray fail to equal ", "lky".getBytes(),"lky".getBytes());
    }

    /**
    * @Title: testAssertEqual
    * @Description: 判断两个对象是否相等,只比较值,不比较它们的地址,类似于java中的equal的比较
     */
    @Test
    public void testAssertEqual(){
        Assert.assertEquals("fail to equql", 50,50);
    }

    @Test
    public void testAssertNotEqual(){
        Assert.assertNotEquals("should be not equal",50,49);
    }

    /**
    * @Title: testAssertNotNull
    * @Description: 判断一个对象是否为空
     */
    @Test
    public void testAssertNotNull(){
        Assert.assertNotNull("should be not null", new Object());
    }

    @Test
    public void testAssertNull(){
        Assert.assertNull("should be null", null);
    }

    /**
    * @Title: testAssertSame
    * @Description: 判断两个对象是否相等,包括值和地址,类似于java中的=
     */
    @Test
    public void testAssertSame(){
        Integer number=Integer.valueOf(10);
        Assert.assertSame("should be same",number ,number);
    }
    @Test
    public void testAssertNotSame(){
        Assert.assertNotSame("should be not same", new Object(), new Object());
    }
}
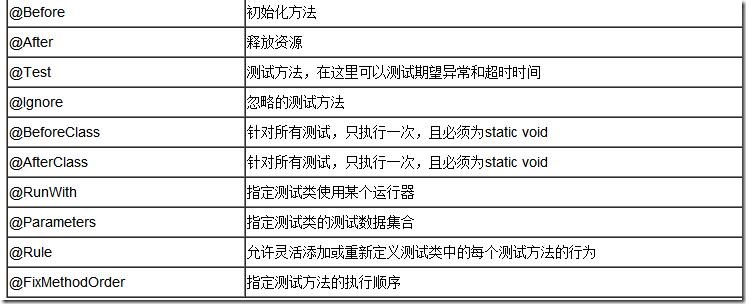
二.注解核心方法
- 执行顺序
一个测试类单元测试的执行顺序为:
@BeforeClass –> @Before –> @Test –> @After –> @AfterClass
- 每一个测试方法的调用顺序为:
@Before –> @Test –> @After
示例代码:
package com.test;

import org.junit.After;
import org.junit.AfterClass;
import org.junit.Assert;
import org.junit.Before;
import org.junit.BeforeClass;
import org.junit.Ignore;
import org.junit.Test;

/**
* @Title: testAnnotation.java
* @Package com.test
* @Description: junit测试中注解测试
* @author lky
* @date 2015年10月17日 上午9:36:39
* @version V1.0
 */
public class testAnnotation {
    private static Demo demo=null;

    /**
    * @Title: testBeforeClass
    * @Description: 在该类加载时运行,有且仅仅执行一次
     */
    @BeforeClass
    public static void testBeforeClass(){
        demo=new Demo();
        System.out.println("Test --------->testBeforeClass");
    }

    /**
    * @Title: testBefore
    * @Description: 在每一个测试执行前,自动被调用
     */
    @Before
    public void testBefore(){
        System.out.println("Test---------->testBefore");
    }

    /**
    * @Title: testAdd
    * @Description: 真正去做测试的代码
     */
    @Test
    public void testAdd(){
        Assert.assertEquals(5, demo.add(2, 3));
    }

    /**
    * @Title: testAdd1
    * @Description: ignore表示忽略该测试
     */
    @Ignore
    @Test
    public void testAdd1(){
         Assert.assertEquals(4, demo.add(2, 2));
    }

    /**
    * @Title: testAfter
    * @Description: 每一个测试执行结束后会被调用
     */
    @After
    public void testAfter(){
        System.out.println("Test----------->testAfter");
    }

    /**
    * @Title: testAfterClass
    * @Description: 所有测试执行结束以后,执行(有且执行一次)
     */
    @AfterClass
    public static void testAfterClass(){
        System.out.println("Test------------>testAfterClass");
    }
}
三.参数化测试
有时一个测试方法,不同的参数值会产生不同的结果,那么我们为了测试全面,会把多个参数值都写出来并一一断言测试,这样有时难免费时费力,这是我们便可以采用参数化测试来解决这个问题。参数化测试就好比把一个“输入值,期望值”的集合传入给测试方法,达到一次性测试的目的。
示例代码:
package com.test;

public class Demo {

    public int add(int a,int b){
        return a+b;
    }
}
package com.test;

import java.util.Arrays;
import java.util.Collection;

import org.junit.Assert;
import org.junit.BeforeClass;
import org.junit.Test;
import org.junit.runner.RunWith;
import org.junit.runners.Parameterized;
import org.junit.runners.Parameterized.Parameters;
/**
* @Title: testParam.java
* @Package com.test
* @Description: 多组数据的单元测试(参数化测试)
* @author lky
* @date 2015年10月17日 上午9:20:54
* @version V1.0
 */

//不使用junit默认的运行器,指定特定的运行器
@RunWith(Parameterized.class)
public class testParam {
    private int expected;
    private int input1;
    private int input2;
    private static  Demo demo;

    public testParam(int expected,int input1,int input2) {
        this.expected=expected;
        this.input1=input1;
        this.input2=input2;
    }

    /**
    * @Title: initData
    * @Description: 测试数据初始化
    * @param @return    设定文件
    * @return Collection<? extends Object>    返回类型
    * @throws
     */
    @Parameters(name="第 {index} 组:-------> {1} + {2} = {0}")
    public static Collection<?extends Object> initData(){
        return Arrays.asList(new Object [][]{{3,2,1},{5,-1,6},{-7,-3,-4},{7,3,4}});
    }

    @BeforeClass
    public static void loadUp(){
        demo=new Demo();
    }

    @Test
    public void testAdd(){
        Assert.assertEquals("should be equal", this.expected, demo.add(this.input1, this.input2));
    }
}
四.异常测试
示例代码:
package com.test;

import java.util.ArrayList;
import java.util.List;

import org.junit.Assert;
import org.junit.Rule;
import org.junit.Test;
import org.junit.rules.ExpectedException;

/**
 *
* @Title: testException.java
* @Package com.test
* @Description: 异常测试(两种方法)
* @author lky
* @date 2015年10月17日 上午10:00:32
* @version V1.0
 */
public class testException {

    @Test(expected=IndexOutOfBoundsException.class)
    public void empty(){
        new ArrayList<Object>().get(0);
    }


    @Rule
    public ExpectedException thrown=ExpectedException.none();

    @Test
    public void shouldTestExceptionMessage() throws IndexOutOfBoundsException {
        List<?extends Object> list=new ArrayList<Object>();
        thrown.expectMessage("Index: 0, Size: 0");
        thrown.expect(IndexOutOfBoundsException.class);
        list.get(0);
        Assert.assertEquals(1, list.get(0));
    }


}
五.超时测试
有时为了防止出现死循环或者方法执行过长(或检查方法效率),而需要使用到限时测试。顾名思义,就是超出设定时间即视为测试失败。共有两种写法
示例代码:
package com.test;

import org.junit.Rule;
import org.junit.Test;
import org.junit.rules.Timeout;

/**
* @Title: testTimeOut.java
* @Package com.test
* @Description: 超时测试
* @author lky
* @date 2015年10月17日 上午9:58:18
* @version V1.0
 */
public class testTimeOut {

    //定义被测试方法的时间参数,
    @Rule
    public Timeout timeout=new Timeout(10000);
    @Test
    public void test(){


    }

    @Test(timeout=10000)
    public void test1(){


    }


}
六.打包测试
如果一个项目中有很多个测试用例,如果一个个测试也很麻烦,因此打包测试就是一次性测试完成包中含有的所有测试用例。
示例代码:
package com.test;

import org.junit.runner.RunWith;
import org.junit.runners.Suite;
import org.junit.runners.Suite.SuiteClasses;

/**
* @Title: testSuite.java
* @Package com.test
* @Description: 打包测试
* @author lky
* @date 2015年10月17日 上午10:05:25
* @version V1.0
 */
@RunWith(Suite.class)
@SuiteClasses({testAnnotation.class,testAssert.class,testParam.class,testException.class,testTimeOut.class})
public class testSuite {

}

