在Django中,自定义User模型,实现注册、登录、修改密码、登出、首页5个API。
大体步骤是:自定义User模型->重构鉴权后台->settings设置->views修改->Postman测试。
1、在models.py中,仿照Django官网提供的样例,自定义User模型,主要是增加了phone这个必选字段。
Django文档地址:https://docs.djangoproject.com/en/2.0/topics/auth/customizing/
代码如下:
from django.db import models
from django.contrib.auth.models import ( BaseUserManager, AbstractBaseUser)


class CustomUserManager(BaseUserManager):
    def create_user(self, user_id, phone, email=None, password=None):
        """
        Creates and saves a User with the given phone,....
        """
        if not phone:
            raise ValueError('phone must be given when create user')
        if email:
            email = self.normalize_email(email)

        user = self.model(
            user_id = user_id,
            phone = phone,
            email = email,
        )

        user.set_password(password)
        user.save(using=self._db)
        return user

    def create_superuser(self, user_id, phone=None, email=None, password=None):
        user = self.create_user(
            user_id,
            phone=phone,
            email=email,
            password=password,
        )
        user.is_admin = True
        user.save(using=self._db)
        return user


class CustomUser(AbstractBaseUser):
    user_id = models.CharField(
        max_length=30,
        unique=True,
    )
    phone = models.CharField(
        max_length=30,
        null=True,
        blank=True,
        unique=True,
        default=None,
    )
    email = models.EmailField(
        verbose_name='email address',
        max_length=255,
        unique=True,
        null=True,
        blank=True,
    )

    is_active = models.BooleanField(default=True)
    is_admin = models.BooleanField(default=False)

    objects = CustomUserManager()

    USERNAME_FIELD = 'user_id'
    REQUIRED_FIELDS = ['phone']

    def __str__(self):
        return self.user_id

    def has_perm(self, perm, obj=None):
        "Does the user have a specific permission?"
        # Simplest possible answer: Yes, always
        return True

    def has_module_perms(self, app_label):
        "Does the user have permissions to view the app `app_label`?"
        # Simplest possible answer: Yes, always
        return True

    @property
    def is_staff(self):
        "Is the user a member of staff?"
        # Simplest possible answer: All admins are staff
        return self.is_admin   # 是admin的话,就是雇员
2、在app目录下,新建backends.py文件,仿照Django官网提供的样例(还是上面给出的网址),写出自定义的CustomBackend(自定义的鉴权后台):
from .models import CustomUser as User


class CustomBackend:

    def authenticate(self,
                     request,
                     user_id=None,
                     phone=None,
                     password=None,
                     **kwargs):
        # 支持后台登录功能,因为admin登录提交的时候会发送username字段
        if user_id is None:
            user_id = kwargs.get('username')

        try:
            if phone:
                user = User.objects.get(phone=phone)
            elif user_id:
                user = User.objects.get(user_id=user_id)
            if user.check_password(password):
                return user
        except User.DoesNotExist:
            return None
        return None

    def get_user(self, user_id):
        try:
            return User.objects.get(pk=user_id)
        except User.DoesNotExist:
            return None
3、在settings中设置:
(1)要使用自定义的User模型和鉴权后台:
# Custom User
AUTH_USER_MODEL = 'chat_user.CustomUser'
# Custom Authentication backend
AUTHENTICATION_BACKENDS = ['chat_user.backends.CustomBackend']
(2)确定使用token鉴权:
INSTALLED_APPS = [
    ......
    'rest_framework',
    'rest_framework.authtoken',
    'chat_user',
]
4、修改views.py,实现注册、登录、修改密码、登出、首页5个API(前4个是post方式,最后一个是get方式):
import uuid
from django.shortcuts import render
from django.contrib import auth
from rest_framework import status
from rest_framework.response import Response
from rest_framework.views import APIView
from rest_framework.authentication import BasicAuthentication,SessionAuthentication,TokenAuthentication
from rest_framework.authtoken.models import Token
from rest_framework.permissions import AllowAny,IsAuthenticated
from .models import CustomUser as User
class Register(APIView):
def post(self, request):
"""
注册
"""
phone = request.data.get('phone')
password = request.data.get('password')
user_id = uuid.uuid4().hex
user = User.objects.create_user(user_id=user_id, phone=phone, password=password)
user.save()
context = {
"status": status.HTTP_200_OK,
"msg": "用户注册成功"
}
return Response(context)
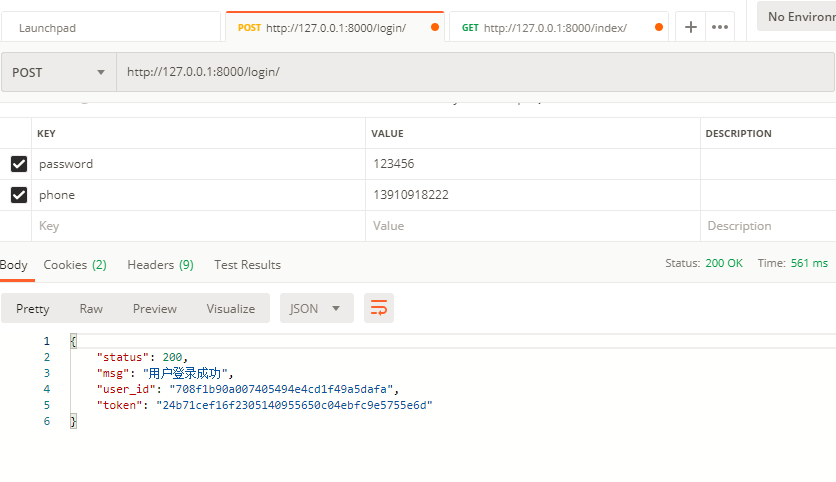
class Login(APIView):
authentication_classes = (BasicAuthentication,TokenAuthentication) # 使用基础的和token的验证方式
permission_classes = (AllowAny,) # 允许所有人访问
def post(self, request):
"""
登录
"""
phone = request.data.get('phone')
password = request.data.get('password')
user = auth.authenticate(request, phone=phone, password=password)
if user:
auth.login(request, user)
token = Token.objects.create(user=user)
context = {
"status": status.HTTP_200_OK,
"msg": "用户登录成功",
"user_id":request.user.user_id,
"token":token.key,
}
else:
context = {
"status": status.HTTP_403_FORBIDDEN,
"msg": "用户名或密码错误",
}
return Response(context)
class Logout(APIView):
authentication_classes = (BasicAuthentication,TokenAuthentication)
permission_classes = (IsAuthenticated,)
def post(self, request):
"""
登出
"""
#auth.logout(request)
Token.objects.filter(user=request.user).delete()
context = {
"status": status.HTTP_200_OK,
"msg": "退出成功"
}
return Response(context)
class Password(APIView):
authentication_classes = (BasicAuthentication,TokenAuthentication) # 使用基础的和token的验证方式
permission_classes = (IsAuthenticated,) # 只允许所有通过鉴权的人访问
def post(self, request):
"""
修改密码
"""
new_password1 = request.data.get('new_password1')
new_password2 = request.data.get('new_password2')
if new_password1 and new_password1 == new_password2:
request.user.set_password(new_password1)
request.user.save()
context = {
"status": status.HTTP_200_OK,
"msg": "修改密码成功"
}
else:
context = {
"status": status.HTTP_403_FORBIDDEN,
"msg": "两次密码不一样或没密码"
}
return Response(context)
class Index(APIView):
authentication_classes = (BasicAuthentication,TokenAuthentication) # 使用基础的和token的验证方式
permission_classes = (IsAuthenticated,) # 只允许所有通过鉴权的人访问
def get(self,request):
context = {
"data":"Hello World!",
"status":200,
"msg":"访问index成功"
}
return Response(context)
5、确认urls已配置好,包括项目的urls和应用的urls,下面列出的仅是应用的urls:
from django.urls import path, include, re_path
from . import views


urlpatterns = [
    path('register/', views.Register.as_view()),
    path('login/', views.Login.as_view()),
    path('logout/', views.Logout.as_view()),
    path('password/', views.Password.as_view()),
    path('index/', views.Index.as_view()),
]
6、写入数据库:
python manage.py makemigrations
python manage.py migrate
在写入的时候可能会报错,django.db.utils.IntegrityError: UNIQUE constraint failed,是因为之前数据库中有user的数据,而表结构不一样,删除原来的用户数据再写入就行;我是删除了整个sqlite数据库,重新写入数据库。
7、开启服务(python manage.py runserver),用Postman测试各个接口,成功。