安卓的界面组件很多,但是有内部严谨的逻辑关系,掌握这些关系将会取得事半功倍的效果。
关系:所有界面能够看得见的,都是View类或是其子类。View类有一个子类ViewGroup,ViewGroup能够作为承接其他组件的容器。安卓五大布局都是ViewGroup的子类。开发过程中,通过布局容纳组件(View,ViewGroup),还能通过继承原有的类(ViewGroup,View)定义出我们自己需要的东西。
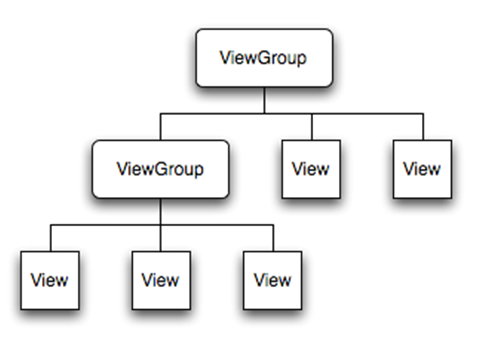 图:界面容纳关系
下面,开始详细介绍:
安卓View类是界面的基本类,所有界面显示的组件都是继承和间接继承于View类。其中View类有一个子类ViewGroup,从名字我们就可以看出他是组件的集合,也就是ViewGroup能够起到集合众多组件的作用,当然你也能将他作为View来使用。
从实际的例子来说,用户注册界面有文本框,提交按钮等等,他们有可能就是ViewGroup的某个子类的实例。
安卓界面上回出现众多的组件,这些组件是通过ViewGroup某个子类统一安排的,并不是人为的指定位置大小,使得安卓的用户界面具有良好的平台无关性,这些子类统称为布局管理器。下面我们介绍安卓布局:
安卓的布局全部都是ViewGroup的子类,ViewGroup的直接子类有线性布局,表格布局,帧布局,相对布局,绝对布局,这五个布局统称五大布局。表格布局实际是继承自线性布局,安卓4.0还增添了新的布局:网格布局。这些布局不但自身能最为UI组件使用,还能够作为容器,通过addView()向内部添加组件来使用。
一 布局介绍
1>线性布局(LinearLayout)
线性布局容器内部的组件将会通过排队方式,一个接一个的显示出来,方向有两个水平或是垂直,如果出了屏幕那就不能继续显示了。简单写写会在xml文件中配置的布局属性:
android:orientation 方向,水平或是垂直
android:gravity 容器内部组件的对其方式
android:layout_height 容器高度
android:layout_width 容器宽度
android:id 使findViewById能够唯一取到这个容器,是唯一标识的
android:background 设置容器背景图片
实例操作:拖动几个TextView到垂直线性布局,查看布局方式
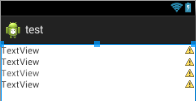
这样的布局方式是从上到下,对应的xml代码,一目了然:
    <LinearLayout
        android:layout_width="match_parent"
        android:layout_height="match_parent"
        android:orientation="vertical" >          (这儿决定了垂直)

        <TextView
            android:id="@+id/textView1"
            android:layout_width="fill_parent"
            android:layout_height="wrap_content"
            android:text="TextView" />

        <TextView
            android:id="@+id/textView2"
            android:layout_width="fill_parent"
            android:layout_height="wrap_content"
            android:text="TextView" />

        <TextView
            android:id="@+id/textView3"
            android:layout_width="fill_parent"
            android:layout_height="wrap_content"
            android:text="TextView" />

        <TextView
            android:id="@+id/textView4"
            android:layout_width="fill_parent"
            android:layout_height="wrap_content"
            android:text="TextView" />

    </LinearLayout>
实例操作:拖动几个TextView到水平线性布局,查看布局方式
 这是水平的条件下放入的组件,多出的组件被挤出了屏幕,无法显示,代码就不贴了。
2>表格布局(TableLayout)
表格布局是线性布局的子类,通过行列形式管理加入的组件。TableLayout的基本组件是TableRow,组件加入TableRow,每加入一个表格增加一列。表格里是可以拉伸收缩隐藏的。表格布局支持线性布局的属性,也有自己的独特属性。
android:collapseColumns 设置要隐藏的列号
android:shrinkColumns 设置可以收缩的列号
android:stretchColumns 设置可以拉伸的列号
实例操作:使用表格布局制作一个登陆界面
可视化的界面上拖一个表格布局容器,之后拖入相应的控件,得到如下图。

请注意,每一行其实有四个控件。第一行的第一个和最后一个其实是两个textView,不对他们设置文字,让他们占据一个空白的位置。挤挤,让我们需要的控件处再正中间。即在我标记的地方各有一个TextView。最好你也跟着做做

代码如下:
    <TableLayout
        android:gravity="center_vertical"
        android:layout_width="match_parent"
        android:layout_height="match_parent"
        android:stretchColumns="0,3" >

        <TableRow
            android:id="@+id/tableRow1"
            android:layout_width="wrap_content"
            android:layout_height="wrap_content" >

            <TextView
                android:id="@+id/textView1"
                android:layout_width="wrap_content"
                android:layout_height="wrap_content"/>

            <TextView
                android:id="@+id/textView2"
                android:layout_width="wrap_content"
                android:layout_height="wrap_content"
                android:text="用户名:" />

            <EditText
                android:id="@+id/editText1"
                android:layout_width="wrap_content"
                android:layout_height="wrap_content"
                android:minWidth="100dp" >

                <requestFocus />
            </EditText>

            <TextView
                android:id="@+id/textView3"
                android:layout_width="wrap_content"
                android:layout_height="wrap_content" />

        </TableRow>

        <TableRow
            android:id="@+id/tableRow2"
            android:layout_width="wrap_content"
            android:layout_height="wrap_content" >

            <TextView
                android:id="@+id/textView4"
                android:layout_width="wrap_content"
                android:layout_height="wrap_content" />

            <TextView
                android:id="@+id/textView5"
                android:layout_width="wrap_content"
                android:layout_height="wrap_content"
                android:text="密码:" />

            <EditText
                android:id="@+id/editText2"
                android:layout_width="wrap_content"
                android:layout_height="wrap_content"
                android:minWidth="100dp"
                android:password="true" />

            <TextView
                android:id="@+id/textView6"
                android:layout_width="wrap_content"
                android:layout_height="wrap_content" />

        </TableRow>

        <TableRow
            android:id="@+id/tableRow3"
            android:layout_width="wrap_content"
            android:layout_height="wrap_content" >

            <TextView
                android:id="@+id/textView7"
                android:layout_width="wrap_content"
                android:layout_height="wrap_content" />

            <TextView
                android:id="@+id/textView9"
                android:layout_width="wrap_content"
                android:layout_height="wrap_content" />

            <Button
                android:id="@+id/button1"
                android:layout_width="wrap_content"
                android:layout_height="wrap_content"
                android:text="login" />

            <TextView
                android:id="@+id/textView8"
                android:layout_width="wrap_content"
                android:layout_height="wrap_content" />

        </TableRow>
    </TableLayout>
3>帧布局(FrameLayout)
这个布局管理器,每放入一个组件,容器都会为这个组件生成一个空白区域,此区域成为一帧,帧会按照容器的gravity属性进行对齐和布局。帧布局有一个特点:后添加的帧如果在区域上和前面添加的帧有重合,则会遮挡住前面添加的帧。和Swing类似,帧布局也是默认从左上角向右下角布局显示的。常用属性:
android:foreground 设置帧布局的前景图像
android:foregroundGravity 设置前景图像的显示位置
操作实例:动手拖动帧布局,加入三个颜色不一样的TextView。如你所见,后加入的帧会遮盖前面的帧。O(∩_∩)O哈哈~ 如果我们通过代码获取这三个TextView,每隔固定的事件让他们相互转换颜色,那么就能实现街上的弥红灯效果。

<FrameLayout xmlns:android="http://schemas.android.com/apk/res/android"
    xmlns:tools="http://schemas.android.com/tools"
    android:id="@+id/container"
    android:layout_width="match_parent"
    android:layout_height="match_parent"
    tools:context="com.nzg.test.Main"
    tools:ignore="MergeRootFrame" >

    <TextView
        android:id="@+id/textView1"
        android:layout_width="200dp"
        android:layout_height="200dp"
        android:layout_gravity="center"
        android:background="#ff0000" />

    <TextView
        android:id="@+id/textView2"
        android:layout_width="150dp"
        android:layout_height="150dp"
        android:layout_gravity="center"
        android:background="#00ff00" />

    <TextView
        android:id="@+id/textView3"
        android:layout_width="100dp"
        android:layout_height="100dp"
        android:layout_gravity="center"
        android:background="#0000ff" />

</FrameLayout>
4>相对布局(RelativeLayout)
顾名思义,相对布局是通过组件之间的相对位置进行摆放显示的,相比于其他通过xml参数设置显示位置的方式,这是十分方便的。但是,安卓程序会在不同的环境下运行,分辨率差别会扰乱原有的布局。
android:gravity 设置容器中组件的对齐方式
android:ignoreGravity 设置容器中某个组件不受容器对其方式影响
android:layout_toLeftOf 设置在某个组件的左边,参数是组件id
android:layout_toRightOf 设置在某个组件的右边
android:layout_centerVertical 设置组件垂直居中,参数是boolean
android:layout_alignLeft 设置以某个组件的左边界对齐,参数是id
android:layout_alignBottom 指定和某个组件的底部对齐,参数是id
android:layout_alignParentLeft 设置和容器的左边界对齐
android:layout_below 设置组件在某个组件的下方
操作实例:相对布局是最好理解的,拖动UI界面时候你就会发现十分方便,利于我们设计界面。动手试试就知道了

5>网格布局(GridLayout)
安卓4.0版本之后添加的网格布局,4.0之前需要相应的库进行支撑。网格布局思想是将屏幕划分成 数行×数列 的表格,当然我们可以将相邻的表格进行合并,有点类似于HTML里面的table标签,十分方便。
android:alignmentMode 设置布局管理的对齐模式
android:columnCount 设置列数量
android:rowCount 设置行数量
android:columnOrderPreserved 是否保留列序号
android:useDefaultMargins 是否使用默认页边距
android:layout_column 设置组件所在的列
android:layout_row 设置组件所在行
android:layout_gravity 设置组件对齐方式
android:layout_columnSpan 横向占据几列
android:layout_rowSpan 组件纵向占几行
操作实例:这里我们设计一个 4x4 的表格,在3X3的位置放置一个按钮,效果和代码如下
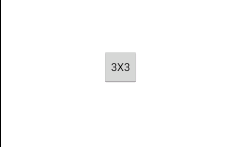
    <android.support.v7.widget.GridLayout
        android:layout_width="wrap_content"
        android:layout_height="wrap_content"
        android:layout_gravity="center"
        app:columnCount="4"
        app:rowCount="4" >

        <Button
            android:id="@+id/button1"
            style="?android:attr/buttonStyleSmall"
            android:layout_width="wrap_content"
            android:layout_height="wrap_content"
            app:layout_column="2"
            app:layout_gravity="center_horizontal|top"
            app:layout_row="2"
            android:text="3X3" />
    </android.support.v7.widget.GridLayout>
6>绝对布局(AbsoluteLayout)
绝对布局比较死板,需要直接指定在屏幕中显示的位置
android:layout_x 指定x坐标
android:layout_y 指定y坐标
指定坐标涉及安卓坐标单位,简单介绍:
sp:主要用于字体
px:屏幕像素计量单位
dp或dip:安卓计量单位(较为推荐)
绝对布局在安卓2.0以后就不推荐使用了,还是不操作了。
总结:安卓所有能够显示出来的都是View或是View子类,View子类有ViewGroup类,此类不仅能够当做View使用,还能作为其他组件的容器。
水平有限,请留言批评!