一、前言
spring-boot项目整合redis很常见,Redis 一般上生产的时候都是以集群模式部署,也就是redis cluster。本demo以最干净简洁的方式整合spring-boot和redis cluster,方便需要的同学查阅。
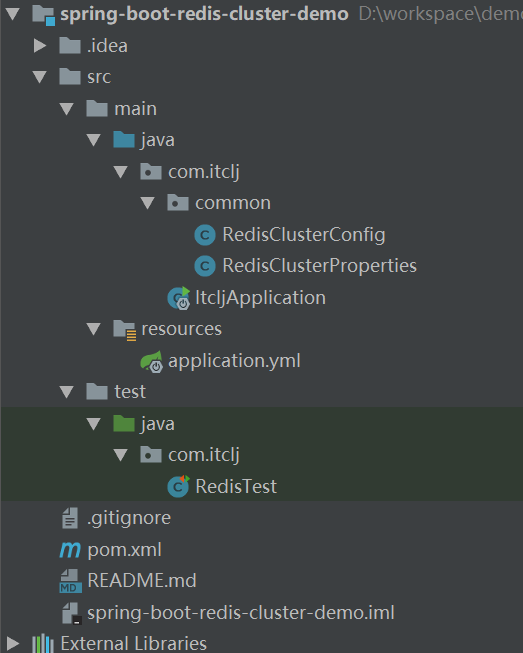
二、项目结构

三、整合过程
本工程采用maven管理依赖,程序主框架采用spring-boot。
maven核心依赖
       <dependency>
            <groupId>org.springframework.boot</groupId>
            <artifactId>spring-boot-starter</artifactId>
            <version>1.5.1.RELEASE</version>
        </dependency>
        <dependency>
            <groupId>org.springframework.boot</groupId>
            <artifactId>spring-boot-starter-redis</artifactId>
            <version>1.4.4.RELEASE</version>
        </dependency>
工程主要包括4部分:
- redis cluster配置类
- spring-boot主文件
- spring-boot配置文件
- 单元测试
redis cluster配置类
- RedisClusterProperties
把配置文件application.yml中redis cluster的配置项,映射到java对象中,方便直接使用
@Configuration
@ConfigurationProperties(prefix = "spring.redis.cluster")
public class RedisClusterProperties {

    //集群节点
    private List<String> nodes=new ArrayList<>();

    public List<String> getNodes() {
        return nodes;
    }

    public void setNodes(List<String> nodes) {
        this.nodes = nodes;
    }
}
- RedisClusterConfig
redis cluster核心配置类,启动spring-boot项目的时候在这里实例化JedisCluster对象
 @Bean
    public JedisCluster redisCluster(){

        Set<HostAndPort> nodes = new HashSet<>();
        for (String node:redisClusterProperties.getNodes()){
            String[] parts= StringUtils.split(node,":");
            Assert.state(parts.length==2, "redis node shoule be defined as 'host:port', not '" + Arrays.toString(parts) + "'");
            nodes.add(new HostAndPort(parts[0], Integer.valueOf(parts[1])));
        }

        return new JedisCluster(nodes);
    }
spring-boot主文件
- ItcljApplication
spring-boot工程启动文件,里面就是main方法,用于启动项目,项目启动过程中会自动扫描com.itclj包下的所有类,扫描到RedisClusterConfig类的时候,由于public JedisCluster redisCluster()方法加了@Bean注解,spring会自动执行该方法实例化一个JedisCluster对象放入spring上下文,以后需要使用的时候在需要的类直接自动注入即可。
spring-boot配置文件
- application.yml
配置redis集群服务器地址
spring:
  redis:
    cluster:
      nodes:
        - redis1.msxf.lotest:7000
        - redis1.msxf.lotest:7001
        - redis2.msxf.lotest:7002
        - redis2.msxf.lotest:7003
        - redis3.msxf.lotest:7004
        - redis3.msxf.lotest:7005
单元测试
- RedisTest
采用junit作为单元测试工具,启动单元测试spring-boot会初始化整个项目,构建上下文,在这个过程中JedisCluster也将被实例化放入spring-boot上下文中,在单元测试类中直接使用,调用其get()方法获取redis集群的数据。
在正式写业务逻辑的时候用法也是一样的,在需要的类里面自动注入JedisCluster即可,然后直接使用,进行redis的增删改查。
    @Autowired
    private JedisCluster jedisCluster;

    @Test
    public void get(){
       System.out.println("=============="+jedisCluster.get("youqian-spread-sync-to-mysql-date"));
    }
四、运行代码
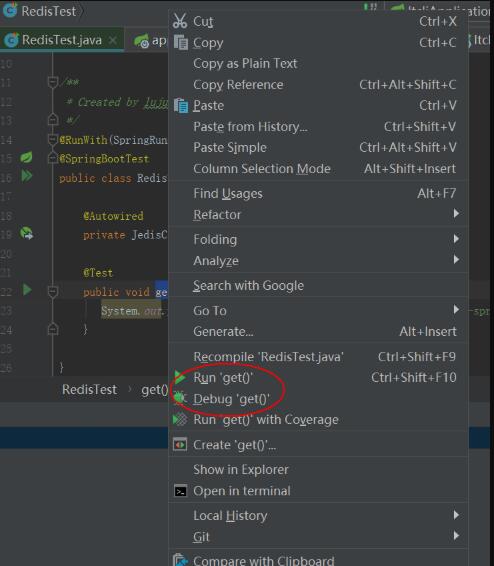
在idea里面,进入单元测试类RedisTest选中get()方法,有单击鼠标,run即可。然后在控制台输出从redis cluster中获取到的数据了。
 spring-boot-redis-cluster简单整合例子
注:本文著作权归作者,由demo大师代发,拒绝转载,转载需要作者授权