一、准备工作
-
需要准备什么环境
需要安装有Visual Studio并且配置了OpenCV。能够使用OpenCV的core模块。
使用者需要有基本的C++编程基础。
-
本例子实现什么功能
本例实现了简单的深度神经网络,基于OpenCV的矩阵类Mat。程序实现了BP算法,支持创建和训练多层神经网络,支持loss可视化。支持模型的保存和加载。
二、示例代码
新建和初始化一个神经网络的过程非常简单,像下面这样:
	//Set neuron number of every layer
	vector<int> layer_neuron_num = { 784,100,10 };

	// Initialise Net and weights
	Net net;
	net.initNet(layer_neuron_num);
	net.initWeights(0, 0., 0.01);
	net.initBias(Scalar(0.5));
训练神经网络也很容易,下面是一个例子。训练完之后可以保存模型
#include"../include/Net.h"
//<opencv2opencv.hpp>

using namespace std;
using namespace cv;
using namespace liu;

int main(int argc, char *argv[])
{
	//Set neuron number of every layer
	vector<int> layer_neuron_num = { 784,100,10 };

	// Initialise Net and weights
	Net net;
	net.initNet(layer_neuron_num);
	net.initWeights(0, 0., 0.01);
	net.initBias(Scalar(0.5));

	//Get test samples and test samples
	Mat input, label, test_input, test_label;
	int sample_number = 800;
	get_input_label("data/input_label_1000.xml", input, label, sample_number);
	get_input_label("data/input_label_1000.xml", test_input, test_label, 200, 800);

	//Set loss threshold,learning rate and activation function
	float loss_threshold = 0.5;
	net.learning_rate = 0.3;
	net.output_interval = 2;
	net.activation_function = "sigmoid";

	//Train,and draw the loss curve(cause the last parameter is ture) and test the trained net
	net.train(input, label, loss_threshold, true);
	net.test(test_input, test_label);

	//Save the model
	net.save("models/model_sigmoid_800_200.xml");

	getchar();
	return 0;
}
加载训练过的模型然后直接使用就更加方便了。
#include"../include/Net.h"
//<opencv2opencv.hpp>

using namespace std;
using namespace cv;
using namespace liu;

int main(int argc, char *argv[])
{
	//Get test samples and the label is 0--1
	Mat test_input, test_label;
	int sample_number = 200;
	int start_position = 800;
	get_input_label("data/input_label_1000.xml", test_input, test_label, sample_number, start_position);

	//Load the trained net and test.
	Net net;
	net.load("models/model_sigmoid_800_200.xml");
	net.test(test_input, test_label);

	getchar();
	return 0;
}
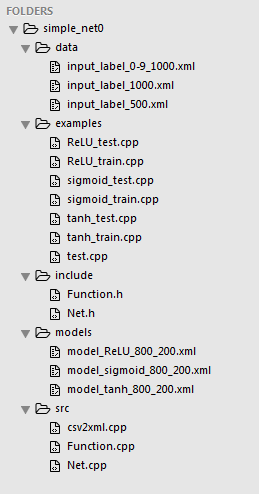
三、文件结构
- 文件结构
下载后文件如下: - 包含了例子所用的数据(data)
- 示例程序(examples)
- 头文件(include)
- 示例程序训练的模型(models)
- 实现源代码(src)

四、运行效果
这是以部分minist数据测试的效果图。同时还能实时输出loss值。
C++从零实现简单深度神经网络(基于OpenCV)
注:本文著作权归作者,由demo大师代发,拒绝转载,转载需要作者授权