Web Service 学习第四期(手把手和你一起开发一个较完整的契约优先开发流程实例)
1、开始主题功能
1.1、新建一个动态Web项目
在JavaEE工作空间  下的项目视图

在Java工作空间  下的项目视图
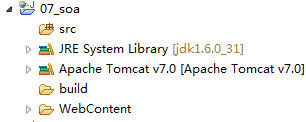
1.2、依次编写schema(schema是标准然后根据schema编写wsdl)、wsdl;然后生成接口并且编写实现类
1.2.1、新建文件夹META-INF、META-INFàwsdl和user.xsd
注意:将schema统一加上命名空间前缀xsd
<?xml version="1.0" encoding="UTF-8"?>
<xsd:schema xmlns:xsd="http://www.w3.org/2001/XMLSchema"
targetNamespace="http://service.zttc.edu.cn"
xmlns:tns="http://service.zttc.edu.cn"
elementFormDefault="qualified">
<xsd:element name="add" type="tns:add"></xsd:element>
<xsd:element name="addResponse" type="tns:addResponse"></xsd:element>
<xsd:element name="delete" type="tns:delete"></xsd:element>
<xsd:element name="deleteResponse" type="tns:deleteResponse"></xsd:element>
<xsd:element name="list" type="tns:list"></xsd:element>
<xsd:element name="listResponse" type="tns:listResponse"></xsd:element>
<xsd:element name="login" type="tns:login"></xsd:element>
<xsd:element name="loginResponse" type="tns:loginResponse"></xsd:element>
<!-- 接下来定义上面引用到的那些类型 -->
<xsd:complexType name="add">
<xsd:sequence>
<xsd:element name="user" type="tns:user"></xsd:element>
</xsd:sequence>
</xsd:complexType>
<xsd:complexType name="addResponse">
<xsd:sequence/>
</xsd:complexType>
<xsd:complexType name="delete">
<xsd:sequence>
<xsd:element name="username" type="xsd:string"></xsd:element>
</xsd:sequence>
</xsd:complexType>
<xsd:complexType name="deleteResponse">
<xsd:sequence/>
</xsd:complexType>
<xsd:complexType name="list">
<xsd:sequence/>
</xsd:complexType>
<xsd:complexType name="listResponse">
<xsd:sequence minOccurs="1" maxOccurs="unbounded">
<xsd:element name="user"/>
</xsd:sequence>
</xsd:complexType>
<xsd:complexType name="login">
<xsd:sequence>
<xsd:element name="username" type="xsd:string"/>
<xsd:element name="password" type="xsd:string"/>
</xsd:sequence>
</xsd:complexType>
<xsd:complexType name="loginResponse">
<xsd:sequence>
<xsd:element name="user" type="tns:user"/>
</xsd:sequence>
</xsd:complexType>
<xsd:complexType name="user">
<xsd:sequence>
<xsd:element name="username" type="xsd:string"/>
<xsd:element name="password" type="xsd:string"/>
<xsd:element name="nickname" type="xsd:string"/>
</xsd:sequence>
</xsd:complexType>
</xsd:schema>
1.2.2、新建WSDL user.wsdl
依次编写WSDL的五个部分
<?xml version="1.0" encoding="UTF-8" standalone="no"?>
<wsdl:definitions
xmlns:soap="http://schemas.xmlsoap.org/wsdl/soap/"
xmlns:tns="http://service.zttc.edu.cn"
xmlns:wsdl="http://schemas.xmlsoap.org/wsdl/"
xmlns:xsd="http://www.w3.org/2001/XMLSchema"
name="UserService" targetNamespace="http://service.zttc.edu.cn">
<wsdl:types>
<xsd:schema targetNamespace="http://service.zttc.edu.cn">
<!-- <xsd:import namespace="http://service.zttc.edu.cn" schemaLocation="user.xsd"></xsd:import> -->
<xsd:include schemaLocation="user.xsd"></xsd:include>
</xsd:schema>
</wsdl:types>
<wsdl:message name="add">
<wsdl:part element="tns:add" name="parameters"/>
</wsdl:message>
<wsdl:message name="addResponse">
<wsdl:part element="tns:addResponse" name="parameters"/>
</wsdl:message>
<wsdl:message name="delete">
<wsdl:part element="tns:delete" name="parameters"/>
</wsdl:message>
<wsdl:message name="deleteResponse">
<wsdl:part element="tns:deleteResponse" name="parameters"/>
</wsdl:message>
<wsdl:message name="list">
<wsdl:part element="tns:list" name="parameters"/>
</wsdl:message>
<wsdl:message name="listResponse">
<wsdl:part element="tns:listResponse" name="parameters"/>
</wsdl:message>
<wsdl:message name="login">
<wsdl:part element="tns:login" name="parameters"/>
</wsdl:message>
<wsdl:message name="loginResponse">
<wsdl:part element="tns:loginResponse" name="parameters"/>
</wsdl:message>
<!-- port是接口 -->
<wsdl:portType name="IUserService">
<!-- operation是方法 -->
<wsdl:operation name="add">
<wsdl:input message="tns:add"/>
<wsdl:output message="tns:addResponse"/>
</wsdl:operation>
<wsdl:operation name="delete">
<wsdl:input message="tns:delete"/>
<wsdl:output message="tns:deleteResponse"/>
</wsdl:operation>
<wsdl:operation name="list">
<wsdl:input message="tns:list"/>
<wsdl:output message="tns:listResponse"/>
</wsdl:operation>
<wsdl:operation name="login">
<wsdl:input message="tns:login"/>
<wsdl:output message="tns:loginResponse"/>
</wsdl:operation>
</wsdl:portType>
<!-- 通过binding可以设置传输的格式 -->
<wsdl:binding name="userServiceSOAP" type="tns:IUserService">
<!-- binding的type是的name属性<wsdl:portType name="IUserService"> -->
<soap:binding style="document" transport="http://schemas.xmlsoap.org/soap/http"/>
<!-- 下面是操作 -->
<wsdl:operation name="add">
<!-- <soap:operation soapAction="http://service.zttc.edu.cn/NewOperation"/> -->
<wsdl:input>
<soap:body use="literal"/>
</wsdl:input>
<wsdl:output>
<soap:body use="literal"/>
</wsdl:output>
</wsdl:operation>
<wsdl:operation name="delete">
<!-- <soap:operation soapAction="http://service.zttc.edu.cn/NewOperation"/> -->
<wsdl:input>
<soap:body use="literal"/>
</wsdl:input>
<wsdl:output>
<soap:body use="literal"/>
</wsdl:output>
</wsdl:operation>
<wsdl:operation name="list">
<!-- <soap:operation soapAction="http://service.zttc.edu.cn/NewOperation"/> -->
<wsdl:input>
<soap:body use="literal"/>
</wsdl:input>
<wsdl:output>
<soap:body use="literal"/>
</wsdl:output>
</wsdl:operation>
<wsdl:operation name="login">
<!-- <soap:operation soapAction="http://service.zttc.edu.cn/NewOperation"/> -->
<wsdl:input>
<soap:body use="literal"/>
</wsdl:input>
<wsdl:output>
<soap:body use="literal"/>
</wsdl:output>
</wsdl:operation>
</wsdl:binding>
<!-- 最后Service绑定 -->
<wsdl:service name="UserService">
<!-- <wsdl:service name="UserService">的name属性是整个文档开头wsdl:definitions的name <wsdl:definitions name="UserService"-->
<wsdl:port binding="tns:userServiceSOAP" name="UserServicePort">
<soap:address location="http://localhost:9898/us/"/>
</wsdl:port>
</wsdl:service>
</wsdl:definitions>
1.2.3、通过刚刚写好的WSDL文件生成服务端的java接口文件
进入WSDL文件所在的目录

wsimport -d D:\wsimport\07s -keep -verbose user.wsdl

将生成的代码拷贝到项目的src文件夹下
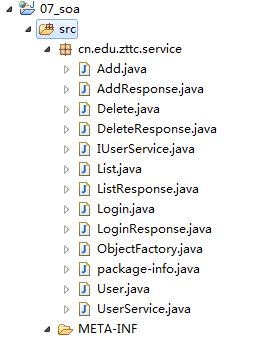
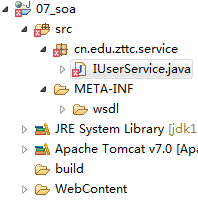
之后删除除了IUserService.java的其它文件
修改IUserService.java的代码:删除ObjectFactory
@XmlSeeAlso({
ObjectFactory.class
})
在项目中添加User类

package org.zttc.vo;
public class User {
private String username;
private String password;
private String nickname;
public String getUsername() {
return username;
}
public void setUsername(String username) {
this.username = username;
}
public String getPassword() {
return password;
}
public void setPassword(String password) {
this.password = password;
}
public String getNickname() {
return nickname;
}
public void setNickname(String nickname) {
this.nickname = nickname;
}
public User(String username, String password, String nickname) {
super();
this.username = username;
this.password = password;
this.nickname = nickname;
}
public User() {
super();
}
}
PS注意:其实像User这种类都是我们项目中本来就应该有的东西,我们刚刚编写WSDL也好,之前编写的以代码优先的服务也好,都只是为我们本来已有的项目提供了对外的Web服务接口而已。
继续修改IUserService.java 添加对User的包引用
1.2.4、编写实现类
根据接口新建实现类UserServiceImpl.java
很重要的一步是编写实现类的Web Service Annotation(用于绑定服务接口以及WSDL)
@WebService(endpointInterface="cn.edu.zttc.service.IUserService",
wsdlLocation="META-INF/wsdl/user.wsdl",
serviceName="UserService",//wsdl中<wsdl:definitions name="UserService"的name
portName="UserServicePort",//<wsdl:service--><wsdl:port name="UserServicePort">的name
targetNamespace="http://service.zttc.edu.cn" //把IUserService的命名空间拷贝过来
)
1.2.5、新建MyService类发布服务
package cn.edu.zttc.service;
import javax.xml.ws.Endpoint;
public class MyService {
public static void main(String[] args) {
Endpoint.publish("http://localhost:9898/us", new UserServiceImpl());
}
}
1.2.6、导出客户端
在MyService类中启动服务
此时在浏览器中输入地址:http://localhost:9898/us?wsdl 既可以访问WSDL
通过地址导出客户端代码
wsimport -d D:\wsimport\07c -keep http://localhost:9898/us?wsdl
此时因为使用JavaApplication发布的服务,所以如果WSDL和schema如果是分离的就会发生找不到schema的情况,如果改用Tomcat发布服务就没问题。为了继续,先将schema的内容拷贝到WSDL中

之后再次生成客户端
新建一个客户端项目并且将生成的客户端代码拷贝到src目录
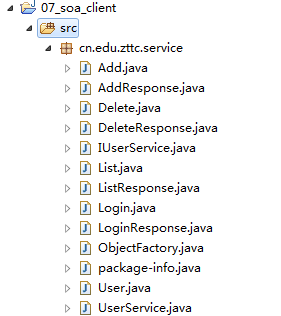
1.2.7、实现接口
新建dao层包 org.zttc.dao
在包中新建UserDao类
编写UserDao
package org.zttc.dao;
import java.util.ArrayList;
import java.util.HashMap;
import java.util.List;
import java.util.Map;
import java.util.Set;
import org.zttc.vo.User;
public class UserDao {
private static final Map<String, User> users = new HashMap<String, User>();
private static UserDao dao = null;
//写一个单例
private UserDao() {
users.put("admin", new User("admin", "123", "超级管理员"));
}
public static UserDao newInstance() {
if(dao == null) {
dao = new UserDao();
}
return dao;
}
public void add(User user) {
users.put(user.getUsername(), user);
}
public void delete(String username) {
users.remove(username);
}
public List<User> list() {
Set<String> keys = users.keySet();
List<User> list = new ArrayList<User>();
for(String key : keys) {
list.add(users.get(key));
}
return list;
}
public User login(String username, String password) {
User u = users.get(username);
return u;
}
}
编写UserServiceImpl
package cn.edu.zttc.service;
import java.util.List;
import javax.jws.WebService;
import org.zttc.dao.UserDao;
import org.zttc.vo.User;
@WebService(endpointInterface="cn.edu.zttc.service.IUserService",
wsdlLocation="META-INF/wsdl/user.wsdl",
serviceName="UserService",//wsdl中<wsdl:definitions name="UserService"的name
portName="UserServicePort",//<wsdl:service--><wsdl:port name="UserServicePort">的name
targetNamespace="http://service.zttc.edu.cn" //把IUserService的命名空间拷贝过来
)
public class UserServiceImpl implements IUserService {
private UserDao userDao = UserDao.newInstance();
@Override
public void add(User user) {
userDao.add(user);
}
@Override
public void delete(String username) {
userDao.delete(username);
}
@Override
public List<User> list() {
return userDao.list();
}
@Override
public User login(String username, String password) {
return userDao.login(username, password);
}
}
发布服务
1.2.8、再次生成客户端并且编写TestService类
wsimport -d D:\wsimport\07c -keep http://localhost:9898/us?wsdl
新建包org.zttc.test和TestService类

TestService的代码如下
package org.zttc.test;
import java.net.MalformedURLException;
import java.net.URL;
import java.util.List;
import javax.xml.namespace.QName;
import org.junit.Before;
import org.junit.Test;
import cn.edu.zttc.service.IUserService;
import cn.edu.zttc.service.User;
import cn.edu.zttc.service.UserService;
public class TestService {
private IUserService port;
private UserService us;
private String ns = "http://service.zttc.edu.cn";
@Before
public void init() {
try {
URL url = new URL("http://localhost:8888/us?wsdl");
QName name = new QName(ns, "UserService");
us = new UserService(url, name);
port = us.getUserServicePort();
} catch (MalformedURLException e) {
// TODO Auto-generated catch block
e.printStackTrace();
}
//us = new UserService();
//port = us.getUserServicePort();
}
@Test
public void testList() {
List<User> list = port.list();
for(User u :list) {
System.out.println(u.getNickname());
}
}
@Test
public void testAdd() {
User u = new User();
u.setNickname("张三");
u.setPassword("123");
u.setUsername("zs");
port.add(u);
}
@Test
public void testLogin() {
User u = port.login("zs", "123");
System.out.println(u.getUsername());
}
@Test
public void testDelete() {
port.delete("zs");
}
}
2、善后处理
2.1、异常处理
2.2.1、处理代码端
新建异常类
UserException
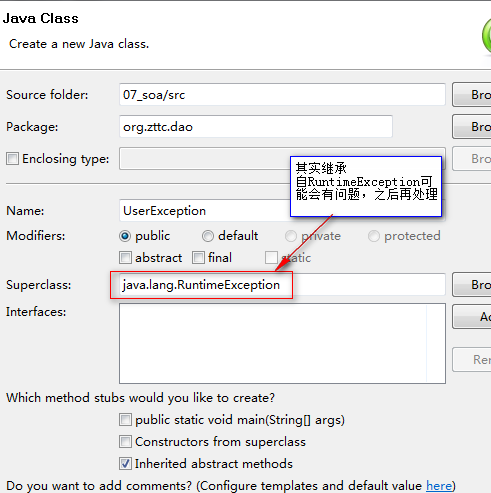
之后在UserException中生成超类的构造方法
package org.zttc.dao;
public class UserException extends RuntimeException {
public UserException() {
super();
// TODO Auto-generated constructor stub
}
public UserException(String message, Throwable cause) {
super(message, cause);
// TODO Auto-generated constructor stub
}
public UserException(String message) {
super(message);
// TODO Auto-generated constructor stub
}
public UserException(Throwable cause) {
super(cause);
// TODO Auto-generated constructor stub
}
}
在UserDao中的add函数和login添加异常处理
public void add(User user) {
if(users.containsKey(user.getUsername())) throw new UserException("用户已经存在");
users.put(user.getUsername(), user);
}
public User login(String username, String password) {
if(!users.containsKey(username)) throw new UserException("用户不存在");
User u = users.get(username);
if(!password.equals(u.getPassword())) throw new UserException("用户密码不正确");
return u;
}
2.2.2、处理WSDL
在schema中添加异常类型
<xsd:element name="loginResponse" type="tns:loginResponse"></xsd:element>
<!-- 异常处理信息 -->
<xsd:element name="UserException" type="tns:UserException"></xsd:element>
<xsd:complexType name="UserException">
<xsd:sequence>
<xsd:element name="message" type="xsd:string"></xsd:element>
</xsd:sequence>
</xsd:complexType>
<!-- 异常处理信息 -->
在WSDL中添加消息
<wsdl:message name="UserException">
<wsdl:part name="fault" element="tns:UserException"></wsdl:part>
</wsdl:message>
为portType设置异常
add和login会抛出异常所以设置这两个方法
<wsdl:operation name="add">
<wsdl:input message="tns:add"/>
<wsdl:output message="tns:addResponse"/>
<wsdl:fault name="UserException" message="tns:UserException"></wsdl:fault>
</wsdl:operation>
<wsdl:operation name="login">
<wsdl:input message="tns:login"/>
<wsdl:output message="tns:loginResponse"/>
<wsdl:fault name="UserException" message="tns:UserException"></wsdl:fault>
</wsdl:operation>
为binding添加异常(异常应该以什么样的格式来设置,以什么样的编码格式来传递呢)
也是add和login可能会有异常
<wsdl:operation name="add">
<!-- <soap:operation soapAction="http://service.zttc.edu.cn/NewOperation"/> -->
<wsdl:input>
<soap:body use="literal"/>
</wsdl:input>
<wsdl:output>
<soap:body use="literal"/>
</wsdl:output>
<!-- 异常处理 -->
<wsdl:fault name="UserException">
<!-- use="literal"设置格式 -->
<soap:fault name="UserException" use="literal"/>
</wsdl:fault>
</wsdl:operation>
<wsdl:operation name="login">
<!-- <soap:operation soapAction="http://service.zttc.edu.cn/NewOperation"/> -->
<wsdl:input>
<soap:body use="literal"/>
</wsdl:input>
<wsdl:output>
<soap:body use="literal"/>
</wsdl:output>
<!-- 异常处理 -->
<wsdl:fault name="UserException">
<!-- use="literal"设置格式 -->
<soap:fault name="UserException" use="literal"/>
</wsdl:fault>
</wsdl:operation>
重新生成IUserService
wsimport -d D:\wsimport\07s -keep -verbose user.wsdl
去掉
@XmlSeeAlso({
ObjectFactory.class
})
将UserException_Exception 换成UserException
重新生成客户端
wsimport -d D:\wsimport\07c -keep http://localhost:9898/us?wsdl
可以看到再执行add和login方法的时候编译器会提示添加异常处理

将异常处理加上
@Test
public void testAdd() {
try{
User u = new User();
u.setNickname("张三");
u.setPassword("123");
u.setUsername("zs");
port.add(u);
}catch (UserException_Exception e) {
System.out.println(e.getMessage());
}
}
@Test
public void testLogin() {
try {
User u = port.login("zs", "123");
System.out.println(u.getUsername());
} catch (UserException_Exception e) {
System.out.println(e.getMessage());
}
}
重新启动服务
在客户端执行两次testAdd函数应该就会触发异常

程序中断了,服务器端抛出了异常之后终止了;而我们想要的是服务器端抛出一个异常然后被JAX截获,创建一个fault对象出来,然后把fault对象通过SOAP传递到客户端,不应该在向服务器的上层抛了。之所以出现这种情况就是因为我们的UserException异常类继承自了RuntimeException了(运行时刻异常)

将上述错误改正,让UserException继承自Exception

之后在服务器端的org.zttc.dao.UserDao类和cn.edu.zttc.servic. UserServiceImpl类的方法中就要做相应的异常处理了
public User login(String username, String password) {
if(!users.containsKey(username)) throw new UserException("用户不存在");
User u = users.get(username);
if(!password.equals(u.getPassword())) throw new UserException("用户密码不正确");
return u;
}
进行相应的异常处理
之后进行测试
执行两次testAdd
客户端控制台输出
说明异常被处理了
一下是从Tcpmon中截获的有关异常处理的SOAP报文
<?xml version="1.0" ?>
<S:Envelope xmlns:S="http://schemas.xmlsoap.org/soap/envelope/">
<S:Body>
12d
<S:Fault xmlns:ns3="http://www.w3.org/2003/05/soap-envelope">
<faultcode>S:Server</faultcode>
<faultstring>鐢ㄦ埛宸茬粡瀛樺湪</faultstring>
<detail>
<ns2:UserException xmlns:ns2="http://service.zttc.edu.cn">
<message>鐢ㄦ埛宸茬粡瀛樺湪</message>
</ns2:UserException>
</detail>
</S:Fault>
</S:Body>
</S:Envelope>
虽然由于编码问题输出了乱码
但是可以推测出 鐢ㄦ埛宸茬粡瀛樺湪应该是 "用户已存在"
3、在Web服务器中发布服务
3.1、将META-INFàwsdl的目录及其下面wsdl和xsd拷贝到我们Web项目的WEB-INF目录下

之后就可以在WSDL中使用导入schema的方式了(之前是因为用JavaApplication发布的原因,所以将wsdl中types下面的schema全都写到了WSDL中)
D:\项目\学习 workspace\workspace\07_soa\WebContent\WEB-INF\wsdl>wsimport -d D:\w
simport\07s -keep user.wsdl
将IUserService接口拷出来,覆盖下图中的

3.2、修改实现类UserServiceImpl
将webservice的annotation下的wsdlLocation属性目录修改为WEB-INF
@WebService(endpointInterface="cn.edu.zttc.service.IUserService",
wsdlLocation="META-INF/wsdl/user.wsdl",
@WebService(endpointInterface="cn.edu.zttc.service.IUserService",
wsdlLocation="WEN-INF/wsdl/user.wsdl",
3.3、在WEB-INF下创建sun-jaxws.xml文件
在这个文件下配置endpoint
<?xml version="1.0" encoding="UTF-8"?>
<endpoints xmlns="http://java.sun.com/xml/ns/jax-ws/ri/runtime" version="2.0">
<!-- 下边的name是我们对外发布的Service的名称(servlet中所需要对应的名称),implementation是实现类,
url-pattern是在浏览器上访问的页面的地址 -->
<endpoint name="UserServiceAaa"
implementation="cn.edu.zttc.UserServiceImpl" url-pattern="/us"/>
</endpoints>
3.4、配置web.xml
3.4.1、导入JAX-RI包
将jaxws-ri-2.2.5包中lib目录下的文件拷贝到WEB-INF下的lib目录

3.4.2、加入监听器以及servlet
<?xml version="1.0" encoding="UTF-8"?>
<web-app xmlns:xsi="http://www.w3.org/2001/XMLSchema-instance" xmlns="http://java.sun.com/xml/ns/javaee" xmlns:web="http://java.sun.com/xml/ns/javaee/web-app_2_5.xsd" xsi:schemaLocation="http://java.sun.com/xml/ns/javaee http://java.sun.com/xml/ns/javaee/web-app_2_5.xsd" id="WebApp_ID" version="2.5">
<listener>
<!-- listener-class是jax-ri中的一个类 -->
<listener-class>com.sun.xml.ws.transport.http.servlet.WSServletContextListener</listener-class>
</listener>
<!-- 创建servlet -->
<servlet>
<!-- servlet-name要和sun-jaxws.xml中的<endpoint name="UserServiceAaa"的name一致 -->
<servlet-name>UserServiceAaa</servlet-name>
<!-- servlet-class也是jax-ri中的一个类 -->
<servlet-class>com.sun.xml.ws.transport.http.servlet.WSServlet</servlet-class>
</servlet>
<servlet-mapping>
<servlet-name>UserServiceAaa</servlet-name>
<url-pattern>/us</url-pattern>
</servlet-mapping>
</web-app>
注意:cn.edu.zttc.service目录下不要有.class文件,否则在启动Tomcat时会报错
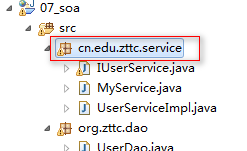
之后启动Tomcat服务器
在浏览器里访问发布出去的wsdl
http://localhost:8080/07_soa/us?wsdl
重新生成客户端测试
D:\项目\学习 workspace\workspace\07_soa\WebContent\WEB-INF\wsdl>wsimport -d D:\w
simport\07c -keep -verbose http://localhost:8080/07_soa/us?wsdl