工具:pycharm
django+mysql
1.创建django项目autotest:
django-admin startproject autotest
2.修改数据库信息
DATABASES = {
    'default': {
        'ENGINE': 'django.db.backends.mysql', #mysql数据库
        'NAME': 'api_test', # 数据库名
        'USER': 'dagnkai',# 用户
        'PASSWORD': 'dangkai', # 密码
        'HOST': '127.0.0.1', # 本地
        'PORT': '3306',
        # 'OPTIONS': {
        #     'init_command': "SET sql_mode='STRICT_TRANS_TABLES'",
        #     'sql_mode': 'traditional',
        #     },
    }
}
3. 启动服务:
Python manage.py runserver 默认端口8000, 也可以修改端口启动 Python manage.py runserver 127.0.0.1:80
4. 创建相应的表:
4.1 根据model.py中的类创建:
python manage.py makemigrations 这个命令是记录我们对models.py的所有改动,并且将这个改动迁移到migrations这个文件下生成一个文件
python manage.py makemigrations
如下所示:
E:Python_Webautotest>python manage.py makemigrations
No changes detected
4.2 根据模型类创建表
python manage.py migrate
如果要想精确到某一个迁移文件则可以使用:
python manage.py migrate appname
E:Python_Webautotest>python  manage.py migrate
Operations to perform:
  Apply all migrations: admin, auth, contenttypes, sessions
Running migrations:
  Applying contenttypes.0001_initial... OK
  Applying auth.0001_initial... OK
  Applying admin.0001_initial... OK
  Applying admin.0002_logentry_remove_auto_add... OK
  Applying contenttypes.0002_remove_content_type_name... OK
  Applying auth.0002_alter_permission_name_max_length... OK
  Applying auth.0003_alter_user_email_max_length... OK
  Applying auth.0004_alter_user_username_opts... OK
  Applying auth.0005_alter_user_last_login_null... OK
  Applying auth.0006_require_contenttypes_0002... OK
  Applying auth.0007_alter_validators_add_error_messages... OK
  Applying auth.0008_alter_user_username_max_length... OK
  Applying auth.0009_alter_user_last_name_max_length... OK
  Applying sessions.0001_initial... OK
4.3 创建超级用户:
python manage.py createsuperuser
E:Python_Webautotest>python manage.py createsuperuser
Username (leave blank to use 'xjy'): dangkai
Email address: 1370465454@qq.com
Password:
Password (again):
This password is too short. It must contain at least 8 characters.
Password:
Password (again):
This password is too short. It must contain at least 8 characters.
Password:
Password (again):
Superuser created successfully.
4.4 浏览器中输入127.0.0.1:8000/admin 输入刚创建的超级用户

5 汉化中文界面:
# LANGUAGE_CODE = 'en-us'
#
# TIME_ZONE = 'UTC'
LANGUAGE_CODE = 'zh-Hans'

TIME_ZONE = 'Asia/Shanghai'
6 创建应用:
python manage.py startapp apitest
将app注册到django中 setting中加入apitest
INSTALLED_APPS = [
    'django.contrib.admin',
    'django.contrib.auth',
    'django.contrib.contenttypes',
    'django.contrib.sessions',
    'django.contrib.messages',
    'django.contrib.staticfiles',
    'apitest'
]
7 创建视图:
在views中加入test函数
from django.shortcuts import render
from django.http import HttpResponse #加入引用
# Create your views here.
def test(request):
    return HttpResponse("hello test") #返回响应函数
8 创建映射:
在autotest/urls.py中加入:
from django.contrib import admin
from django.urls import path
from apitest import views

urlpatterns = [
    path('admin/', admin.site.urls),
    path('test/',views.test),# 加入关联路径和函数
]
浏览器中输入:127.0.0.1:8000/test
9 创建模板:
在apitest下创建templates文件夹,然后创建login.html
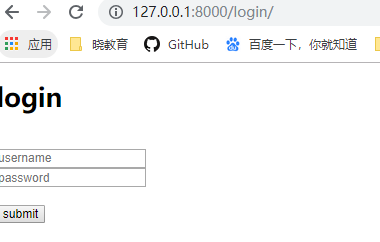
<!DOCTYPE html>
<html lang="en">
<head>
    <meta charset="UTF-8">
    <title>Login</title>
</head>
<body>
<h1>login</h1>
<form method="post" action="/login/">
    {% csrf_token %}
    <br> <input name="username" type="text" placeholder="username">
    <br> <input name="password" type="password" placeholder="password">
    {{ error }}<br>
    <br> <button id="submit" type="submit">submit</button>
</form>

</body>
</html>
在autotest/urls.py中创建关联映射
from django.contrib import admin
from django.urls import path
from apitest import views

urlpatterns = [
    path('admin/', admin.site.urls),
    path('test/',views.test),# 加入关联路径和函数
    path('login/',views.login)
]
在apitest/views.py创建login函数
from django.shortcuts import render
from django.http import HttpResponse #加入引用
# Create your views here.
def test(request):
    return HttpResponse("hello test") #返回响应函数

def login(request):
    return render(request,'login.html')
然后输入127.0.0.1:8000/login,可以看到登录页面
使用mysql数据库
在autotest/__init__.py文件中加入
import pymysql
pymysql.install_as_MySQLdb()