• 自定义布局管理器FormLayout


    自定义布局管理器-FormLayout

                                           第二部分:自定义布局管理器
    在java.awt包与javax.swing包下有许多现成的布局类,比如BorderLayout、FlowLayout,还有较为复杂的、用于精确定位的布局类GridBagLayout、SpringLayout等。起初我刚刚从事gooey时(06年中),企图依靠JDK自带的布局类进行布局,但是实际不可能或者说很难做到。对于复杂的GridBagLayout、SpringLayout来说又望而生畏,而且使用GridBagLayout、SpringLayout来完成布局的话工作量相当可观,因此当时放弃了布局管理器,采用ComponentListener等尺寸监听事件来布局组件。虽然这种做法没有工具支持、采用手工coding,但是自由度上升了很多,而且熟悉了以后编码效率也大幅其高。与此同时,我开始接触SWT,发现org.eclipse.swt.layout.FormLayout布局很强大、用起来爱不释手、要多好有多好、要多强有多强......。于是当时我用来布局组件的方式是采用ComponentListener监听与FormLayout结合的方式,也是在同期,我领悟到了九宫图这种专业布局,因此之后九宫图的实现也都采用上述两种方法。随着对SWT的不断了解外加IM软件界面的专业性,我发现SWT并不非常适合做专业外观,也因为此我逐渐将精力转向Swing。

    在介绍如何编写自定义布局管理器前,我想先把SWT体系下的FormLayout布局(表单布局)特点做个简要介绍。
    SWT体系下的FormLayout是非常灵活、精确的布局,FormLayout布局组件的特点是采用百分比+偏移量的方式。前者可以应付容器尺寸变化时内部组件随之等比例调整;后者以应付精确的布局。这一特征是通过org.eclipse.swt.layout.FormData和org.eclipse.swt.layout.FormAttachment两个类来实现。
    通常使用FormLayout来定位一个组件要确定4个FormAttachment对象:top、bottom、left、right,即组件的4条边。而且通常是使用FormAttachment(int numerator,int offset)这个构造器,也就是百分比+偏移量。当然FormAttachment不只这一种,但是都是可选的,如果想深入研究FormLayout可以参阅SWT相关的介绍。
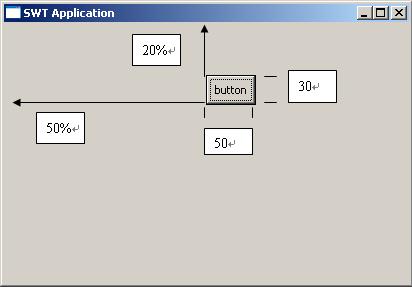
    下面给出一段SWT示例程序:

    public static void main(String[] args) {
    Display display = new Display();
    Shell shell = new Shell(display);
    shell.setText("SWT Application");
    shell.setLayout(new FormLayout());
    final Button button = new Button(shell, SWT.NONE);
    button.setText("button");
    final FormData formData = new FormData();
    formData.top = new FormAttachment(20, 0);
    formData.left = new FormAttachment(50, 0);
    formData.bottom = new FormAttachment(20, 30);
    formData.right = new FormAttachment(50, 50);
    button.setLayoutData(formData);
    shell.open();
    while (!shell.isDisposed()) {
    if (!display.readAndDispatch()) {
    display.sleep();
    }
    }
    display.dispose();
    }
    运行效果如下:

    由运行效果可以看出,FormLayout通过指定组件的四条边来完成布局。
    FormLayout很强大、灵活,但是AWT、Swing包中却没有,但是不等于说不能实现,学习了上文之后当然可以移植到Swing中来。

    SWT中使用FormLayout还要结合FormData(表单数据)与FormAttachment(表单附件)。下面给出这两个移植过来的类实现


    public final class FormAttachment {
        float percentage; // 这个参数与SWT中的不同,不叫numerator,而是其等价的小数形式
        int offset;
        public FormAttachment(float percentage, int offset) {
            this.percentage = percentage;
            this.offset = offset;
        }
    }

    public final class FormData {
        public FormAttachment left;
        public FormAttachment right;
        public FormAttachment top;
        public FormAttachment bottom;
    }


    你应该了解坐标系的概念,Java中的坐标系以向右、向下为正方向。因此对于offset,正值是向右、向下偏移;负值是向左、向上偏移。

    与SWT的FormAttachment稍有不同的是,我自定义的构造器第一个参数是float类型,它代表的意思与“FormAttachment(int numerator,int offset)”相同,都是表示百分比,只不过前者用整数表示,后者用小数表示。例如SWT中“new FormAttachment(20,0);”用后者表示就是“new FormAttachment(0.2f,0);”。
    在FormLayout布局中,定位一个组件需要最多4个FormAttachment对象,但是可以不必全部指定,稍后可以看到缺省的行为。
    如果你的布局管理器比较简单,可以实现LayoutManager接口。但是正如上文所述,LayoutManager的addLayoutComponent(String name, Component comp)方法是必须通过java.awt.Container类的“Component add(String name, Component comp)”方法触发调用,其中的字符串参数指定了布局信息。但是字符串表达方式很有限,因此应当采用LayoutManager2接口,这样,addLayoutComponent(Component comp, Object constraints)方法被调用时,“Object constraints”可以是任何类型的对象,很方便。下面逐步实现这个类。
    首先搭建的原型如下

    public final class FormLayout implements LayoutManager2 {

        public void addLayoutComponent(Component comp, Object constraints) {}

        public float getLayoutAlignmentX(Container target) {
            return 0;
        }

        public float getLayoutAlignmentY(Container target) {
            return 0;
        }

        public void invalidateLayout(Container target) {}

        public Dimension maximumLayoutSize(Container target) {
            return null;
        }

        public void addLayoutComponent(String name, Component comp) {}

        public void layoutContainer(Container parent) {}

        public Dimension minimumLayoutSize(Container parent) {
            return null;
        }

        public Dimension preferredLayoutSize(Container parent) {
            return null;
        }
        public void removeLayoutComponent(Component comp) {}

    }
    再声明一个保存组件与布局信息对应关系的映射:private final Map<Component, FormData> componentConstraints = new HashMap<Component, FormData>();

    接着完成addLayoutComponent方法的实现。在完成编写之前我们看一下怎样去使用FormLayout以做到心中有数。下面的一段代码是调用FormLayout示例:
    getContentPane().setLayout(new FormLayout());
    JButton button = new JButton();
    button.setText("button");
    FormData formData = new FormData();
    formData.top = new FormAttachment(0.2f, 0);
    formData.left = new FormAttachment(0.5f, 0);
    formData.bottom = new FormAttachment(0.2f, 30);
    formData.right = new FormAttachment(0.5f, 50);
    getContentPane().add(button,formData);

    如上所示,当调用“getContentPane().add(button,formData);”时,布局类的 public void addLayoutComponent(Component comp, Object constraints)方法便会调用,constraints参数就是FormData对象。所以在addLayoutComponent方法中需要做的就是把组件与布局信息关联起来。下面是完整实现:
    public void addLayoutComponent(Component comp, Object constraints) {
        if (constraints == null) {
            throw new IllegalArgumentException("constraints can't be null");
        } else if (!(constraints instanceof FormData)) {
            throw new IllegalArgumentException("constraints must be a " + FormData.class.getName() + " instance");
        } else {
            synchronized (comp.getTreeLock()) {
                FormData formData = (FormData) constraints;
                if (formData.left == null || formData.top == null) {
                    throw new IllegalArgumentException("left FormAttachment and top FormAttachment can't be null");
                }
                 componentConstraints.put(comp, (FormData) constraints);
            }
        }
    }
    前面的合法性检查是必需的,你懂的。然后比较重要的就是“synchronized (comp.getTreeLock()) ”,这是保障在多线程的环境下能安全执行,如果你察看JDK源码布局类的实现,会发现这个同步多次用到,我这么用也是参考JDK的实现。关于getTreeLock的实现在JDK6.0源码中是这样实现的。
    public abstract class Component implements ImageObserver, MenuContainer, Serializable {
    ...
        static final Object LOCK = new AWTTreeLock();
        static class AWTTreeLock {}
    ...
        public final Object getTreeLock() {
            return LOCK;
        }
    ...
    }
    还要注意的是传入的FormData实例的left、top FormAttachment必须要给出,因为这两个FormAttachment代表的是Location(位置)信息,因此必须指定。对于right、bottom可以不指定,但是如果不指定的话,必须能从getPreferredSize()中得到信息,否则组件的尺寸将无法确定。

    对于addLayoutComponent(String name, Component comp)方法,由于通过查看源码发现“实现了LayoutManager2 接口的布局类该方法永远不会被调用”(未来的JDK版本如何实现不能保证),所以该方法空实现,并在注视上作@deprecated标记。
        /**
         * @deprecated
         */
        public void addLayoutComponent(String name, Component comp) {}

    除了layoutContainer方法,其余方法均很简单。一并给出:
        public float getLayoutAlignmentX(Container target) {
            return 0.5f;
        }
        public float getLayoutAlignmentY(Container target) {
            return 0.5f;
        }
        
        public void invalidateLayout(Container target) {}
        
        public Dimension maximumLayoutSize(Container target) {
            return new Dimension(Integer.MAX_VALUE, Integer.MAX_VALUE);
        }
        public Dimension minimumLayoutSize(Container target) {
            return new Dimension(0, 0);
        }
        
        public Dimension preferredLayoutSize(Container target) {
            return new Dimension(0, 0);
        }
        
        public void removeLayoutComponent(Component comp) {
            synchronized (comp.getTreeLock()) {
                  componentConstraints.remove(comp);
            }
    }
    根据上文所述,这些方法不难理解。其实对于FormLayout来说,...LayoutSize(Container target)、getLayoutAlignmentX等方法不是很重要。重要的是public void layoutContainer(Container target)的实现,也是所有布局类最重要的一个类。
    首先该方法的第一步也要套上 synchronized (target.getTreeLock()) {},所有的代码放入同步块中。接下来是:
    final int w = parent.getWidth();
    final int h = parent.getHeight();
    final Component[] components = parent.getComponents();
    for (final Component comp : components) {}
    不难理解,是要首先获取容器当前的长、高,然后遍历容器内的所有组件逐一进行布局。下面的工作就是在for循环体中做文章了。循环体第一段是
    final FormData formData = componentConstraints.get(comp);
    if (formData == null) {
        continue;
    }
    因为在addLayoutComponent(Component comp, Object constraints)方法中已经关联了组件与布局信息,所以可以通过componentMap.get(comp)这一行得到组件的布局信息,加上空值判断确保代码万无一失。
    接下来取出4个FormAttachment对象,表示组件的四条边。
    final FormAttachment left = formData.left;
    final FormAttachment right = formData.right;
    final FormAttachment top = formData.top;
    final FormAttachment bottom = formData.bottom;
    然后计算Location信息(组件左上角的坐标)x、y:
    final int x = (int) (left.percentage * w) + left.offset;     // 左边的x坐标
    final int y = (int) (top.percentage * h) + top.offset;     // 上边的y坐标
    计算方法就是FormLayout的布局方式:(百分比*容器尺寸)+像素偏移量。

    然后计算组件的长、高,width、height:

    final int width;
    final int height;
    if (right == null || bottom == null) {
        final Dimension size = comp.getPreferredSize();
        if (size == null) {
            throw new RuntimeException("If right FormAttachment or bottom FormAttachment is null,the component must have preferred-size");
        } else {
            width = size.width;
            height = size.height;
        }
    } else {
        final int x2 = (int) (right.percentage * w) + right.offset;          // 右边的x坐标
        final int y2 = (int) (bottom.percentage * h) + bottom.offset;   // 下边的y坐标
        width = x2 - x;
        height = y2 - y;
    }


    计算时根据给出right与bottom布局分为两种情况,如果未给出,那么根据组件的getPreferredSize方法得到组件的最佳大小,以这个大小决定组件的尺寸。作为规范,使用布局管理器布局不是参照组件的getSize而是参照getPreferredSize来最终决定组件的尺寸,所有布局管理器也都是这么实现的。所以如果你企图 
    设置组件的setSize()方法来达到在布局管理器中布局的目的是不可能的,所以你应该视图调用组件的setPreferredSize方法。接上,如果right和bottom都不是null,那么计算组件尺寸将忽略getPreferredSize,计算x2和y2的坐标,然后两坐标相减得到长宽。最后调用组件的setBounds进行最终定位。

    comp.setBounds(x, y, width, height);
    可见对于布局管理器,其布局原理与使用绝对布局一样,调用setBounds实现,没什么特别之处。只不过是把布局单独抽出成一个类来实现罢了。
    layoutContainer的完整代码如下:
    public void layoutContainer(final Container parent) {
        synchronized (parent.getTreeLock()) {
            final int w = parent.getWidth();
            final int h = parent.getHeight();
            final Component[] components = parent.getComponents();
            for (final Component comp : components) {
                final FormData formData = componentConstraints.get(comp);
                if (formData == null) {
                    continue;
                }
                final FormAttachment left = formData.left;
                final FormAttachment right = formData.right;
                final FormAttachment top = formData.top;
                final FormAttachment bottom = formData.bottom;
                final int x = (int) (left.percentage * w) + left.offset;
                final int y = (int) (top.percentage * h) + top.offset;
                final int width;
                final int height;
                if (right == null || bottom == null) {
                    final Dimension size = comp.getPreferredSize();
                    if (size == null) {
                        throw new RuntimeException("If right FormAttachment or bottom FormAttachment is null,the component must have preferred-size");
                    } else {
                        width = size.width;
                        height = size.height;
                    }
                } else {
                    final int x2 = (int) (right.percentage * w) + right.offset;
                    final int y2 = (int) (bottom.percentage * h) + bottom.offset;
                    width = x2 - x;
                    height = y2 - y;
                }
                comp.setBounds(x, y, width, height);
            }
        }
    }


    作为FormLayout需要补充的是,在进行最终布局“component.setBounds(x, y, width, height);”之前,未进行逻辑判断,所以x、y可能会超出了容器的范围而width、height也可能是负值,这都会导致组件“莫名其妙”地不可见,这都不是布局管理器的问题。例如以下两行代码:
    formData.left = new FormAttachment(0.5f, 30);
    formData.right = new FormAttachment(0.5f, 20);
    就会使组件永远不能显示,因为对于left的定位,是位于容器50%处向右30像素处,而right是位于容器50%处向右20像素处,这样组件的长度就是-10,怎么能显示出来呢?

    本文转自:http://www.blogjava.net/javagui/archive/2007/11/24/FormLayout.html

  • 相关阅读:
    Asp.net实现URL重写
    IHttpModule不起作用的两个原因
    从客户端中检测到有潜在危险的 request.form值[解决方法]
    PHP $_SERVER详解
    string.Format 格式化日期格式
    图解正向代理、反向代理、透明代理
    Javacard 解释器怎样在API类库中找到源文件调用的类、方法或者静态域?
    API
    指令集
    机器码与字节码
  • 原文地址:https://www.cnblogs.com/daichangya/p/12959970.html
Copyright © 2020-2023  润新知