图书管理
src / pages / BookAdd.js // 图书添加页
/**
 * 图书添加页面
 */
import React from 'react';
// 布局组件
import HomeLayout from '../layouts/HomeLayout';
// 编辑组件
import BookEditor from '../components/BookEditor';

class BookAdd extends React.Component {
  render() {
    return (
      <HomeLayout title="添加图书">
        <BookEditor />
      </HomeLayout>
    );
  }
}

export default BookAdd;
src / pages / BookList.js // 图书列表页
/**
 * 图书列表页面
 */
import React from 'react';
// 布局组件
import HomeLayout from '../layouts/HomeLayout';
// 引入 prop-types
import PropTypes from 'prop-types';

class BookList extends React.Component {
  // 构造器
  constructor(props) {
    super(props);
    // 定义初始化状态
    this.state = {
      bookList: []
    };
  }

  /**
   * 生命周期
   * componentWillMount
   * 组件初始化时只调用,以后组件更新不调用,整个生命周期只调用一次
   */
  componentWillMount(){
    // 请求数据
    fetch('http://localhost:8000/book')
      .then(res => res.json())
      .then(res => {
        /**
         * 成功的回调
         * 数据赋值
         */
        this.setState({
          bookList: res
        });
      });
  }

  /**
   * 编辑
   */
  handleEdit(book){
    // 跳转编辑页面
    this.context.router.push('/book/edit/' + book.id);
  }

  /**
   * 删除
   */
  handleDel(book){
    // 确认框
    const confirmed = window.confirm(`确认要删除书名 ${book.name} 吗?`);
    // 判断
    if(confirmed){
      // 执行删除数据操作
      fetch('http://localhost:8000/book/' + book.id, {
        method: 'delete'
      })
      .then(res => res.json())
      .then(res => {
        /**
         * 设置状态
         * array.filter
         * 把Array的某些元素过滤掉,然后返回剩下的元素
         */
        this.setState({
          bookList: this.state.bookList.filter(item => item.id !== book.id)
        });
        alert('删除用户成功');
      })
      .catch(err => {
        console.log(err);
        alert('删除用户失败');
      });
    }
  }

  render() {
    // 定义变量
    const { bookList } = this.state;

    return (
      <HomeLayout title="图书列表">
        <table>
          <thead>
            <tr>
              <th>图书ID</th>
              <th>图书名称</th>
              <th>价格</th>
              <th>操作</th>
            </tr>
          </thead>

          <tbody>
            {
              bookList.map((book) => {
                return (
                  <tr key={book.id}>
                    <td>{book.id}</td>
                    <td>{book.name}</td>
                    <td>{book.price}</td>
                    <td>
                      <a onClick={() => this.handleEdit(book)}>编辑</a>

                      <a onClick={() => this.handleDel(book)}>删除</a>
                    </td>
                  </tr>
                );
              })
            }
          </tbody>
        </table>
      </HomeLayout>
    );
  }
}

/**
 * 任何使用this.context.xxx的地方,必须在组件的contextTypes里定义对应的PropTypes
 */
BookList.contextTypes = {
  router: PropTypes.object.isRequired
};

export default BookList;
src / components / BookEditor.js // 图书编辑组件
/**
 * 图书编辑器组件
 */
import React from 'react';
import FormItem from '../components/FormItem'; // 或写成 ./FormItem
// 高阶组件 formProvider表单验证
import formProvider from '../utils/formProvider';
// 引入 prop-types
import PropTypes from 'prop-types';

class BookEditor extends React.Component {
  // 按钮提交事件
  handleSubmit(e){
    // 阻止表单submit事件自动跳转页面的动作
    e.preventDefault();
    // 定义常量
    const { form: { name, price, owner_id }, formValid, editTarget} = this.props; // 组件传值
    // 验证
    if(!formValid){
      alert('请填写正确的信息后重试');
      return;
    }

    // 默认值
    let editType = '添加';
    let apiUrl = 'http://localhost:8000/book';
    let method = 'post';
    // 判断类型
    if(editTarget){
      editType = '编辑';
      apiUrl += '/' + editTarget.id;
      method = 'put';
    }

    // 发送请求
    fetch(apiUrl, {
      method, // method: method 的简写
      // 使用fetch提交的json数据需要使用JSON.stringify转换为字符串
      body: JSON.stringify({
        name: name.value,
        price: price.value,
        owner_id: owner_id.value
      }),
      headers: {
        'Content-Type': 'application/json'
      }
    })
    // 强制回调的数据格式为json
    .then((res) => res.json())
    // 成功的回调
    .then((res) => {
      // 当添加成功时,返回的json对象中应包含一个有效的id字段
      // 所以可以使用res.id来判断添加是否成功
      if(res.id){
        alert(editType + '添加图书成功!');
        this.context.router.push('/book/list'); // 跳转到用户列表页面
        return;
      }else{
        alert(editType + '添加图书失败!');
      }
    })
    // 失败的回调
    .catch((err) => console.error(err));
  }

  // 生命周期--组件加载中
  componentWillMount(){
    const {editTarget, setFormValues} = this.props;
    if(editTarget){
      setFormValues(editTarget);
    }
  }

  render() {
    // 定义常量
    const {form: {name, price, owner_id}, onFormChange} = this.props;
    return (
      <form onSubmit={(e) => this.handleSubmit(e)}>
        <FormItem label="书名:" valid={name.valid} error={name.error}>
          <input
            type="text"
            value={name.value}
            onChange={(e) => onFormChange('name', e.target.value)}/>
        </FormItem>

        <FormItem label="价格:" valid={price.valid} error={price.error}>
          <input
            type="number"
            value={price.value || ''}
            onChange={(e) => onFormChange('price', e.target.value)}/>
        </FormItem>

        <FormItem label="所有者:" valid={owner_id.valid} error={owner_id.error}>
          <input
            type="text"
            value={owner_id.value || ''}
            onChange={(e) => onFormChange('owner_id', e.target.value)}/>
        </FormItem>
        <br />
        <input type="submit" value="提交" />
      </form>
    );
  }
}

// 必须给BookEditor定义一个包含router属性的contextTypes
// 使得组件中可以通过this.context.router来使用React Router提供的方法
BookEditor.contextTypes = {
  router: PropTypes.object.isRequired
};

// 实例化
BookEditor = formProvider({ // field 对象
  // 书名
  name: {
    defaultValue: '',
    rules: [
      {
        pattern: function (value) {
          return value.length > 0;
        },
        error: '请输入图书户名'
      },
      {
        pattern: /^.{1,10}$/,
        error: '图书名最多10个字符'
      }
    ]
  },
  // 价格
  price: {
    defaultValue: 0,
    rules: [
      {
        pattern: function(value){
          return value > 0;
        },
        error: '价格必须大于0'
      }
    ]
  },
  // 所有者
  owner_id: {
    defaultValue: '',
    rules: [
      {
        pattern: function (value) {
          return value > 0;
        },
        error: '请输入所有者名称'
      },
      {
        pattern: /^.{1,10}$/,
        error: '所有者名称最多10个字符'
      }
    ]
  }
})(BookEditor);

export default BookEditor;
src / pages / BookEdit.js // 图书编辑页
/**
 * 编辑图书页面
 */
import React from 'react';
// 布局组件
import HomeLayout from '../layouts/HomeLayout';
// 引入 prop-types
import PropTypes from 'prop-types';
// 图书编辑器组件
import BookEditor from '../components/BookEditor';

class BookEdit extends React.Component {
  // 构造器
  constructor(props) {
    super(props);
    // 定义初始化状态
    this.state = {
      book: null
    };
  }

  // 生命周期--组件加载中
  componentWillMount(){
    // 定义常量
    const bookId = this.context.router.params.id;
    /**
     * 发送请求
     * 获取用户数据
     */
    fetch('http://localhost:8000/book/' + bookId)
    .then(res => res.json())
    .then(res => {
      this.setState({
        book: res
      });
    })
  }

  render() {
    const {book} = this.state;
    return (
      <HomeLayout title="编辑图书">
        {
          book ? <BookEditor editTarget={book} /> : '加载中...'
        }
      </HomeLayout>
    );
  }
}

BookEdit.contextTypes = {
  router: PropTypes.object.isRequired
};

export default BookEdit;
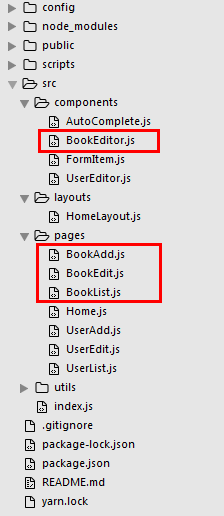
项目结构:
自动完成组件
找了个例子看一下效果:

可以发现,这是一个包含一个输入框、一个下拉框的复合控件。
实现一个通用组件,在动手写代码之前我会做以下准备工作:
- 确定组件结构
- 观察组件逻辑
- 确定组件内部状态(state)
- 确定组件向外暴露的属性(props)
组件结构
上面提了,这个组件由一个输入框和一个下拉框组成。
注意,这里的下拉框是一个“伪”下拉框,并不是指select与option。仔细看上面的动图,可以看得出来这个“伪”下拉框只是一个带边框的、位于输入框正下方的一个列表。
我们可以假设组件的结构是这样的:
<div>
  <input type="text"/>
  <ul>
    <li>...</li>
    ...
  </ul>
</div>
组件逻辑
观察动图,可以发现组件有以下行为:
- 未输入时,与普通输入框一致
- 输入改变时如果有建议的选项,则在下放显示出建议列表
- 建议列表可以使用键盘上下键进行选择,选择某一项时该项高亮显示,并且输入框的值变为该项的值
- 当移出列表(在第一项按上键或在最后一项按下键)时,输入框的值变为原来输入的值(图中的“as”)
- 按下回车键可以确定选择该项,列表消失
- 可以使用鼠标在列表中进行选择,鼠标移入的列表项高亮显示
组件内部状态
一个易用的通用组件应该对外隐藏只有内部使用的状态。使用React组件的state来维护组件的内部状态。
根据组件逻辑,我们可以确定自动完成组件需要这些内部状态:
- 逻辑2|3|4:输入框中显示的值,默认为空字符串(displayValue)
- 逻辑3|6:建议列表中高亮的项目,可以维护一个项目在列表中的索引,默认为-1(activeItemIndex)
组件暴露的属性
我们的目标是一个通用的组件,所以类似组件实际的值、推荐列表这样的状态,应该由组件的使用者来控制:
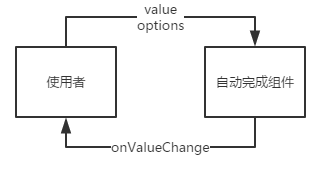
如上图,组件应向外暴露的属性有:
- value:代表实际的值(不同于上面的displayValue表示显示的、临时的值,value表示的是最终的值)
- options:代表当前组件的建议列表,为空数组时,建议列表隐藏
- onValueChange:用于在输入值或确定选择了某一项时通知使用者的回调方法,使用者可以在这个回调方法中对options、value进行更新
实现
确定了组件结构、组件逻辑、内部状态和外部属性之后,就可以着手进行编码了:
在/src/components下新建AutoComplete.js文件,写入组件的基本代码:
/**
 * 自动完成组件
 */
import React from 'react';
// 引入 prop-types
import PropTypes from 'prop-types';

class AutoComplete extends React.Component {
  // 构造器
  constructor(props) {
    super(props);
    // 定义初始化状态
    this.state = {
      displayValue: '',
      activeItemIndex: -1
    };
  }

  // 渲染
  render() {
    const {displayValue, activeItemIndex} = this.state;
    // 组件传值
    const {value, options} = this.props;
    return (
      <div>
        <input value={value}/>
        {options.length > 0 && (
          <ul>
            {
              options.map((item, index) => {
                return (
                  <li key={index}>
                    {item.text || item}
                  </li>
                );
              })
            }
          </ul>
        )}
      </div>
    );
  }
}

// 通用组件最好写一下propTypes约束
AutoComplete.propTypes = {
  value: PropTypes.string.isRequired, // 字符串
  options: PropTypes.array.isRequired, // 数组
  onValueChange: PropTypes.func.isRequired // 函数
};

// 向外暴露
export default AutoComplete;
为了方便调试,把BookEditor里的owner_id输入框换成AutoComplete,传入一些测试数据:
...
import AutoComplete from './AutoComplete';

class BookEditor extends React.Component {
  ...
  render () {
    const {form: {name, price, owner_id}, onFormChange} = this.props;
    return (
      <form onSubmit={this.handleSubmit}>
        ...
        <FormItem label="所有者:" valid={owner_id.valid} error={owner_id.error}>

          <AutoComplete
            value={owner_id.value ? owner_id.value + '' : ''}
            options={['10000(一韬)', '10001(张三)']}
            onValueChange={value => onFormChange('owner_id', value)}
          />
        </FormItem>
      </form>
    );
  }
}
...
现在大概是这个样子:

有点怪,我们来给它加上样式。
新建/src/styles文件夹和auto-complete.less文件,写入代码:
.wrapper {
  display: inline-block;
  position: relative;
}

.options {
  margin: 0;
  padding: 0;
  list-style: none;
  top: 110%;
  left: 0;
  right: 0;
  position: absolute;
  box-shadow: 1px 1px 10px 0 rgba(0, 0, 0, .6);

  > li {
    padding: 3px 6px;

    &.active {
      background-color: #0094ff;
      color: white;
    }
  }
}
给AutoComplete.js加上className:
/**
 * 自动完成组件
 */
import React from 'react';
// 引入 prop-types
import PropTypes from 'prop-types';
// 引入样式
import '../styles/auto-complete.less';

class AutoComplete extends React.Component {
  // 构造器
  constructor(props) {
    super(props);
    // 定义初始化状态
    this.state = {
      displayValue: '',
      activeItemIndex: -1
    };
  }

  // 渲染
  render() {
    const {displayValue, activeItemIndex} = this.state;
    // 组件传值
    const {value, options} = this.props;
    return (
      <div className="wrapper">
        <input value={displayValue || value}/>
        {options.length > 0 && (
          <ul className="options">
            {
              options.map((item, index) => {
                return (
                  <li key={index} className={activeItemIndex === index ? 'active' : ''}>
                    {item.text || item}
                  </li>
                );
              })
            }
          </ul>
        )}
      </div>
    );
  }
}

// 通用组件最好写一下propTypes约束
AutoComplete.propTypes = {
  value: PropTypes.string.isRequired, // 字符串
  options: PropTypes.array.isRequired, // 数组
  onValueChange: PropTypes.func.isRequired // 函数
};

// 向外暴露
export default AutoComplete;
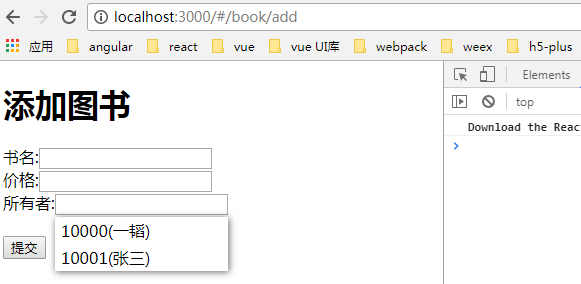
稍微顺眼一些了吧:
现在需要在AutoComplete中监听一些事件:
- 输入框的onChange
- 输入框的onKeyDown,用于对上下键、回车键进行监听处理
- 列表项目的onClick
- 列表项目的onMouseEnter,用于在鼠标移入时设置activeItemIndex
- 列表的onMouseLeave,用户鼠标移出时重置activeItemIndex
...
// 获得当前元素value值
function getItemValue (item) {
  return item.value || item;
}

class AutoComplete extends React.Component {
  // 构造器
  constructor(props) {
    super(props);
    // 定义初始化状态
    this.state = {
      displayValue: '',
      activeItemIndex: -1
    };

    // 对上下键、回车键进行监听处理
    this.handleKeyDown = this.handleKeyDown.bind(this);
    // 对鼠标移出进行监听处理
    this.handleLeave = this.handleLeave.bind(this);
  }

  // 处理输入框改变事件
  handleChange(value){
    //
  }

  // 处理上下键、回车键点击事件
  handleKeyDown(e){
    //
  }

  // 处理鼠标移入事件
  handleEnter(index){
    //
  }

  // 处理鼠标移出事件
  handleLeave(){
    //
  }

  // 渲染
  render() {
    const {displayValue, activeItemIndex} = this.state;
    // 组件传值
    const {value, options} = this.props;
    return (
      <div className="wrapper">
        <input
          value={displayValue || value}
          onChange={e => this.handleChange(e.target.value)}
          onKeyDown={this.handleKeyDown} />
        {options.length > 0 && (
          <ul className="options" onMouseLeave={this.handleLeave}>
            {
              options.map((item, index) => {
                return (
                  <li
                    key={index}
                    className={activeItemIndex === index ? 'active' : ''}
                    onMouseEnter={() => this.handleEnter(index)}
                    onClick={() => this.handleChange(getItemValue(item))}
                  >
                    {item.text || item}
                  </li>
                );
              })
            }
          </ul>
        )}
      </div>
    );
  }
}
...
先来实现handleChange方法,handleChange方法用于在用户输入、选择列表项的时候重置内部状态(清空displayName、设置activeItemIndex为-1),并通过回调将新的值传递给组件使用者:
...
handleChange (value) {
  this.setState({activeItemIndex: -1, displayValue: ''});
  this.props.onValueChange(value);
}
...
然后是handleKeyDown方法,这个方法中需要判断当前按下的键是否为上下方向键或回车键,如果是上下方向键则根据方向设置当前被选中的列表项;如果是回车键并且当前有选中状态的列表项,则调用handleChange:
...
handleKeyDown (e) {
  const {activeItemIndex} = this.state;
  const {options} = this.props;

  switch (e.keyCode) {
    // 13为回车键的键码(keyCode)
    case 13: {
      // 判断是否有列表项处于选中状态
      if (activeItemIndex >= 0) {
        // 防止按下回车键后自动提交表单
        e.preventDefault();
        e.stopPropagation();
        this.handleChange(getItemValue(options[activeItemIndex]));
      }
      break;
    }
    // 38为上方向键,40为下方向键
    case 38:
    case 40: {
      e.preventDefault();
      // 使用moveItem方法对更新或取消选中项
      this.moveItem(e.keyCode === 38 ? 'up' : 'down');
      break;
    }
  }
}

moveItem (direction) {
  const {activeItemIndex} = this.state;
  const {options} = this.props;
  const lastIndex = options.length - 1;
  let newIndex = -1;

  // 计算新的activeItemIndex
  if (direction === 'up') {
    if (activeItemIndex === -1) {
      // 如果没有选中项则选择最后一项
      newIndex = lastIndex;
    } else {
      newIndex = activeItemIndex - 1;
    }
  } else {
    if (activeItemIndex < lastIndex) {
      newIndex = activeItemIndex + 1;
    }
  }

  // 获取新的displayValue
  let newDisplayValue = '';
  if (newIndex >= 0) {
    newDisplayValue = getItemValue(options[newIndex]);
  }

  // 更新状态
  this.setState({
    displayValue: newDisplayValue,
    activeItemIndex: newIndex
  });
}
...
handleEnter和handleLeave方法比较简单:
...
handleEnter (index) {
  const currentItem = this.props.options[index];
  this.setState({activeItemIndex: index, displayValue: getItemValue(currentItem)});
}

handleLeave () {
  this.setState({activeItemIndex: -1, displayValue: ''});
}
...
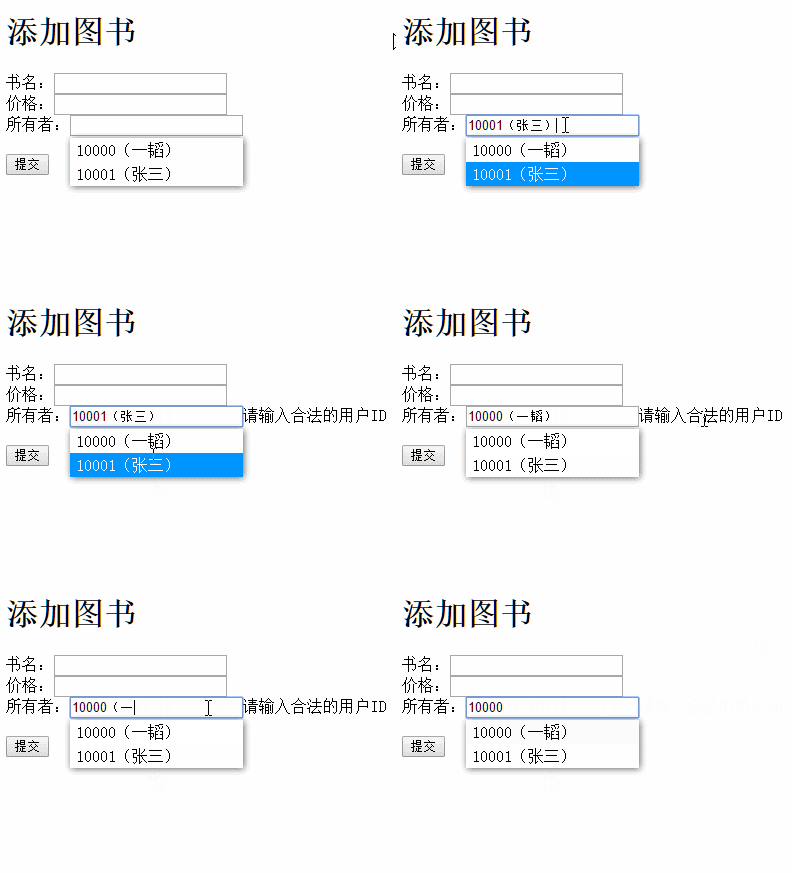
看一下效果:
完整的代码:
src / components / AutoComplete.js
/**
 * 自动完成组件
 */
import React from 'react';
// 引入 prop-types
import PropTypes from 'prop-types';
// 引入样式
import '../styles/auto-complete.less';

// 获得当前元素value值
function getItemValue (item) {
  return item.value || item;
}

class AutoComplete extends React.Component {
  // 构造器
  constructor(props) {
    super(props);
    // 定义初始化状态
    this.state = {
      displayValue: '',
      activeItemIndex: -1
    };

    // 对上下键、回车键进行监听处理
    this.handleKeyDown = this.handleKeyDown.bind(this);
    // 对鼠标移出进行监听处理
    this.handleLeave = this.handleLeave.bind(this);
  }

  // 处理输入框改变事件
  handleChange(value){
    // 选择列表项的时候重置内部状态
    this.setState({
      activeItemIndex: -1,
      displayValue: ''
    });
    // 通过回调将新的值传递给组件使用者
    this.props.onValueChange(value);
  }

  // 处理上下键、回车键点击事件
  handleKeyDown(e){
    const {activeItemIndex} = this.state;
    const {options} = this.props;

    /**
     * 判断键码
     */
    switch (e.keyCode) {
      // 13为回车键的键码(keyCode)
      case 13: {
        // 判断是否有列表项处于选中状态
        if(activeItemIndex >= 0){
          // 防止按下回车键后自动提交表单
          e.preventDefault();
          e.stopPropagation();
          // 输入框改变事件
          this.handleChange(getItemValue(options[activeItemIndex]));
        }
        break;
      }
      // 38为上方向键,40为下方向键
      case 38:
      case 40: {
        e.preventDefault();
        // 使用moveItem方法对更新或取消选中项
        this.moveItem(e.keyCode === 38 ? 'up' : 'down');
        break;
      }
      default: {
        //
      }
    }
  }

  // 使用moveItem方法对更新或取消选中项
  moveItem(direction){
    const {activeItemIndex} = this.state;
    const {options} = this.props;
    const lastIndex = options.length - 1;
    let newIndex = -1;

    // 计算新的activeItemIndex
    if(direction === 'up'){ // 点击上方向键
      if(activeItemIndex === -1){
        // 如果没有选中项则选择最后一项
        newIndex = lastIndex;
      }else{
        newIndex = activeItemIndex - 1;
      }
    }else{ // 点击下方向键
      if(activeItemIndex < lastIndex){
        newIndex = activeItemIndex + 1;
      }
    }

    // 获取新的displayValue
    let newDisplayValue = '';
    if(newIndex >= 0){
      newDisplayValue = getItemValue(options[newIndex]);
    }

    // 更新状态
    this.setState({
      displayValue: newDisplayValue,
      activeItemIndex: newIndex
    });
  }

  // 处理鼠标移入事件
  handleEnter(index){
    const currentItem = this.props.options[index];
    this.setState({
      activeItemIndex: index,
      displayValue: getItemValue(currentItem)
    });
  }

  // 处理鼠标移出事件
  handleLeave(){
    this.setState({
      activeItemIndex: -1,
      displayValue: ''
    });
  }

  // 渲染
  render() {
    const {displayValue, activeItemIndex} = this.state;
    // 组件传值
    const {value, options} = this.props;
    return (
      <div className="wrapper">
        <input
          value={displayValue || value}
          onChange={e => this.handleChange(e.target.value)}
          onKeyDown={this.handleKeyDown} />
        {options.length > 0 && (
          <ul className="options" onMouseLeave={this.handleLeave}>
            {
              options.map((item, index) => {
                return (
                  <li
                    key={index}
                    className={activeItemIndex === index ? 'active' : ''}
                    onMouseEnter={() => this.handleEnter(index)}
                    onClick={() => this.handleChange(getItemValue(item))}
                  >
                    {item.text || item}
                  </li>
                );
              })
            }
          </ul>
        )}
      </div>
    );
  }
}

// 通用组件最好写一下propTypes约束
AutoComplete.propTypes = {
  value: PropTypes.string.isRequired, // 字符串
  options: PropTypes.array.isRequired, // 数组
  onValueChange: PropTypes.func.isRequired // 函数
};

// 向外暴露
export default AutoComplete;
基本上已经实现了自动完成组件,但是从图中可以发现选择后的值把用户名也带上了。
但是如果吧options中的用户名去掉,这个自动完成也就没有什么意义了,我们来把BookEditor中传入的options改一改:
...
<AutoComplete
  value={owner_id.value ? owner_id.value + '' : ''}
  options={[{text: '10000(一韬)', value: 10000}, {text: '10001(张三)', value: 10001}]}
  onValueChange={value => onFormChange('owner_id', value)}
/>
...
刷新看一看,已经达到了我们期望的效果:
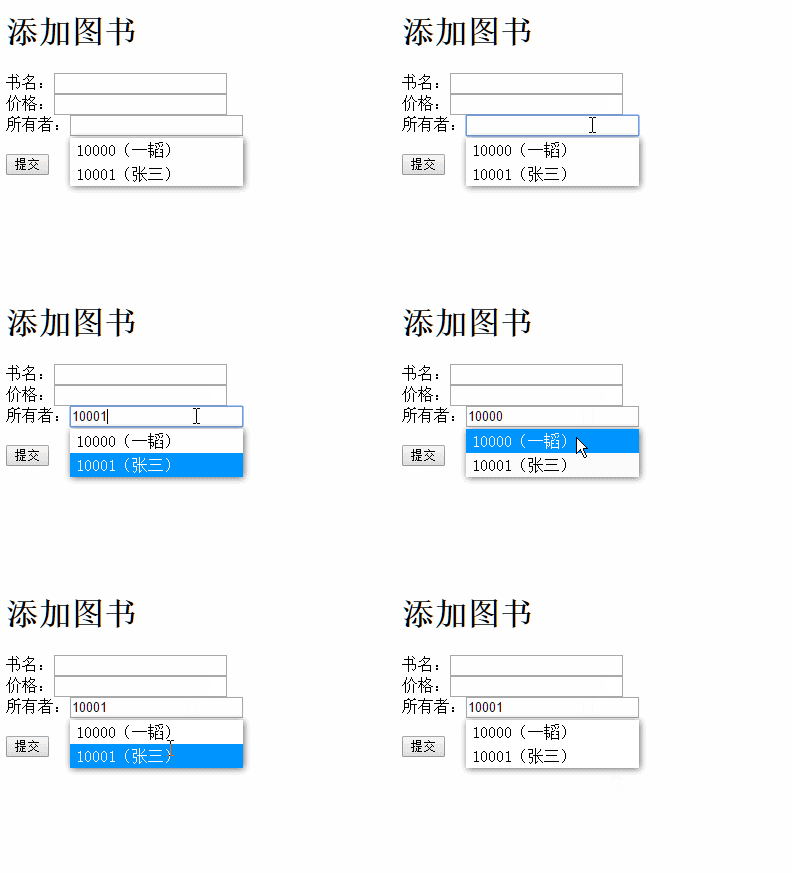
有时候我们显示的值并不一定是我们想要得到的值,这也是为什么我在组件的代码里有一个getItemValue方法了。
调用接口获取建议列表
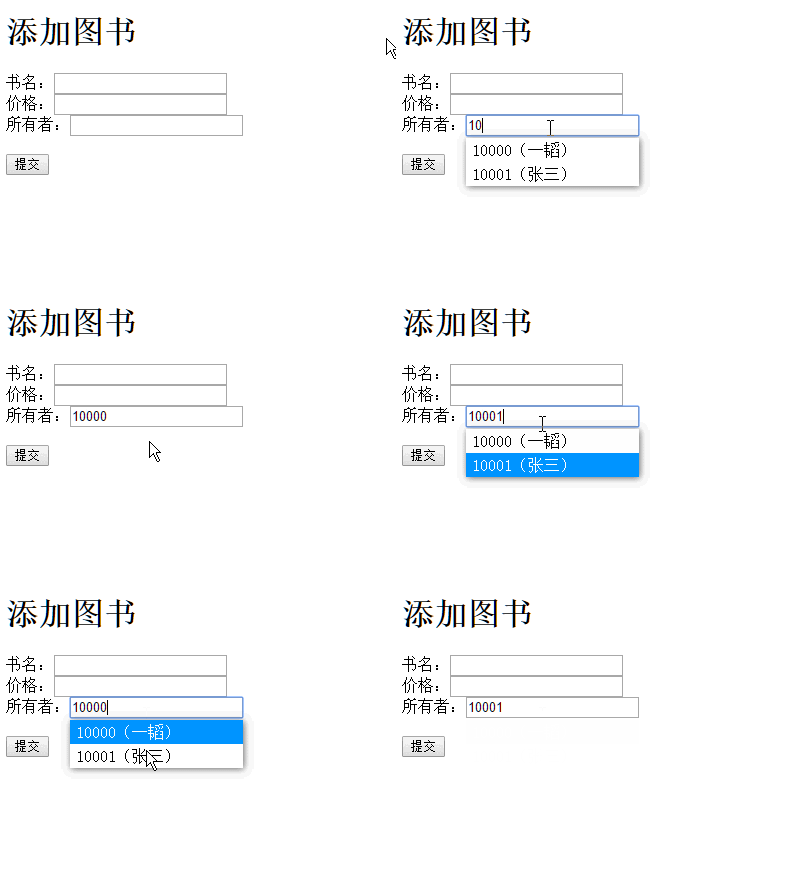
也许有人要问了,这个建议列表为什么一直存在?
这是因为我们为了方便测试给了一个固定的options值,现在来完善一下,修改BookEditor.js:
import React from 'react';
import FormItem from './FormItem';
import AutoComplete from './AutoComplete';
import formProvider from '../utils/formProvider';

class BookEditor extends React.Component {
  constructor (props) {
    super(props);
    this.state = {
      recommendUsers: []
    };
    ...
  }
  ...
  getRecommendUsers (partialUserId) {
    fetch('http://localhost:8000/user?id_like=' + partialUserId)
      .then((res) => res.json())
      .then((res) => {
        if (res.length === 1 && res[0].id === partialUserId) {
          // 如果结果只有1条且id与输入的id一致,说明输入的id已经完整了,没必要再设置建议列表
          return;
        }

        // 设置建议列表
        this.setState({
          recommendUsers: res.map((user) => {
            return {
              text: `${user.id}(${user.name})`,
              value: user.id
            };
          })
        });
      });
  }

  timer = 0;
  handleOwnerIdChange (value) {
    this.props.onFormChange('owner_id', value);
    this.setState({recommendUsers: []});

    // 使用“节流”的方式进行请求,防止用户输入的过程中过多地发送请求
    if (this.timer) {
      clearTimeout(this.timer);
    }

    if (value) {
      // 200毫秒内只会发送1次请求
      this.timer = setTimeout(() => {
        // 真正的请求方法
        this.getRecommendUsers(value);
        this.timer = 0;
      }, 200);
    }
  }

  render () {
    const {recommendUsers} = this.state;
    const {form: {name, price, owner_id}, onFormChange} = this.props;
    return (
      <form onSubmit={this.handleSubmit}>
        ...
        <FormItem label="所有者:" valid={owner_id.valid} error={owner_id.error}>
          <AutoComplete
            value={owner_id.value ? owner_id.value + '' : ''}
            options={recommendUsers}
            onValueChange={value => this.handleOwnerIdChange(value)}
          />
        </FormItem>
        ...
      </form>
    );
  }
}
...
看一下最后的样子:
完整的代码:
src / components / BookEditor.js
/**
 * 图书编辑器组件
 */
import React from 'react';
import FormItem from '../components/FormItem'; // 或写成 ./FormItem
// 高阶组件 formProvider表单验证
import formProvider from '../utils/formProvider';
// 引入 prop-types
import PropTypes from 'prop-types';
// 引入自动完成组件
import AutoComplete from './AutoComplete';

class BookEditor extends React.Component {
  // 构造器
  constructor(props) {
    super(props);

    this.state = {
      recommendUsers: []
    };
  }

  // 获取推荐用户信息
  getRecommendUsers (partialUserId) {
    // 请求数据
    fetch('http://localhost:8000/user?id_like=' + partialUserId)
    .then((res) => res.json())
    .then((res) => {
      if(res.length === 1 && res[0].id === partialUserId){
        // 如果结果只有1条且id与输入的id一致,说明输入的id已经完整了,没必要再设置建议列表
        return;
      }

      // 设置建议列表
      this.setState({
        recommendUsers: res.map((user) => {
          return {
            text: `${user.id}(${user.name})`,
            value: user.id
          }
        })
      });
    })
  }

  // 计时器
  timer = 0;
  handleOwnerIdChange(value){
    this.props.onFormChange('owner_id', value);
    this.setState({
      recommendUsers: []
    });

    // 使用"节流"的方式进行请求,防止用户输入的过程中过多地发送请求
    if(this.timer){
      // 清除计时器
      clearTimeout(this.timer);
    }

    if(value){
      // 200毫秒内只会发送1次请求
      this.timer = setTimeout(() => {
        // 真正的请求方法
        this.getRecommendUsers(value);
        this.timer = 0;
      }, 200);
    }
  }

  // 按钮提交事件
  handleSubmit(e){
    // 阻止表单submit事件自动跳转页面的动作
    e.preventDefault();
    // 定义常量
    const { form: { name, price, owner_id }, formValid, editTarget} = this.props; // 组件传值
    // 验证
    if(!formValid){
      alert('请填写正确的信息后重试');
      return;
    }

    // 默认值
    let editType = '添加';
    let apiUrl = 'http://localhost:8000/book';
    let method = 'post';
    // 判断类型
    if(editTarget){
      editType = '编辑';
      apiUrl += '/' + editTarget.id;
      method = 'put';
    }

    // 发送请求
    fetch(apiUrl, {
      method, // method: method 的简写
      // 使用fetch提交的json数据需要使用JSON.stringify转换为字符串
      body: JSON.stringify({
        name: name.value,
        price: price.value,
        owner_id: owner_id.value
      }),
      headers: {
        'Content-Type': 'application/json'
      }
    })
    // 强制回调的数据格式为json
    .then((res) => res.json())
    // 成功的回调
    .then((res) => {
      // 当添加成功时,返回的json对象中应包含一个有效的id字段
      // 所以可以使用res.id来判断添加是否成功
      if(res.id){
        alert(editType + '添加图书成功!');
        this.context.router.push('/book/list'); // 跳转到用户列表页面
        return;
      }else{
        alert(editType + '添加图书失败!');
      }
    })
    // 失败的回调
    .catch((err) => console.error(err));
  }

  // 生命周期--组件加载中
  componentWillMount(){
    const {editTarget, setFormValues} = this.props;
    if(editTarget){
      setFormValues(editTarget);
    }
  }

  render() {
    // 定义常量
    const {recommendUsers} = this.state;
    const {form: {name, price, owner_id}, onFormChange} = this.props;
    return (
      <form onSubmit={(e) => this.handleSubmit(e)}>
        <FormItem label="书名:" valid={name.valid} error={name.error}>
          <input
            type="text"
            value={name.value}
            onChange={(e) => onFormChange('name', e.target.value)}/>
        </FormItem>

        <FormItem label="价格:" valid={price.valid} error={price.error}>
          <input
            type="number"
            value={price.value || ''}
            onChange={(e) => onFormChange('price', e.target.value)}/>
        </FormItem>

        <FormItem label="所有者:" valid={owner_id.valid} error={owner_id.error}>
          <AutoComplete
            value={owner_id.value ? owner_id.value + '' : ''}
            options={recommendUsers}
            onValueChange={value => this.handleOwnerIdChange(value)} />
        </FormItem>
        <br />
        <input type="submit" value="提交" />
      </form>
    );
  }
}

// 必须给BookEditor定义一个包含router属性的contextTypes
// 使得组件中可以通过this.context.router来使用React Router提供的方法
BookEditor.contextTypes = {
  router: PropTypes.object.isRequired
};

// 实例化
BookEditor = formProvider({ // field 对象
  // 书名
  name: {
    defaultValue: '',
    rules: [
      {
        pattern: function (value) {
          return value.length > 0;
        },
        error: '请输入图书户名'
      },
      {
        pattern: /^.{1,10}$/,
        error: '图书名最多10个字符'
      }
    ]
  },
  // 价格
  price: {
    defaultValue: 0,
    rules: [
      {
        pattern: function(value){
          return value > 0;
        },
        error: '价格必须大于0'
      }
    ]
  },
  // 所有者
  owner_id: {
    defaultValue: '',
    rules: [
      {
        pattern: function (value) {
          return value > 0;
        },
        error: '请输入所有者名称'
      },
      {
        pattern: /^.{1,10}$/,
        error: '所有者名称最多10个字符'
      }
    ]
  }
})(BookEditor);

export default BookEditor;
.