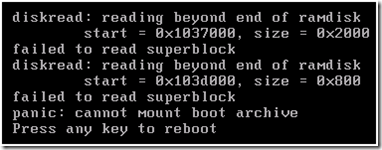
在某些情况下(比如:异常宕机)solaris10的boot archive可能会损坏,导致solaris无法启动,此时需要手工修复boot archive。
本文通过模拟boot archive损坏,测试如何在root镜像存在的情况下恢复boot archive. (本测试在x86虚拟机上进行)
测试分为四部分。第一部分是solaris10做root镜像,第二部分通过dd命令模拟boot archive损坏,第三部分是拆除镜像和修复boot archive,第四部分是修复root镜像
1. 系统盘镜像
1) 硬盘分区情况
c1t0d0s0 /
c1t0d0s1 swap
c1t0d0s7 metadb
2) 镜像盘创建solaris fdisk分区 (x86)
format -> 1(镜像盘) -> fdisk -> y
3) 将源盘分区表同步到镜像盘上
root@solaris10 # prtvtoc /dev/rdsk/c1t0d0s2 | fmthard -s - /dev/rdsk/c1t1d0s2
fmthard: New volume table of contents now in place.
4) 创建metadb,放在slice7上
root@solaris10 # metadb -a -c 3 -f c1t0d0s7 c1t1d0s7
root@solaris10 # metadb -i
flags first blk block count
a u 16 8192 /dev/dsk/c1t0d0s7
a u 8208 8192 /dev/dsk/c1t0d0s7
a u 16400 8192 /dev/dsk/c1t0d0s7
a u 16 8192 /dev/dsk/c1t1d0s7
a u 8208 8192 /dev/dsk/c1t1d0s7
a u 16400 8192 /dev/dsk/c1t1d0s7
r - replica does not have device relocation information
o - replica active prior to last mddb configuration change
u - replica is up to date
l - locator for this replica was read successfully
c - replica's location was in /etc/lvm/mddb.cf
p - replica's location was patched in kernel
m - replica is master, this is replica selected as input
W - replica has device write errors
a - replica is active, commits are occurring to this replica
M - replica had problem with master blocks
D - replica had problem with data blocks
F - replica had format problems
S - replica is too small to hold current data base
R - replica had device read errors
5) 创建root分区镜像
root@solaris10 # metainit -f d11 1 1 c1t0d0s0
d11: Concat/Stripe is setup
root@solaris10 # metainit -f d12 1 1 c1t1d0s0
d12: Concat/Stripe is setup
root@solaris10 # metainit d10 -m d11
d10: Mirror is setup
6) 执行metaroot修改vfstab
root@solaris10 # metaroot d10
7) 重启
root@solaris10 # shutdown -i6 -g0 -y
8) 创建swap镜像
root@solaris10 # metainit -f d21 1 1 c1t0d0s1
d21: Concat/Stripe is setup
root@solaris10 # metainit -f d22 1 1 c1t1d0s1
d22: Concat/Stripe is setup
root@solaris10 # metainit d20 -m d21
d20: Mirror is setup
9) 修改vfstab文件
/dev/dsk/c1t0d0s1 - - swap - no -
修改为=>
/dev/md/dsk/d20 - - swap - no -
10) 重启
root@solaris10 # shutdown -i6 -g0 -y
11) 附加子镜像
root@solaris10 # metattach d10 d12
d10: submirror d12 is attached
root@solaris10 # metattach d20 d22
d20: submirror d22 is attached
12) 检查镜像
root@solaris10 # metastat
2. 模拟boot archive损坏
root@solaris10 # dd if=/dev/zero of=/platform/`uname -i`/boot_archive bs=1024 count=1
1+0 records in
1+0 records out重启主机
root@solaris10 # shutdown -i6 -g0 –y报错:
3. 修复boot archive
1) 启动到failsafe
启动时选择Solaris failsafe (x86)
ok boot -F failsafe (sparc)
2) 拆除镜像
# mount /dev/dsk/c1t0d0s0 /a
备份vfstab
# cp /a/etc/vfstab /a/etc/vfstab.svm
备份system
# cp /a/etc/system /a/etc/system.svm修改vfstab文件,把所有md设备修改成slice
# TERM=vt100; export TERM
# vi /a/etc/vfstab(如果不清楚md设备与slice的对应关系,可以cat /a/etc/lvm/md.cf)
如果vfstab与初始安装时一致,也可以用初始安装覆盖
# cp /a/etc/vfstab-INSTALL /a/etc/vfstab修改system文件,注释掉(或者删除)rootdev:/pseudo/md@0:0,10,blk这一行。
# vi /a/etc/system如果system与初始安装时一致,也可以用初始安装覆盖
# cp /a/etc/system-INSTALL /a/etc/system
3) 修复boot archive
删除boot archive
# rm -f /a/platform/`uname -i`/boot_archive重建boot archive
# bootadm update-archive -R /a重启
# shutdown -i6 -g0 –y
4. 修复镜像
1) detach子镜像
root@solaris10 # metadetach d10 d12
d10: submirror d12 is detached
root@solaris10 # metadetach d20 d22
d20: submirror d22 is detached
2) 恢复原来的vfstab和system文件
root@solaris10 # mv /etc/system.svm /etc/system
root@solaris10 # mv /etc/vfstab.svm /etc/vfstab
3) 重启
root@solaris10 # shutdown -i6 -g0 –y
4) attach子镜像
root@solaris10 # metattach d10 d12
d10: submirror d12 is attached
root@solaris10 # metattach d20 d22
d20: submirror d22 is attached
