微信公众号:compassblog
欢迎关注、转发,互相学习,共同进步!
有任何问题,请后台留言联系!
1、SpringMVC 概述
(1)、 MVC:Model-View-Control
Control 层属于框架性质,完成的主要工作是:封装 web 请求为一个数据对象、调用业务逻辑层来处理数据对象、返回处理数据结果及相应的视图给客户端。
(2)、什么是 SpringMVC
Spring mvc 和 Struts2 都属于表现层的框架,是 Spring 框架的一部分,Spring 框架的 Control 层的核心是 DispatcherServlet,它的作用是将请求分发给不同的后端处理器。
Spring 的 Control 层框架使用了后端控制器来映射处理器和视图解析器来共同完成 Control 层框架的主要工作。并且 spring 的 Control 层框架还真正地把业务层处理的数据结果和相应的视图拼成一个对象,即 ModelAndView 对象。
SpringMVC 本身就是 Spring 的子项目,对 Spring 兼容性很好,因此也不需要做过多的配置。
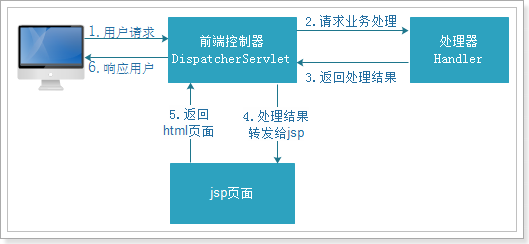
(3)SpringMVC 框架处理流程
2、SpringMVC 入门实例
(1)、创建 web 项目,导入所需要的 jar 包,如图下图所示:

(2)、创建 SpringMVC 的核心配置文件,具体配置如下:
springmvc.xml
<?xml version="1.0" encoding="UTF-8"?>
<beans xmlns="http://www.springframework.org/schema/beans"
    xmlns:xsi="http://www.w3.org/2001/XMLSchema-instance" xmlns:p="http://www.springframework.org/schema/p"
    xmlns:context="http://www.springframework.org/schema/context"
    xmlns:mvc="http://www.springframework.org/schema/mvc"
    xsi:schemaLocation="http://www.springframework.org/schema/beans http://www.springframework.org/schema/beans/spring-beans-4.0.xsd
        http://www.springframework.org/schema/mvc http://www.springframework.org/schema/mvc/spring-mvc-4.0.xsd
        http://www.springframework.org/schema/context http://www.springframework.org/schema/context/spring-context-4.0.xsd">


        <!-- 扫描@Controler  @Service   -->
        <context:component-scan base-package="com.springmvc"/>

        <!-- 处理器映射器 -->
<!--         <bean class="org.springframework.web.servlet.mvc.method.annotation.RequestMappingHandlerMapping"/> -->
        <!-- 处理器适配器 -->
<!--         <bean class="org.springframework.web.servlet.mvc.method.annotation.RequestMappingHandlerAdapter"/> -->
        <!-- 注解驱动 -->
        <mvc:annotation-driven/>

        <!-- 视图解释器 -->
        <bean class="org.springframework.web.servlet.view.InternalResourceViewResolver">
            <property name="prefix" value="/WEB-INF/jsp/"/>
            <property name="suffix" value=".jsp"/>
        </bean>

   </beans>
(3)、配置 SpringMVC 的前端控制器 DispatcherServlet,具体配置如下:
web.xml
<?xml version="1.0" encoding="UTF-8"?>
<web-app xmlns:xsi="http://www.w3.org/2001/XMLSchema-instance" xmlns="http://java.sun.com/xml/ns/javaee" xmlns:web="http://java.sun.com/xml/ns/javaee/web-app_2_5.xsd" xsi:schemaLocation="http://java.sun.com/xml/ns/javaee http://java.sun.com/xml/ns/javaee/web-app_2_5.xsd" id="WebApp_ID" version="2.5">
  <display-name>SpringmvcProject</display-name>
  <welcome-file-list>
    <welcome-file>index.html</welcome-file>
    <welcome-file>index.htm</welcome-file>
    <welcome-file>index.jsp</welcome-file>
    <welcome-file>default.html</welcome-file>
    <welcome-file>default.htm</welcome-file>
    <welcome-file>default.jsp</welcome-file>
  </welcome-file-list>
  <servlet>
    <servlet-name>springmvc</servlet-name>
    <servlet-class>org.springframework.web.servlet.DispatcherServlet</servlet-class>
    <init-param>
      <param-name>contextConfigLocation</param-name>
      <param-value>classpath:springmvc.xml</param-value>
    </init-param>
  </servlet>
  <servlet-mapping>
    <servlet-name>springmvc</servlet-name>
    <url-pattern>*.action</url-pattern>
  </servlet-mapping>
</web-app>
(4)、在 /WEB-INF/ 目录下新建 jsp 目录,新建 jsp 文件,具体代码如下:
itemList.jsp
<%@ page language="java" contentType="text/html; charset=UTF-8"
    pageEncoding="UTF-8"%>
<%@ taglib uri="http://java.sun.com/jsp/jstl/core" prefix="c" %>
<%@ taglib uri="http://java.sun.com/jsp/jstl/fmt"  prefix="fmt"%>
<!DOCTYPE html PUBLIC "-//W3C//DTD HTML 4.01 Transitional//EN" "http://www.w3.org/TR/html4/loose.dtd">
<html>
<head>
<meta http-equiv="Content-Type" content="text/html; charset=UTF-8">
<title>查询商品列表</title>
</head>
<body>
<form action="${pageContext.request.contextPath }/item/queryitem.action" method="post">
<p></p>
商品列表:
<p></p>
<table width="100%" border=1>
<tr>
    <td>商品名称</td>
    <td>商品价格</td>
    <td>生产日期</td>
    <td>商品描述</td>
</tr>
<c:forEach items="${itemList }" var="item">
<tr>
    <td>${item.name }</td>
    <td>${item.price }</td>
    <td><fmt:formatDate value="${item.createtime}" pattern="yyyy-MM-dd HH:mm:ss"/></td>
    <td>${item.detail }</td>
</tr>
</c:forEach>
</table>
</form>
</body>
</html>
(5)、创建 POJO 类,具体代码如下:
Items.java
package com.springmvc.pojo;

import java.util.Date;

public class Items {

    public Items(Integer id, String name, Float price, Date createtime, String detail) {
        super();
        this.id = id;
        this.name = name;
        this.price = price;
        this.createtime = createtime;
        this.detail = detail;
    }

    private Integer id;

    private String name;

    private Float price;

    private String pic;

    private Date createtime;

    private String detail;

    public Integer getId() {
        return id;
    }

    public void setId(Integer id) {
        this.id = id;
    }

    public String getName() {
        return name;
    }

    public void setName(String name) {
        this.name = name == null ? null : name.trim();
    }

    public Float getPrice() {
        return price;
    }

    public void setPrice(Float price) {
        this.price = price;
    }

    public String getPic() {
        return pic;
    }

    public void setPic(String pic) {
        this.pic = pic == null ? null : pic.trim();
    }

    public Date getCreatetime() {
        return createtime;
    }

    public void setCreatetime(Date createtime) {
        this.createtime = createtime;
    }

    public String getDetail() {
        return detail;
    }

    public void setDetail(String detail) {
        this.detail = detail == null ? null : detail.trim();
    }
}
(6)、创建 Controller 类,具体代码如下:
ItemController.java
package com.springmvc.controller;

import java.util.ArrayList;
import java.util.Date;
import java.util.List;

import org.springframework.stereotype.Controller;
import org.springframework.web.bind.annotation.RequestMapping;
import org.springframework.web.servlet.ModelAndView;

import com.springmvc.pojo.Items;

/**
 * 商品管理
 *
 * @author lx
 *
 */
@Controller
public class ItemController {

    @RequestMapping(value = "/itemlist.action")
    public ModelAndView itemList(){

        // 创建页面需要显示的商品数据
        List<Items> list = new ArrayList<Items>();
        list.add(new Items(1, "1华为 荣耀8", 2399f, new Date(), "质量好!1"));
        list.add(new Items(2, "2华为 荣耀8", 2399f, new Date(), "质量好!2"));
        list.add(new Items(3, "3华为 荣耀8", 2399f, new Date(), "质量好!3"));
        list.add(new Items(4, "4华为 荣耀8", 2399f, new Date(), "质量好!4"));
        list.add(new Items(5, "5华为 荣耀8", 2399f, new Date(), "质量好!5"));
        list.add(new Items(6, "6华为 荣耀8", 2399f, new Date(), "质量好!6"));

        ModelAndView mav = new ModelAndView();
        //数据
        mav.addObject("itemList", list);
        mav.setViewName("itemList");
        return mav;
    }

}
(7)、启动 Tomcat,并到浏览器地址栏测试,结果如下:
3、SpringMVC 框架访问流程图
注:部分知识源于网络,侵权联删。
关注微信公众号compassblog,后台回复 “SpringMVC系列一” 获取本项目源码
推荐阅读:
本系列后期仍会持续更新,欢迎关注!
如果你认为这篇文章有用,欢迎转发分享给你的好友!
本号文章可以任意转载,转载请注明出处!
扫描关注微信公众号,了解更多