在以前的一篇文章中我们介绍过IO模型
IO模型总结 http://www.cnblogs.com/coldridgeValley/p/5449758.html
,而在实际运用中多路复用IO使用很多,JDK早在1.4的时候就引入了NIO(new IO),今天我们来学习NIO基础组件之一的Buffer的相关原理。
Java NIO由以下几个核心部分组成:
- Buffer
- Channel
- Selector
传统的IO操作是面向数据流的,这样就意味着数据从流中读取出来直到读取完毕都是没有任何地方可以缓存的。而NIO操作面向的是缓冲区,数据从Channel中读取到Buffer缓冲区,在Buffer中处理数据,本文我们从源码角度来解析缓冲区Buffer的代码实现,从而理解其原理。
Buffer
A container for data of a specific primitive type.
A buffer is a linear, finite sequence of elements of a specific primitive type. Aside from its content, the essential properties of a buffer are its capacity, limit, and position:
A buffer's capacity is the number of elements it contains. The capacity of a buffer is never negative and never changes.
A buffer's limit is the index of the first element that should not be read or written. A buffer's limit is never negative and is never greater than its capacity.
A buffer's position is the index of the next element to be read or written. A buffer's position is never negative and is never greater than its limit.
There is one subclass of this class for each non-boolean primitive type.
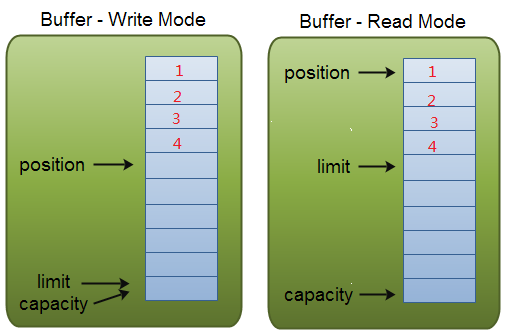
上文是JDK文档中对于Buffer的描述,简单而言就是Buffer是一个线性的,有限容量的基本数据类型容器,对于所有的非布尔型变量,都有一种buffer可以与之对应。Buffer这个容器中有几个重要的变量:
- capacity:表示buffer的容量,固定变量。
- limit:表示读写的边界位置,读写的数据不会超过此值,改值永远不大于capacity。
- position:表示下次读写开始的位置,大小永远不大于limit。
引用一幅网上流传非常广泛的图

看起来还是比较容易理解的。
Java NIO有如下常用的buffer类型:
- ByteBuffer
- CharBuffer
- DoubleBuffer
- ShortBuffer
- FloatBuffer
- IntBuffer
- LongBuffer
可以看到Buffer的类型代表不同的数据类型,也就是说Buffer中存放的数据可以是基本数据类型,MappedByteBuffer稍有不同,会单独介绍。
我们在看Buffer的源码之前先来看个Buffer的Demo
public class BufferDemoOne {

    public static void main(String[] args)throws Exception {
        testBuffer();
    }

    private static void testBuffer() throws Exception{
        RandomAccessFile file = new RandomAccessFile("/test.txt", "rw");
        FileChannel channel = file.getChannel();
        ByteBuffer buffer = ByteBuffer.allocate(1024);
        int read = channel.read(buffer);
        while (read != -1) {
            buffer.flip();
            while (buffer.hasRemaining()) {
                System.out.print((char)buffer.get());
            }
            buffer.clear();
            read = channel.read(buffer);
        }
        file.close();
    }
}
可以看到利用Buffer来读写数据基本包含四步:
- 数据写入buffer
- 调用flip()将buffer转换为读模式
- 从buffer中读取数据
- 调用buffer.clear()清空数据
ByteBuffer是我们最常用的Buffer之一,接下来我们从源码角度一步一步来分析其内部一些重要方法的实现。
put
我们正常出了使用channel向buffer中写入数据,还有其本身的put方法,put方法的重载版本很多。我们这里找最简单的放入一个byte数据看下:
 public ByteBuffer put(byte x) {
        hb[ix(nextPutIndex())] = x;
        return this;
 }
   final int nextPutIndex() {                          // package-private
        if (position >= limit)
            throw new BufferOverflowException();
        return position++;
    }
很简单,把内部的position指针累加,同时把byte数据存放在内部的byte数组中。
mark
    public final Buffer mark() {
        mark = position;
        return this;
    }
mark变量是一个ByteBuffer特有的变量,mark()方法的目的就是将position值赋给mark变量从而达到记录position的目的。
reset
    public final Buffer reset() {
        int m = mark;
        if (m < 0)
            throw new InvalidMarkException();
        position = m;
        return this;
    }
利用mark中记录下来的position进行恢复,所以叫reset
flip
   public final Buffer flip() {
        limit = position;
        position = 0;
        mark = -1;
        return this;
    }
flip的作用是将buffer的模式从写模式转换为读模式,所以我们可以看到,通过flip调用以后,buffer的limit限制到了之前写入的position,position被设置成了0,mark也被重置了。通过这样的方式可以让数据position为0的地方开始读取,并且不会超出写入的数据上限。
remaining
   public final int remaining() {
        return limit - position;
    }
对比两个变量的含义很容易就理解,remaining表示还有多少字节未读取。
hasRemaining
  public final boolean hasRemaining() {
        return position < limit;
    }
是否还有未读数据
clear
   public final Buffer clear() {
        position = 0;
        limit = capacity;
        mark = -1;
        return this;
    }
虽然clear表面意思看起来像是清除数据,但是实际上数据并没有被清除,只是相关参数被重置了。相当于buffer被创建的时候的初始状态,所以如果buffer中还存在未读取的数据,调用clear,那么数据就没法读取了。
compact
  public ByteBuffer compact() {
        System.arraycopy(hb, ix(position()), hb, ix(0), remaining());
        position(remaining());
        limit(capacity());
        discardMark();
        return this;
    }
简单看下就是把未读取的数据copy到数据起始位置,外加把相关变量重置。compact和clear区别在于:如果存在未读取的数据,那么调用clear会无法再读取数据,compact则是把剩余未读取数据复制到数组起始位置以便读取。
allocate
 public static ByteBuffer allocate(int capacity) {
        if (capacity < 0)
            throw new IllegalArgumentException();
   		//调用 HeapByteBuffer 构造函数
        return new HeapByteBuffer(capacity, capacity);
    }

  HeapByteBuffer(int cap, int lim) {            // package-private
        super(-1, 0, lim, cap, new byte[cap], 0);
        /*
        hb = new byte[cap];
        offset = 0;
        */
    }

    ByteBuffer(int mark, int pos, int lim, int cap,   // package-private
                 byte[] hb, int offset)
    {
        super(mark, pos, lim, cap);
        this.hb = hb;
        this.offset = offset;
    }

    Buffer(int mark, int pos, int lim, int cap) {       // package-private
        if (cap < 0)
            throw new IllegalArgumentException("Negative capacity: " + cap);
        this.capacity = cap;
        limit(lim);
        position(pos);
        if (mark >= 0) {
            if (mark > pos)
                throw new IllegalArgumentException("mark > position: ("
                                                   + mark + " > " + pos + ")");
            this.mark = mark;
        }
    }
allocate方法创建了一个HeapByteBuffer实例。HeapByteBuffer是ByteBuffer的一个子类,在HeapByteBuffer的构造器中调用了父类ByteBuffer的构造器,可以看到最终实际上是把ByteBuffer中每个变量赋值,同时我们也看到了在HeapByteBuffer中真正存放数据的是底层的byte数组。
allocateDirect
public static ByteBuffer allocateDirect(int capacity) {
        return new DirectByteBuffer(capacity);
    }
   // Primary constructor
    //
    DirectByteBuffer(int cap) {                   // package-private

        super(-1, 0, cap, cap);
        boolean pa = VM.isDirectMemoryPageAligned();
        int ps = Bits.pageSize();
        long size = Math.max(1L, (long)cap + (pa ? ps : 0));
        Bits.reserveMemory(size, cap);

        long base = 0;
        try {
            base = unsafe.allocateMemory(size);
        } catch (OutOfMemoryError x) {
            Bits.unreserveMemory(size, cap);
            throw x;
        }
        unsafe.setMemory(base, size, (byte) 0);
        if (pa && (base % ps != 0)) {
            // Round up to page boundary
            address = base + ps - (base & (ps - 1));
        } else {
            address = base;
        }
        cleaner = Cleaner.create(this, new Deallocator(base, size, cap));
        att = null;
    }
allocateDirect 方法创建了一个DirectByteBuffer实例。DirectByteBuffer也是ByteBuffer的一个实例,和HeapByteBuffer的区别在于,HeapByteBuffer是指在JVM堆内存中,而DirectByteBuffer是指直接内存。通过看代码可以看到,DirectByteBuffer通过unsafe.allocateMemory(size)直接申请内存,通过unsafe.setMemory(base, size, (byte) 0);将申请的内存数据清空。并且通过address变量维护指向改内存的地址。
总结:
Buffer在NIO中充当着数据容器的角色,灵活的使用其非常重要。从源码角度分析我们看到了,Buffer内部通过维护不同的变量来实现读写转换,数据的存储。所以理解这些关键变量(例如 postion mark limit capacity)基本就可以理解其所有api的使用逻辑以及场景。同时Buffer存在两个重要的子类,一个是Heap,一个是Direct 分别在不同的场景里使用。