请求传参
在某些情况下,我们爬取的数据不在同一个页面中,例如,我们爬取一个电影网站,电影的名称,评分在一级页面,而要爬取的其他电影详情在其二级子页面中。这时我们就需要用到请求传参
案例展示:爬取http://www.55xia.com电影网,将一级页面中的电影名称,名字,评分 二级页面中的导演,演员进行爬取
爬虫文件

# -*- coding: utf-8 -*-
import scrapy

from moviePro.items import MovieproItem
class MovieSpider(scrapy.Spider):
    name = 'movie'
    # allowed_domains = ['www.xxx.com']
    start_urls = ['http://www.55xia.com/']

    def parse(self, response):
        div_list = response.xpath('//div[@class="col-xs-1-5 movie-item"]')
        for div in div_list:
            item = MovieproItem()
            item['name'] = div.xpath('.//div[@class="meta"]/h1/a/text()').extract_first()
            item['score'] = div.xpath('.//div[@class="meta"]/h1/em/text()').extract_first()
            if item['score'] == None:
                item['score'] = '0'
            detail_url = 'https:'+div.xpath('.//div[@class="meta"]/h1/a/@href').extract_first()

            #对详情页的url发请求
            #使用meta参数实现请求传参
            yield scrapy.Request(url=detail_url,callback=self.getDetailPage,meta={'item':item})

    def getDetailPage(self,response):
        item = response.meta['item']
        deactor = response.xpath('/html/body/div[1]/div/div/div[1]/div[1]/div[2]/table/tbody/tr[1]/td[2]/a/text()').extract_first()
        desc = response.xpath('/html/body/div[1]/div/div/div[1]/div[2]/div[2]/p/text()').extract_first()
        item['desc'] = desc
        item['deactor'] =deactor

        yield item


        #总结:当使用scrapy进行数据爬取的时候,如果发现爬取的数据值没有在同一张页面中进行存储.则必须使用请求传参进行处理(持久化)

import scrapy


class MovieproItem(scrapy.Item):
    # define the fields for your item here like:
    # name = scrapy.Field()
    name = scrapy.Field()
    score = scrapy.Field()
    deactor = scrapy.Field()
    desc = scrapy.Field()

class MovieproPipeline(object):
    fp = None

    def open_spider(self, spider):
        self.fp = open('./movie.txt', 'w', encoding='utf-8')

    def process_item(self, item, spider):
        self.fp.write(item['name'] + ':' + item['score'] + ':' + item['deactor'] + ':' + item['desc'] + '
')
        return item

    def close_spider(self, spider):
        self.fp.close()

# UA
USER_AGENT = 'Mozilla/5.0 (Windows NT 6.1; Win64; x64) AppleWebKit/537.36 (KHTML, like Gecko) Chrome/71.0.3578.98 Safari/537.36'


ROBOTSTXT_OBEY = False
#管道
ITEM_PIPELINES = {
   'moviePro.pipelines.MovieproPipeline': 300,
}
提升爬虫效率
1.增加并发:
    默认scrapy开启的并发线程为32个,可以适当进行增加。在settings配置文件中修改CONCURRENT_REQUESTS = 100值为100,并发设置成了为100。

2.降低日志级别:
    在运行scrapy时,会有大量日志信息的输出,为了减少CPU的使用率。可以设置log输出信息为INFO或者ERROR即可。在配置文件中编写:LOG_LEVEL = ‘INFO’

禁止cookie:
    如果不是真的需要cookie,则在scrapy爬取数据时可以进制cookie从而减少CPU的使用率,提升爬取效率。在配置文件中编写:COOKIES_ENABLED = False

禁止重试:
    对失败的HTTP进行重新请求(重试)会减慢爬取速度,因此可以禁止重试。在配置文件中编写:RETRY_ENABLED = False

减少下载超时:
    如果对一个非常慢的链接进行爬取,减少下载超时可以能让卡住的链接快速被放弃,从而提升效率。在配置文件中进行编写:DOWNLOAD_TIMEOUT = 10 超时时间为10s
爬取彼岸图网示例
爬虫程序

# -*- coding: utf-8 -*-
import scrapy
from picPro.items import PicproItem


class PicSpider(scrapy.Spider):
    name = 'pic'
    # allowed_domains = ['www.xxx.com']
    start_urls = ['http://pic.netbian.com/']

    def parse(self, response):
        li_list = response.xpath('//div[@class="slist"]/ul/li')  # 获取图片的列表
        for li in li_list:
            img_url = 'http://pic.netbian.com' + li.xpath('./a/span/img/@src').extract_first()  # 获取图片地址
            img_name = img_url.split('/')[-1]  # 获取图片名字
            item = PicproItem()
            item['name'] = img_name

            yield scrapy.Request(url=img_url, callback=self.getImgData, meta={'item': item})

    def getImgData(self, response):
        item = response.meta['item']
        item['img_data'] = response.body

        yield item
管道文件

import os


class PicproPipeline(object):
    def open_spider(self, spider):
        if not os.path.exists('picLib'):
            os.mkdir('./picLib')

    def process_item(self, item, spider):
        imgPath = './picLib/' + item['name']
        with open(imgPath, 'wb') as fp:
            fp.write(item['img_data'])
            print(imgPath + '下载成功!')
        return item
items

import scrapy


class PicproItem(scrapy.Item):
    # define the fields for your item here like:
    # name = scrapy.Field()
    name = scrapy.Field()
    img_data = scrapy.Field()
settings文件

ROBOTSTXT_OBEY = False
USER_AGENT = 'Mozilla/5.0 (Windows NT 6.1; Win64; x64) AppleWebKit/537.36 (KHTML, like Gecko) Chrome/71.0.3578.98 Safari/537.36'
CONCURRENT_REQUESTS = 30  # 设置连接数
LOG_LEVEL = 'ERROR'  # 降低日志级别
COOKIES_ENABLED = False  # 禁止cookies
RETRY_ENABLED = False  # 禁止重试
DOWNLOAD_TIMEOUT = 5  # 下载超时时间
UA池和ip代理池
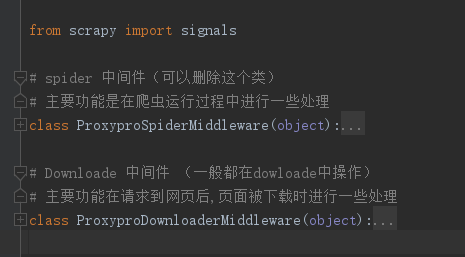
首先先要看下medmiddlewaresy文件
主要是两类

Spider Middleware
主要功能是在爬虫运行过程中进行一些处理 一般不用
- process_spider_input 接收一个response对象并处理,
位置是Downloader-->process_spider_input-->Spiders(Downloader和Spiders是scrapy官方结构图中的组件)
- process_spider_exception spider出现的异常时被调用
- process_spider_output 当Spider处理response返回result时,该方法被调用
- process_start_requests 当spider发出请求时,被调用
位置是Spiders-->process_start_requests-->Scrapy Engine(Scrapy Engine是scrapy官方结构图中的组件)
Downloader Middleware
主要功能在请求到网页后,页面被下载时进行一些处理
使用
添加UA池和ip池就在 ProxyproDownloaderMiddleware 类中 process_request 方法中添加就可以
class ProxyproDownloaderMiddleware(object):
    # Not all methods need to be defined. If a method is not defined,
    # scrapy acts as if the downloader middleware does not modify the
    # passed objects.
    # 拦截请求:request参数就是拦截到的请求
   # 添加  http池 和https池
    PROXY_http = [
        '58.45.195.51:9000',
        '111.230.113.238:9999',
    ]
    PROXY_https = [
        '120.83.49.90:9000',
        '106.14.162.110:8080',
    ]
    # 添加 ua池
    user_agent_list = [
        "Mozilla/5.0 (Windows NT 6.1; WOW64) AppleWebKit/537.1 "
        "(KHTML, like Gecko) Chrome/22.0.1207.1 Safari/537.1",
        "Mozilla/5.0 (X11; CrOS i686 2268.111.0) AppleWebKit/536.11 "
        "(KHTML, like Gecko) Chrome/20.0.1132.57 Safari/536.11",
        "Mozilla/5.0 (Windows NT 6.1; WOW64) AppleWebKit/536.6 "
        "(KHTML, like Gecko) Chrome/20.0.1092.0 Safari/536.6",
        "Mozilla/5.0 (Windows NT 6.2) AppleWebKit/536.6 "
        "(KHTML, like Gecko) Chrome/20.0.1090.0 Safari/536.6",
        "Mozilla/5.0 (Windows NT 6.2; WOW64) AppleWebKit/537.1 "
        "(KHTML, like Gecko) Chrome/19.77.34.5 Safari/537.1",
        "Mozilla/5.0 (X11; Linux x86_64) AppleWebKit/536.5 "
        "(KHTML, like Gecko) Chrome/19.0.1084.9 Safari/536.5",
        "Mozilla/5.0 (Windows NT 6.0) AppleWebKit/536.5 "
        "(KHTML, like Gecko) Chrome/19.0.1084.36 Safari/536.5",
        "Mozilla/5.0 (Windows NT 6.1; WOW64) AppleWebKit/536.3 "
        "(KHTML, like Gecko) Chrome/19.0.1063.0 Safari/536.3",
        "Mozilla/5.0 (Windows NT 5.1) AppleWebKit/536.3 "
        "(KHTML, like Gecko) Chrome/19.0.1063.0 Safari/536.3",
        "Mozilla/5.0 (Macintosh; Intel Mac OS X 10_8_0) AppleWebKit/536.3 "
        "(KHTML, like Gecko) Chrome/19.0.1063.0 Safari/536.3",
        "Mozilla/5.0 (Windows NT 6.2) AppleWebKit/536.3 "
        "(KHTML, like Gecko) Chrome/19.0.1062.0 Safari/536.3",
        "Mozilla/5.0 (Windows NT 6.1; WOW64) AppleWebKit/536.3 "
        "(KHTML, like Gecko) Chrome/19.0.1062.0 Safari/536.3",
        "Mozilla/5.0 (Windows NT 6.2) AppleWebKit/536.3 "
        "(KHTML, like Gecko) Chrome/19.0.1061.1 Safari/536.3",
        "Mozilla/5.0 (Windows NT 6.1; WOW64) AppleWebKit/536.3 "
        "(KHTML, like Gecko) Chrome/19.0.1061.1 Safari/536.3",
        "Mozilla/5.0 (Windows NT 6.1) AppleWebKit/536.3 "
        "(KHTML, like Gecko) Chrome/19.0.1061.1 Safari/536.3",
        "Mozilla/5.0 (Windows NT 6.2) AppleWebKit/536.3 "
        "(KHTML, like Gecko) Chrome/19.0.1061.0 Safari/536.3",
        "Mozilla/5.0 (X11; Linux x86_64) AppleWebKit/535.24 "
        "(KHTML, like Gecko) Chrome/19.0.1055.1 Safari/535.24",
        "Mozilla/5.0 (Windows NT 6.2; WOW64) AppleWebKit/535.24 "
        "(KHTML, like Gecko) Chrome/19.0.1055.1 Safari/535.24"
    ]


    def process_request(self, request, spider):
        # Called for each request that goes through the downloader
        # middleware.

        # Must either:
        # - return None: continue processing this request
        # - or return a Response object
        # - or return a Request object
        # - or raise IgnoreRequest: process_exception() methods of
        #   installed downloader middleware will be called

        # 使用随机ip
        print('下载中间件', request)
        if request.url.split(':')[0] == 'http':  # 如果使用的是网站开头是http的
            request.meta['proxy'] = random.choice(self.PROXY_http)
        else:
            request.meta['proxy'] = random.choice(self.PROXY_https)

        # 使用随机UA伪装
        request.headers['User-Agent'] = random.choice(self.user_agent_list)

        print(request.headers['User-Agent'])
        return None
注意 一定开启settings的 !!!
# 开启下载中间件
DOWNLOADER_MIDDLEWARES = {
   'proxyPro.middlewares.ProxyproDownloaderMiddleware': 543,
}
