[root@RHEL5-1 ~]# fdisk /dev/sdb //格式化/dev/sdb
Device contains neither a valid DOS partition table, nor Sun, SGI or OSF disklabel
Building a new DOS disklabel. Changes will remain in memory only,
until you decide to write them. After that, of course, the previous
content won't be recoverable.
Command action
e extended
p primary partition (1-4)
p //创建主分区
Partition number (1-4): 1 //分区号为1
First cylinder (1-130, default 1): //设置分区大小
Using default value 1
Last cylinder or +size or +sizeM or +sizeK (1-130, default 130):
Using default value 130
Selected partition 1
Hex code (type L to list codes): fd //设置系统HEX为fd,即raid模式
Changed system type of partition 1 to fd (Linux raid autodetect)
The partition table has been altered!
Syncing disks.
[root@RHEL5-1 ~]# fdisk /dev/sdc //格式化/dev/sdc
Building a new DOS disklabel. Changes will remain in memory only,
until you decide to write them. After that, of course, the previous
content won't be recoverable.
Command action
e extended
p primary partition (1-4)
p
Partition number (1-4): 1
First cylinder (1-130, default 1):
Using default value 1
Last cylinder or +size or +sizeM or +sizeK (1-130, default 130):
Using default value 130
Selected partition 1
Hex code (type L to list codes): fd
Changed system type of partition 1 to fd (Linux raid autodetect)
The partition table has been altered!
Syncing disks.
[root@RHEL5-1 ~]# fdisk /dev/sdd //格式化/dev/sdd
Device contains neither a valid DOS partition table, nor Sun, SGI or OSF disklabel
Building a new DOS disklabel. Changes will remain in memory only,
until you decide to write them. After that, of course, the previous
content won't be recoverable.
Command action
e extended
p primary partition (1-4)
p
Partition number (1-4): 1
First cylinder (1-130, default 1):
Using default value 1
Last cylinder or +size or +sizeM or +sizeK (1-130, default 130):
Using default value 130
Selected partition 1
Hex code (type L to list codes): fd
Changed system type of partition 1 to fd (Linux raid autodetect)
The partition table has been altered!
Syncing disks.
[root@RHEL5-1 ~]# fdisk -l //查看分区情况
255 heads, 63 sectors/track, 1044 cylinders
Units = cylinders of 16065 * 512 = 8225280 bytes
/dev/sda1 * 1 13 104391 83 Linux
/dev/sda2 14 268 2048287+ 83 Linux
/dev/sda3 269 395 1020127+ 83 Linux
/dev/sda4 396 1044 5213092+ 5 Extended
/dev/sda5 396 522 1020096 82 Linux swap / Solaris
/dev/sda6 523 1044 4192933+ 83 Linux
255 heads, 63 sectors/track, 130 cylinders
Units = cylinders of 16065 * 512 = 8225280 bytes
/dev/sdb1 1 130 1044193+ fd Linux raid autodetect
255 heads, 63 sectors/track, 130 cylinders
Units = cylinders of 16065 * 512 = 8225280 bytes
/dev/sdc1 1 130 1044193+ fd Linux raid autodetect
255 heads, 63 sectors/track, 130 cylinders
Units = cylinders of 16065 * 512 = 8225280 bytes
/dev/sdd1 1 130 1044193+ fd Linux raid autodetect
[root@RHEL5-1 ~]# mdadm --create /dev/md0 --level=5 --raid-device=3 /dev/sdb1 /d
ev/sdc1 /dev/sdd1 //创建raid5,/dev/md0阵列设备名,level=5阵列模式raid5,raid-device=3raid有3块硬盘
mdadm: array /dev/md0 started.
[root@RHEL5-1 ~]# cat /proc/mdstat //查看数据同步情况
Personalities : [raid6] [raid5] [raid4]
md0 : active raid5 sdd1[3] sdc1[1] sdb1[0]
2088192 blocks level 5, 64k chunk, algorithm 2 [3/2] [UU_]
[========>............] recovery = 40.0% (419060/1044096) finish=1.4min speed=7423K/sec
unused devices: <none>
[root@RHEL5-1 ~]# cat /proc/mdstat //看到这个说明同步结束
Personalities : [raid6] [raid5] [raid4]
md0 : active raid5 sdd1[2] sdc1[1] sdb1[0]
2088192 blocks level 5, 64k chunk, algorithm 2 [3/3] [UUU]
unused devices: <none>
[root@RHEL5-1 ~]# tail /var/log/messages //查看系统日志
Jun 1 11:34:10 RHEL5-1 kernel: md: syncing RAID array md0
Jun 1 11:34:13 RHEL5-1 kernel: md: minimum _guaranteed_ reconstruction speed: 1000 KB/sec/disc.
Jun 1 11:34:15 RHEL5-1 kernel: md: using maximum available idle IO bandwidth (but not more than 200000 KB/sec) for reconstruction.
Jun 1 11:34:19 RHEL5-1 kernel: md: using 128k window, over a total of 1044096 blocks.
Jun 1 11:36:01 RHEL5-1 kernel: md: md0: sync done.
Jun 1 11:36:01 RHEL5-1 kernel: RAID5 conf printout:
Jun 1 11:36:01 RHEL5-1 kernel: --- rd:3 wd:3 fd:0
Jun 1 11:36:01 RHEL5-1 kernel: disk 0, o:1, dev:sdb1
Jun 1 11:36:01 RHEL5-1 kernel: disk 1, o:1, dev:sdc1
Jun 1 11:36:01 RHEL5-1 kernel: disk 2, o:1, dev:sdd1
[root@RHEL5-1 ~]# echo device /dev/sdb1 /dev/sdc1 /dev/sdd1 > /etc/mdadm.conf
[root@RHEL5-1 ~]# mdadm --detail --scan >> /etc/mdadm.conf
[root@RHEL5-1 ~]# cat /etc/mdadm.conf
device /dev/sdb1 /dev/sdc1 /dev/sdd1
ARRAY /dev/md0 level=raid5 num-devices=3 UUID=36f261b7:4899a54c:9edf36d1:9eb86529
[root@RHEL5-1 ~]# mdadm -S /dev/md0 //停止阵列
mdadm: stopped /dev/md0
[root@RHEL5-1 ~]# mdadm -As /dev/md0 //启动阵列
mdadm: /dev/md0 has been started with 3 drives.
[root@RHEL5-1 ~]# pvcreate /dev/md0 //建立PV
Physical volume "/dev/md0" successfully created
[root@RHEL5-1 ~]# vgcreate lvm1 /dev/md0 //建立VG
Volume group "lvm1" successfully created
[root@RHEL5-1 ~]# vgdisplay //查看VG
--- Volume group ---
VG Name lvm1
System ID
Format lvm2
Metadata Areas 1
Metadata Sequence No 1
VG Access read/write
VG Status resizable
MAX LV 0
Cur LV 0
Open LV 0
Max PV 0
Cur PV 1
Act PV 1
VG Size 1.99 GB
PE Size 4.00 MB
Total PE 509
Alloc PE / Size 0 / 0
Free PE / Size 509 / 1.99 GB
VG UUID h7d74U-S38z-rQrw-ecGG-ePlg-48b5-87sbC1
[root@RHEL5-1 ~]# lvcreate -L 500m -n web1 lvm1 //建立LV ,名为web1,大小为500M
Logical volume "web1" created
[root@RHEL5-1 ~]# lvcreate -L 500m -n web2 lvm1 //建立LV ,名为web2,大小为500M
Logical volume "web2" created
[root@RHEL5-1 ~]# mke2fs -j /dev/lvm1/web1 //格式化web1
mke2fs 1.39 (29-May-2006)
Filesystem label=
OS type: Linux
Block size=1024 (log=0)
Fragment size=1024 (log=0)
128016 inodes, 512000 blocks
25600 blocks (5.00%) reserved for the super user
First data block=1
Maximum filesystem blocks=67633152
63 block groups
8192 blocks per group, 8192 fragments per group
2032 inodes per group
Superblock backups stored on blocks:
8193, 24577, 40961, 57345, 73729, 204801, 221185, 401409
Creating journal (8192 blocks): done
Writing superblocks and filesystem accounting information: done
180 days, whichever comes first. Use tune2fs -c or -i to override.
[root@RHEL5-1 ~]# mke2fs -j /dev/lvm1/web2 //格式化web1
mke2fs 1.39 (29-May-2006)
Filesystem label=
OS type: Linux
Block size=1024 (log=0)
Fragment size=1024 (log=0)
128016 inodes, 512000 blocks
25600 blocks (5.00%) reserved for the super user
First data block=1
Maximum filesystem blocks=67633152
63 block groups
8192 blocks per group, 8192 fragments per group
2032 inodes per group
Superblock backups stored on blocks:
8193, 24577, 40961, 57345, 73729, 204801, 221185, 401409
Creating journal (8192 blocks): done
Writing superblocks and filesystem accounting information: done
180 days, whichever comes first. Use tune2fs -c or -i to override.
[root@RHEL5-1 ~]# mkdir /web1
[root@RHEL5-1 ~]# mkdir /web2
[root@RHEL5-1 ~]# mount /dev/lvm1/web1 /web1 //挂载
[root@RHEL5-1 ~]# mount /dev/lvm1/web2 /web2
[root@RHEL5-1 ~]# vi /etc/fstab //编辑/etc/fstab,让系统启动时自动挂载
LABEL=/ / ext3 defaults 1 1
LABEL=/var /var ext3 defaults 1 2
LABEL=/tmp /tmp ext3 defaults 1 2
LABEL=/boot /boot ext3 defaults 1 2
tmpfs /dev/shm tmpfs defaults 0 0
devpts /dev/pts devpts gid=5,mode=620 0 0
sysfs /sys sysfs defaults 0 0
proc /proc proc defaults 0 0
LABEL=SWAP-sda5 swap swap defaults 0 0
/dev/lvm1/web1 /web1 ext3 defaults 0 0
/dev/lvm1/web2 /web2 ext3 defaults 0 0
[root@RHEL5-1 ~]# reboot
[root@RHEL5-1 ~]# df -h /web1
Filesystem Size Used Avail Use% Mounted on
/dev/mapper/lvm1-web1
485M 11M 449M 3% /web1
[root@RHEL5-1 ~]# pvdisplay
--- Physical volume ---
PV Name /dev/md0
VG Name lvm1
PV Size 1.99 GB / not usable 3.25 MB
Allocatable yes
PE Size (KByte) 4096
Total PE 509
Free PE 259
Allocated PE 250
PV UUID HSyAfx-Qxdv-b6id-01sZ-eRVC-HWAj-By3ctA
3模拟故障
[root@RHEL5-1 ~]# mdadm /dev/md0 -f /dev/sdc1 //标记/dev/sdc1为故障盘
mdadm: set /dev/sdc1 faulty in /dev/md0
[root@RHEL5-1 ~]# more /proc/mdstat
Personalities : [raid6] [raid5] [raid4]
md0 : active raid5 sdd1[2] sdc1[3](F) sdb1[0] //[F]表示为故障盘
2088192 blocks level 5, 64k chunk, algorithm 2 [3/2] [U_U]
unused devices: <none>
[root@RHEL5-1 ~]# mdadm /dev/md0 -r /dev/sdc1 //移除故障盘
mdadm: hot removed /dev/sdc1
[root@RHEL5-1 ~]# more /proc/mdstat //查看阵列情况
Personalities : [raid6] [raid5] [raid4]
md0 : active raid5 sdd1[2] sdb1[0]
2088192 blocks level 5, 64k chunk, algorithm 2 [3/2] [U_U]
unused devices: <none>
[root@RHEL5-1 ~]# pvdisplay /dev/md0 //查看PV情况,发现容量没减少
--- Physical volume ---
PV Name /dev/md0
VG Name lvm1
PV Size 1.99 GB / not usable 3.25 MB
Allocatable yes
PE Size (KByte) 4096
Total PE 509
Free PE 259
Allocated PE 250
PV UUID HSyAfx-Qxdv-b6id-01sZ-eRVC-HWAj-By3ctA
[root@RHEL5-1 ~]# fdisk /dev/sdc //重新格式化sdc,重新添加进阵列
Command action
e extended
p primary partition (1-4)
p
Partition number (1-4): 1
Partition 1 is already defined. Delete it before re-adding it.
Selected partition 1
Hex code (type L to list codes): fd
The partition table has been altered!
Syncing disks.
[root@RHEL5-1 ~]# mdadm /dev/md0 -a /dev/sdc1 //增加
mdadm: re-added /dev/sdc1
[root@RHEL5-1 ~]# more /proc/mdstat //开始同步数据
Personalities : [raid6] [raid5] [raid4]
md0 : active raid5 sdc1[1] sdd1[2] sdb1[0]
2088192 blocks level 5, 64k chunk, algorithm 2 [3/2] [U_U]
[==>..................] recovery = 12.2% (128796/1044096) finish=2.1min s
peed=7155K/sec
unused devices: <none>
[root@RHEL5-1 ~]# pvdisplay
--- Physical volume ---
PV Name /dev/md0
VG Name lvm1
PV Size 1.99 GB / not usable 3.25 MB
Allocatable yes
PE Size (KByte) 4096
Total PE 509
Free PE 259
Allocated PE 250
PV UUID HSyAfx-Qxdv-b6id-01sZ-eRVC-HWAj-By3ctA
[root@RHEL5-1 ~]# vgdisplay lvm1
--- Volume group ---
VG Name lvm1
System ID
Format lvm2
Metadata Areas 1
Metadata Sequence No 3
VG Access read/write
VG Status resizable
MAX LV 0
Cur LV 2
Open LV 2
Max PV 0
Cur PV 1
Act PV 1
VG Size 1.99 GB
PE Size 4.00 MB
Total PE 509
Alloc PE / Size 250 / 1000.00 MB
Free PE / Size 259 / 1.01 GB
VG UUID h7d74U-S38z-rQrw-ecGG-ePlg-48b5-87sbC1
[root@RHEL5-1 ~]# df -h /web1
Filesystem Size Used Avail Use% Mounted on
/dev/mapper/lvm1-web1
485M 11M 449M 3% /web1
[root@RHEL5-1 ~]# lvextend -L +50M /dev/lvm1/web1 //增加web1 50M
Rounding up size to full physical extent 52.00 MB
Extending logical volume web1 to 552.00 MB
Logical volume web1 successfully resized
[root@RHEL5-1 ~]# resize2fs /dev/lvm1/web1 //刷新
resize2fs 1.39 (29-May-2006)
Filesystem at /dev/lvm1/web1 is mounted on /web1; on-line resizing required
Performing an on-line resize of /dev/lvm1/web1 to 565248 (1k) blocks.
The filesystem on /dev/lvm1/web1 is now 565248 blocks long.
[root@RHEL5-1 ~]# df -h /web1 //查看
Filesystem Size Used Avail Use% Mounted on
/dev/mapper/lvm1-web1
NIS+NFS+AUTHCONFIG+AUTOFS实现自动挂载NIS宿主目录到客户机
一、在NIS服务器上共享NIS用户主目录
1.创建用户及NIS用户主目录
建议在NIS服务器上建立独立的目录存放NIS帐号信息,如果保持默认设置则客户端挂载NIS主目录到/home目录时会覆盖原有用户主目录而导致其他异常错误;
我们现在建立/nishome存放NIS用户的主目录并使用useradd -d将NIS帐号的主目录指向/nishome,如果己有帐号可以使用usermod -d变更主目录。
-
[root@master /]# mkdir nishome
-
[root@master /]# mkdir nishome/nisuser1
-
[root@master /]# usermod -d /nishome/nisuser1/ nisuser1
-
[root@master /]# useradd -d /nishome/nisuser2 nisuser2
-
[root@master /]# ls nishome/
- nisuser1 nisuser2
2.重新生成NIS数据库并重启ypserv和yppasswd服务
# /usr/lib/yp/ypinit -m
# service ypserv restart
# service yppasswdd
restart
3.共享用户主目录
-
# vim /etc/exports
-
/nishome/nisuser1 *(rw)
- /nishome/nisuser2 *(rw)
4.重启NFS服务
-
[root@master /]# service nfs restart
-
Shutting down NFS mountd: [ OK ]
-
Shutting down NFS daemon: [ OK ]
-
Shutting down NFS quotas: [ OK ]
-
Shutting down NFS services: [ OK ]
-
Starting NFS services: [ OK ]
-
Starting NFS quotas: [ OK ]
-
Starting NFS daemon: [ OK ]
-
Starting NFS mountd: [ OK ]
-
Stopping RPC idmapd: [ OK ]
- Starting RPC idmapd: [ OK ]
二、客户端配置NIS验证及Autofs
1.检测主/从NIS服务器相应服务是否正常开启
-
[root@client01 ~]# rpcinfo -p master.abcnis
-
program vers proto port
-
100000 2 tcp 111 portmapper
-
100000 2 udp 111 portmapper
-
100024 1 udp 952 status
-
100024 1 tcp 955 status
-
100004 2 udp 682 ypserv
-
100004 1 udp 682 ypserv
-
100004 2 tcp 685 ypserv
-
100004 1 tcp 685 ypserv
-
100009 1 udp 699 yppasswdd
-
100011 1 udp 781 rquotad
-
100011 2 udp 781 rquotad
-
100011 1 tcp 784 rquotad
-
100011 2 tcp 784 rquotad
-
100003 2 udp 2049 nfs
-
100003 3 udp 2049 nfs
-
100003 4 udp 2049 nfs
-
100021 1 udp 49642 nlockmgr
-
100021 3 udp 49642 nlockmgr
-
100021 4 udp 49642 nlockmgr
-
100003 2 tcp 2049 nfs
-
100003 3 tcp 2049 nfs
-
100003 4 tcp 2049 nfs
-
100021 1 tcp 57392 nlockmgr
-
100021 3 tcp 57392 nlockmgr
-
100021 4 tcp 57392 nlockmgr
-
100005 1 udp 796 mountd
-
100005 1 tcp 799 mountd
-
100005 2 udp 796 mountd
-
100005 2 tcp 799 mountd
-
100005 3 udp 796 mountd
- 100005 3 tcp 799 mountd
2.Authconfig启用NIS验证
执行setup(或者authconfig-tui命令)
3.修改Autofs主配置文件
- vim /etc/auto.master
- # Sample auto.master file
- # This is an automounter map and it has the following format
- # key [ -mount-options-separated-by-comma ] location
- # For details of the format look at autofs(5).
- #/misc /etc/auto.misc
- # NOTE: mounts done from a hosts map will be mounted with the
- # "nosuid" and "nodev" options unless the "suid" and "dev"
- # options are explicitly given.
- #
- /net -hosts
- /nishome /etc/auto.nishome
- #nishome是客户端要挂载的目录;auto.nishome是Autofs客户端配置文件;
- # Include central master map if it can be found using
- # nsswitch sources.
- # Note that if there are entries for /net or /misc (as
- # above) in the included master map any keys that are th
- # same will not be seen as the first read key seen takes
- # precedence.
-
+auto.master
4.创建NIS自动挂载配置文件
-
[root@client01 ~]# touch /etc/auto.nishome
-
-
[root@client01 ~]# vim /etc/auto.nishome
-
* -fstype=nfs master.abcnis:/nishome/&
-
# Autofs挂载目录支持通配符 * ;
- # 网络路径中的用户名使用 & 表示;
5.重启Autofs服务
# service autofs restart
可以看到重启Autofs服务后客户端自动创建了/nishome目录!
三、客户端测试
注意如果使用su命令在NIS客户端切换到NIS用户时,在第一次可能会报无法定位到用户家目录的错误,没有关系,退出第二次再使用时就会正常。
- [root@client01 ~]# su nisuser1
-
[nisuser1@client01 root]$ pwd
-
/root
-
[nisuser1@client01 root]$ cd
-
[nisuser1@client01 nisuser1]$ pwd
-
/nishome/nisuser1
-
[nisuser1@client01 nisuser1]$
selinux
关闭防火墙

SELINUX=disabled
可以是三种状态
# enforcing - SELinux security policy is enforced.打开
# permissive - SELinux prints warnings instead of enforcing.打开不拦截
# disabled - No SELinux policy is loaded.关闭,默认
selinux在打开状态下,可以使用下面两个命令
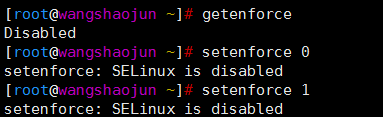
第一个命令是查询selinux的状态,处于关闭状态。
第二个命令是临时关闭。
第三个命令是临时打开。
永久打开或关闭就修改上面的那个配置文件。vim /etc/selinux/config
重启生效。
也可以临时打开或关闭,下次开机就生效了。
////////////////////////////////////////////////////////////////////////////////////////////
总结:如果了解selinux就打开,否则关闭。。