nginx四层负载均衡配置
本次测试用到三台服务器:
A服务器ip: 192.168.100.167(四层负载均衡)
B服务器ip: 192.168.100.166
C服务器ip: 192.168.100.165
1 A服务器
1.1 编译安装nginx
nginx在1.9.0的时候,增加了一个 stream 模块,用来实现四层协议(网络层和传输层)的转发、代理、负载均衡等。stream模块的用法跟http的用法类似,允许我们配置一组TCP或者UDP等协议的监听,然后通过proxy_pass来转发我们的请求,通过upstream添加多个后端服务,实现负载均衡。(该模块默认没有启用,需要编译时添加上)
useradd -M -s /sbin/nologin nginx
wget http://nginx.org/download/nginx-1.18.0.tar.gz
tar xf nginx-1.18.0.tar.gz
cd nginx-1.18.0/
./configure --prefix=/usr/local/nginx --user=nginx --group=nginx --with-http_ssl_module --with-http_v2_module --with-http_gzip_static_module --with-http_stub_status_module --with-stream
make && make install
[root@node07 nginx-1.18.0]# ls /usr/local/nginx/
conf html logs sbin
ln -s /usr/local/nginx/sbin/nginx /usr/local/sbin/ ##优化执行路径
nginx -V

1.2 修改配置文件
cd /usr/local/nginx/conf/
cp nginx.conf nginx.conf.bak
>nginx.conf #清空配置文件
[root@node07 ~]# cat /usr/local/nginx/conf/nginx.conf #将下面的配置复制进去
user nginx nginx;
worker_processes auto;
error_log logs/error.log;
#error_log logs/error.log notice;
#error_log logs/error.log info;
#pid logs/nginx.pid;
events {
use epoll;
worker_connections 1024;
}
stream {
upstream web_server {
server 192.168.100.165:80 max_fails=2 fail_timeout=10s weight=1;
server 192.168.100.166:80 max_fails=2 fail_timeout=10s weight=1;
least_conn;
}
server {
#监听端口,默认使用的是tcp协议,如果需要UDP协议,则配置成listen 3307 udp;
listen 80;
#失败重试
proxy_next_upstream on;
proxy_next_upstream_timeout 0;
proxy_next_upstream_tries 0;
#超时配置
#配置与上游服务器连接超时时间,默认60s
proxy_connect_timeout 1s;
#配置与客户端上游服务器连接的两次成功读/写操作的超时时间,如果超时,将自动断开连接
#即连接存活时间,通过它可以释放不活跃的连接,默认10分钟
proxy_timeout 1m;
#限速配置
#从客户端读数据的速率,单位为每秒字节数,默认为0,不限速
proxy_upload_rate 0;
#从上游服务器读数据的速率,单位为每秒字节数,默认为0,不限速
proxy_download_rate 0;
#上游服务器
proxy_pass web_server;
}
}
[root@node07 ~]# nginx -t #检查配置文件
nginx: the configuration file /usr/local/nginx/conf/nginx.conf syntax is ok
nginx: configuration file /usr/local/nginx/conf/nginx.conf test is successful
[root@node07 ~]# nginx #启动
2 B和C服务器
yum -y install httpd #随便安装个web即可,测试使用
[root@node06 ~]# echo "166-httpd" >/var/www/html/index.html
[root@node06 ~]# systemctl start httpd
yum -y install httpd
[root@node05 ~]# echo "165-httpd" >/var/www/html/index.html
[root@node05 ~]# systemctl start httpd
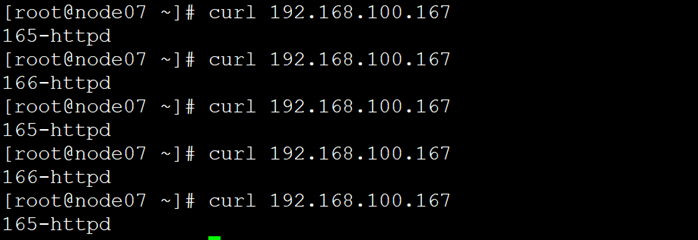
#访问测试