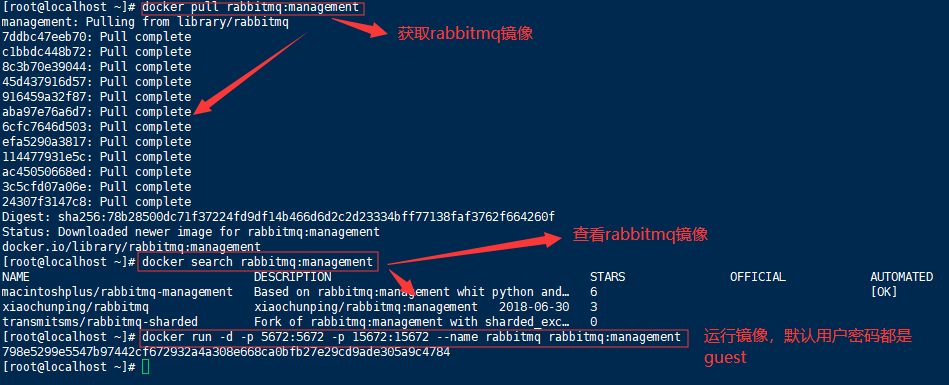
Docker安装
注意获取镜像的时候要获取management版本的,不要获取last版本的,management版本的才带有管理界面
获取rabbitmq镜像
docker pull rabbitmq:management
查看rabbitmq镜像
docker search rabbitmq:management
运行rabbitmq镜像
#方式一:默认guest用户,密码也是guest
   docker run -d -p 5672:5672 -p 15672:15672 --name rabbitmq rabbitmq:management
   # 进入容器执行命令
   docker container exec -it rabbitmq  bash


#方式二:设置用户名和密码
   docker run -d
     --name my-rabbitmq
     -p 5672:5672 -p 15672:15672
     -v /data:/var/lib/rabbitmq
     --hostname my-rabbitmq-host
     -e RABBITMQ_DEFAULT_VHOST=my_vhost
     -e RABBITMQ_DEFAULT_USER=admin
     -e RABBITMQ_DEFAULT_PASS=admin
     --restart=always
     rabbitmq:management
参数说明:
  -d:后台运行容器
   -name:指定容器名
   -p:指定服务运行的端口(5672:应用访问端口;15672:控制台Web端口号)
   -v:映射目录或文件,启动了一个数据卷容器,数据卷路径为:/var/lib/rabbitmq,再将此数据卷映射到住宿主机的/data目录
   --hostname:主机名(RabbitMQ的一个重要注意事项是它根据所谓的 “节点名称” 存储数据,默认为主机名)
   -e:指定环境变量;(RABBITMQ_DEFAULT_VHOST:默认虚拟机名;RABBITMQ_DEFAULT_USER:默认的用户名;RABBITMQ_DEFAULT_PASS:默认用户名的密码)
   --restart=always:当Docker重启时,容器能自动启动
   rabbitmq:management:镜像名

   注1:RABBITMQ_DEFAULT_VHOST=my_vhost,my_vhost名字请记好,在之后的编程中要用到,
        如果启动时没指定,默认值为/
常用操作命令
命令行与管控台-基础操作
rabbitmqctl stop_app:关闭应用
rabbitmqctl start_app:启动应用
rabbitmqctl status:节点状态
rabbitmqctl add_user username password:添加用户
rabbitmqctl list_users:列出所有用户
rabbitmqctl delete_user username:删除用户
rabbitmqctl clear_permissions -p vhostpath username:清除用户权限
rabbitmqctl list_user_permissions username:列出用户权限
rabbitmqctl change_password username newpassword:修改密码
rabbitmqctl set_permissions -p vhostpath username “.*” “.*” “.*”
rabbitmqctl add_vhost vhostpath:创建虚拟主机
rabbitmqctl list_vhosts:列出所有虚拟主机
rabbitmqctl list_permissions -p vhostpath:列出虚拟主机上所有权限
rabbitmqctl delete_vhost vhostpath:删除虚拟主机
rabbitmqctl list_queues:查看所有队列信息
rabbitmqctl -p vhostpath purge_queue blue:清除队列里的消息
命令行与管控台-高级操作
rabbitmqctl reset:移除所有数据,要在rabbitmqctl stop_app之后使用
rabbitmqctl join_cluster <clustermode> [--ram]:组成集群命令
rabbitmqctl cluster_status:查看集群状态
rabbitmqctl change_cluster_node_type disc | ram:修改集群节点的存储形式
rabbitmqctl forget_cluster_node {--offline} 忘记节点 (摘除节点)
rabbitmqctl rename_cluster_node oldnode1 newnode1 [oldnode2] [newnode2...] (修改节点名称)
进入RabbitMQ管理平台进行相关操作在浏览器中查看
输入宿主机的ip+Rabbitmq的端口(15672)
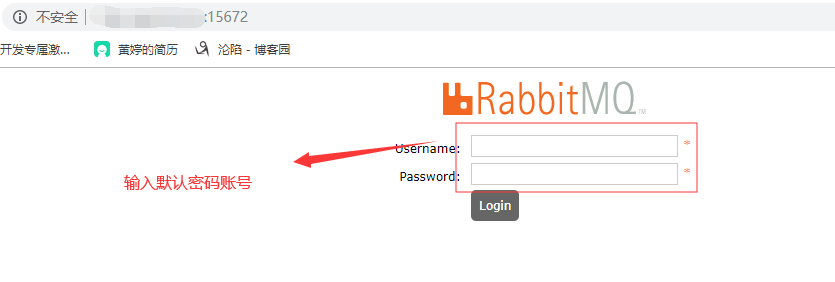
默认密码账号是guest,输入登陆进去ok
或者如下操作安装rabbitmq也行
docker run -d --hostname my-rabbit -p 5672:5672 -p 15672:15672 rabbitmq:3.8.0-beta.4-management
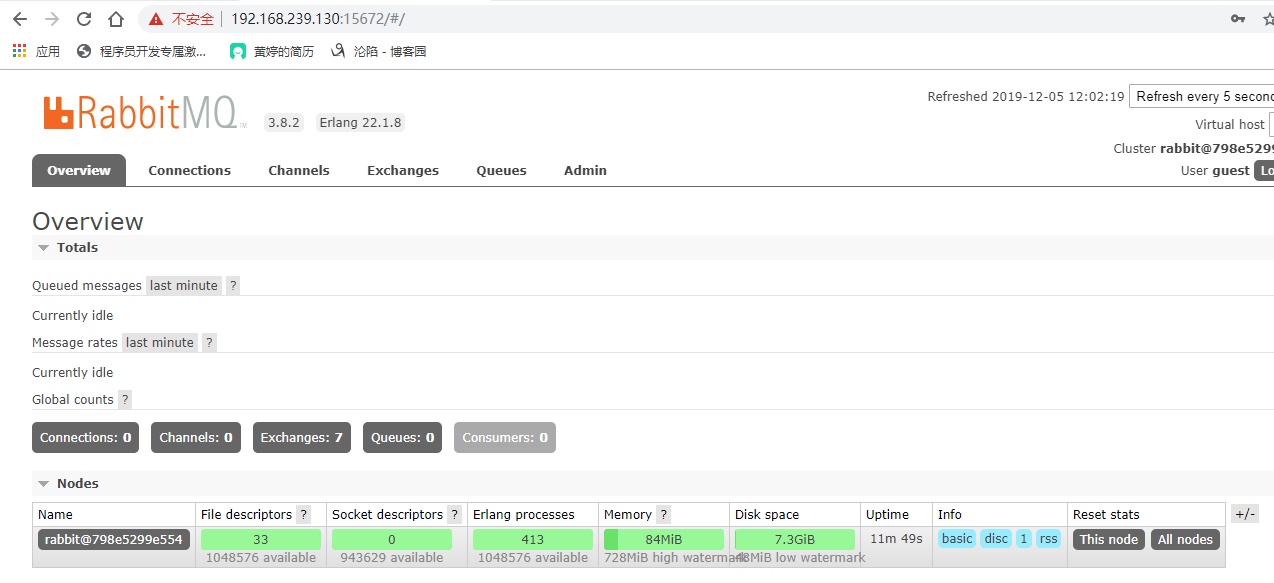
打开浏览器访问ip:15672,默认账号密码都是guest.
RabbitMQ的使用
基于RabbitMQ是工作在‘192.168.174.129:15672’上
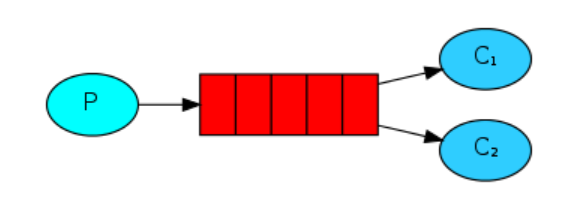
消息分发(基础版)
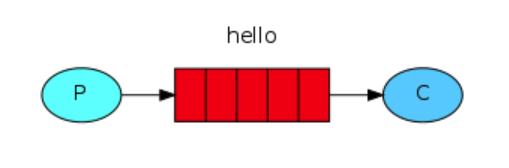
这就是RabbitMQ最简单的工作模式,p为生产者(Producer),生产者发送message给queue,queue再把消息发送至消费者c(Customer)
# 生产者至队列
import pika
connect = pika.BlockingConnection(pika.ConnectionParameters('192.168.174.129')) #建立链接
channel = connect.channel()
channel.queue_declare(queue='hello') #定义一个队列,队列的名字叫‘hello'
channel.basic_publish(exchange='',
                      routing_key='hello',
                      body='hello world!')
print("[x] Sent 'hello world!'")
connect.close()
运行了代码后我们可以进入容器查看消息队列
docker container exec -it rabbitmq bash
rabbitmqctl list_queues

# 消费者
import pika
connect = pika.BlockingConnection(pika.ConnectionParameters('192.168.174.129'))
channel = connect.channel()
# 注意:这里队列名我们在生产者里已经定义了过了,但我们在实际工作中,我们并不能确定是生产者还是消费者先一步运行,如果队列名没有定义的话运行时候是会报错的
channel.queue_declare(queue='hello')

def callback(ch,method,properties,body):
    print('--->', ch, method, properties)
    print("[x] Received %r"%body) #收到的消息是二进制

# ch是connect.channel的内存对象地址
# method是包含的发送的信息

# 当消息来临时,消费者会执行回调函数callback
# pika == 1.1.0 如下写法
channel.basic_consume(queue='hello', on_message_callback=callback, auto_ack=True)
# channel.basic_consume(callback, queue='hello', no_ack=True)

print('[*] Waiting for message. To exit press ctrl+c')
channel.start_consuming()
公平分发(workqueue)
import pika,sys

connect = pika.BlockingConnection(pika.ConnectionParameters('192.168.174.129'))
channel = connect.channel()
channel.queue_declare(queue='hello')
message = ' '.join(sys.argv[1:]) or "Hello World."
channel.basic_publish(exchange='', routing_key='hello', body=message)
print('send %s'%message)
connect.close()

# cmd 中执行 python 脚本名.py 发送消息
import time,pika

connect = pika.BlockingConnection(pika.ConnectionParameters('192.168.174.129'))
channel = connect.channel()
channel.queue_declare(queue='hello')

print(' [*] Waiting for messages. To exit press CTRL+C')

def callback(ch, method, properties, body):
    print(" [x] Received %r" % body)
    time.sleep(body.count(b'.'))
    print(" [x] Done")
    ch.basic_ack(delivery_tag = method.delivery_tag)

channel.basic_consume(queue='hello', on_message_callback=callback, auto_ack=True)
channel.start_consuming()
启动多个消费者,再用生产者发送消息,可以发现,消息是被公平的依次被分发给各个消费者的(Fair dispatch),这种分发的方式叫轮询。
注意
在现实情况中,因为有可能每个消费者处理信息的能力不一样,有的处理的快有的处理的慢,如果按公平分发的话有可能导致负载不平衡,旱的旱死、涝的涝死。为避免这种情况发生我们需要设置一下,让处理快的分发的消息多点,处理慢的少分发点。channel.basic_qos(prefetch_count=1),用这个语句限制了消费者待处理信息的个数,如果消费者待处理消息还有一条没处理就不给它分发消息了,如果消费者没有待处理消息就给它分发消息。
import pika,sys
connect = pika.BlockingConnection(pika.ConnectionParameters('192.168.174.129'))
channel = connect.channel()
channel.queue_declare(queue='hello')
message = ' '.join(sys.argv[1:]) or "Hello World."
channel.basic_publish(exchange='', routing_key='hello', body=message) #消息持久化
print('send %s'%message)
connect.close()
import time,pika
connect = pika.BlockingConnection(pika.ConnectionParameters('192.168.174.129'))
channel = connect.channel()
channel.queue_declare(queue='hello')
print(' [*] Waiting for messages. To exit press CTRL+C')
def callback(ch, method, properties, body):
    print(" [x] Received %r" % body)
    time.sleep(body.count(b'.'))
    print(" [x] Done")

channel.basic_qos(prefetch_count=1)  #限制消费者待处理任务个数
channel.basic_consume(queue='hello', on_message_callback=callback, auto_ack=True)
channel.start_consuming()
消息确认message acknowledgments
现在考虑下这种情形:消费者在处理消息时需要较长的时间,在这时把这个消费者kill掉,正在处理的消息和已经接收但未被处理的消息就丢失了。这应该是不允许的,我们可不希望有数据丢失,就需要将这些任务重新发送给其他正常工作的消费者。
为了保证任务不丢失,RabbitMQ支持使用message acknowledgments,消费者在完成任务后会给RabbitMQ发送个消息,告诉他活已经干完了,RabbitMQ就会把这个任务给释放掉。而当出现消费者宕机、掉线等情况时,RabbitMQ会重新把这个任务发送给其他的消费者。
往回看上面提到的auto_ack这个值默认的是False,RabbitMQ不会主动销毁消息。等待消费者在完成消息后手动确认在销毁。如果为True会自动销毁消息,也就是分发完消息后直接销毁消息,不会进行确认。
import pika

connect = pika.BlockingConnection(pika.ConnectionParameters('192.168.174.129'))
channel = connect.channel()
channel.queue_declare(queue='hello')
message = "Hello World."
channel.basic_publish(exchange='', routing_key='hello', body=message)
print('send %s'%message)
connect.close()
import time,pika

connect = pika.BlockingConnection(pika.ConnectionParameters('192.168.174.129'))
channel = connect.channel()
channel.queue_declare(queue='hello')

print(' [*] Waiting for messages. To exit press CTRL+C')

def callback(ch, method, properties, body):
    print('要接受消息了~~')
    time.sleep(30)
    print(" [x] Received %r" % body)
    ch.basic_ack(delivery_tag=method.delivery_tag) #手动确认完成任务

channel.basic_qos(prefetch_count=1)
channel.basic_consume(queue='hello', on_message_callback=callback)
channel.start_consuming()
这样,当一个消费者宕机了,RabbitMQ就会直接把任务交给下一个消费者。
消息持久化
刚才通过了消息确认,我们保证了消费者在掉线的时候任务不丢失,可是还有一个问题,如果RabbitMQ如果断掉(或者服务重启)了,里面的任务(包括所有queue和exchange依旧会丢失)这时候我们可以用到——消息持久化Message durability
# 如果队列hello已存在你再去持久化会报错
channel.queue_declare(queue='hello',durable=True)#将队列持久化(只保存了队列)

channel.basic_publish(exchange='', routing_key='hello', body=message,
                      properties=pika.BasicProperties(delivery_mode=2))#保持消息持久化
必须同时将队列和消息持久化,可以保证RabbitMQ服务在重启后任务还存在。
注意几点:
-
如果只持久化了消息,服务重启后消息丢失
-
如果只持久化了队列,服务重启后队列还在,但消息丢失
-
在持久化队列的时候要保持生产者和消费者的一致性
import pika

connect = pika.BlockingConnection(pika.ConnectionParameters('192.168.174.129'))
channel = connect.channel()
channel.queue_declare(queue='hello', durable=True) #将队列持久化(只保存了队列)
message = "Hello World."
channel.basic_publish(exchange='', routing_key='hello', body=message, properties=pika.BasicProperties(delivery_mode=2)) #保持消息持久化
print('send %s'%message)
connect.close()
import time,pika

connect = pika.BlockingConnection(pika.ConnectionParameters('192.168.174.129'))
channel = connect.channel()
channel.queue_declare(queue='hello', durable=True) #注意这里也要持久化

print(' [*] Waiting for messages. To exit press CTRL+C')

def callback(ch, method, properties, body):
    print('要接受消息了~~')
    time.sleep(30)
    print(" [x] Received %r" % body)
    ch.basic_ack(delivery_tag=method.delivery_tag)

channel.basic_qos(prefetch_count=1)
channel.basic_consume(queue='hello', on_message_callback=callback)
channel.start_consuming()
发布/订阅(publish/subscribe)
我们在前面两部分将的都是将消息由生产者到消费者之间通过queue传递,现在将引入一个新的成员:exchange。
其实生产者在发送的时候是不知道消息要发送给那个queue的,甚至他都不知道消息是由queue接收的。实际上生产者只是把message发送给了exchange。至于message后续的处理都是由exchange决定的。
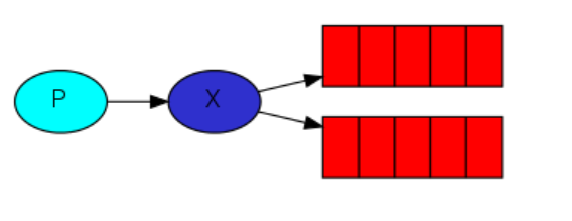
就像图上标示的,exchange在sender和queue之间起到了转呈的作用。
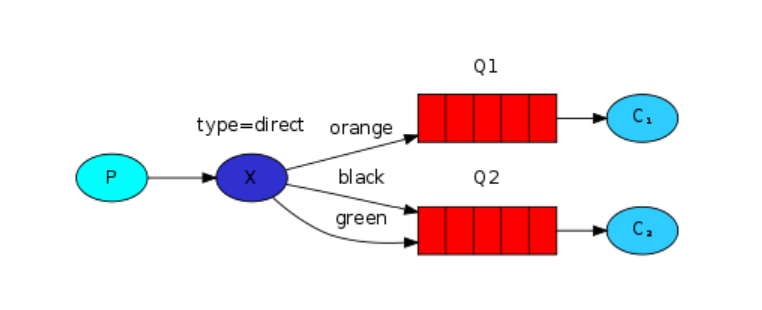
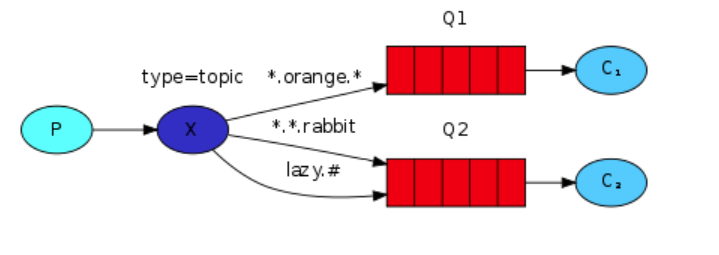
按照工作方式,我们将exchange分成了fanout、direct、topic和headers四种类型。
-
fanout:所有绑定到这个exchange的队列都接收消息
-
direct:通过routingKey和exchange决定的那个唯一的queue可以接收消息
-
topic:所有符合routingKey(可以是表达式)的routingKey所绑定的queue可以接收消息
- 表达式说明:# 表示一个或多个字符,* 表示任何字符
列:#.a会匹配a.a,aa.a,aaa.a等。*.a会匹配a.a,b.a,c.a等
注:使用RoutingKey为#,Exchange Type为topic的时候相当于使用fanout
-
headers:通过headers来决定把消息发送给哪些queue。
注意:前面我们还没有引入exchange这个概念,就用了默认的exchange设置exchange="",空的字符串表示了默认的exchange或名字是空的,那exchange就把消息发送给routing_key指定的queue里(前提是这个queue是存在的),在声明了exchange以后,我们就可以用这个exchange发送消息了
fanout
import pika
connect = pika.BlockingConnection(pika.ConnectionParameters(host='192.168.174.129'))
channel = connect.channel()

#定义一个exchange,名字随便起一个‘logs’,类型声明为fanout
channel.exchange_declare(exchange='logs', exchange_type='fanout')

message = 'info: Hello World!'

#注意这里我们没有定义队列,因为在广播的时候是不用固定具体的哪个queue的
channel.basic_publish(exchange='logs', #使用的exchange名称
                      routing_key='', #使用的队列名称
                      body=message)  #消息内容

print('[x] sent %s' % message)
connect.close()
import pika
connect = pika.BlockingConnection(pika.ConnectionParameters('192.168.174.129'))
channel = connect.channel()
channel.exchange_declare(exchange='logs',exchange_type='fanout')

#exclusive 唯一的,为True时不指定queue名的化随机生成一个queue,在断开连接后把queue销毁,相当于生成一个随机queue
result = channel.queue_declare(queue='', exclusive=True)

channel.queue_bind(exchange='logs', queue=result.method.queue) #绑定的是exchange对应的queue

print('waiting for logs.')
def callback(ch,method,preproteries,body):
    print('get data:%r' % body)
channel.basic_consume(queue=result.method.queue, on_message_callback=callback, auto_ack=True)
channel.start_consuming()
注意:这个订阅——发布的模型就像电台和收音机一样,如果customer下线了是收不到信息的,消息也是在线发送的,并不会保存。
direct
在fanout的发布订阅模式下,接收端是对信息一股脑的照单全收,而在direct模式下,接收端可以对信息进行一定原则的过滤,只接收自己感兴趣的信息
# direct_publisher.py
import pika, sys
connect = pika.BlockingConnection(pika.ConnectionParameters(host='192.168.174.129'))
channel = connect.channel()

channel.exchange_declare(exchange='direct_logs', exchange_type='direct')

serverity = sys.argv[1] if len(sys.argv)>1 else 'info'
message = ' '.join(sys.argv[2:]) or "Hello World."


channel.basic_publish(exchange='direct_logs',
                      routing_key=serverity,  #消息的分类
                      body=message)

print('[x] sent %r:%r' % (serverity, message))
connect.close()

#启动脚本发送信息如下所示
python direct_publisher.py info 123
python direct_publisher.py error 456
python direct_publisher.py warning 789
# direct_consumer.py
import pika, sys
connect = pika.BlockingConnection(pika.ConnectionParameters('192.168.174.129'))
channel = connect.channel()
channel.exchange_declare(exchange='direct_logs',exchange_type='direct')


result = channel.queue_declare(queue='', exclusive=True)
queue_name = result.method.queue

servrities = sys.argv[1:]    #获取所有的关键字
if not servrities:
    sys.stderr.write('Usage: %s [info] [warning] [error]
' % sys.argv[0])
    sys.exit(1)   #关键字不存在打印提示后退出

print('recived:%s' % servrities)

for servrity in servrities:  #循环绑定
    channel.queue_bind(exchange='direct_logs',
                       queue=queue_name,
                       routing_key=servrity)

print('waiting for logs.')
def callback(ch,method,preproteries,body):
    print('[x] %r:%r' % (method.routing_key, body))
channel.basic_consume(queue=queue_name, on_message_callback=callback, auto_ack=True)
channel.start_consuming()

# 启动两个terminal,分别如下启动
python direct_consumer.py info error warning
python direct_consumer.py error
topic
direct的模式实现了初步的消息过滤,topic比direct更加强大,它可以实现更加细致的消息过滤,比如我在获取info的前提下还要知道哪些message是RabbitMQ发来的,哪些是Redis发来的
# topic_publisher.py
import pika
import sys

connection = pika.BlockingConnection(pika.ConnectionParameters(host='192.168.174.129'))
channel = connection.channel()

channel.exchange_declare(exchange='topic_logs', exchange_type='topic')

routing_key = sys.argv[1] if len(sys.argv) > 1 else 'anonymous.info'
message = ' '.join(sys.argv[2:]) or 'Hello World!'
channel.basic_publish(exchange='topic_logs', routing_key=routing_key, body=message)
print(" [x] Sent %r:%r" % (routing_key, message))
connection.close()

#发送
python topic_publisher.py info.11 duziele
python topic_publisher.py mysql.warning.11 slug
python topic_publisher.py mysql.error alzy
# topic_customer.py
import pika
import sys

connection = pika.BlockingConnection(pika.ConnectionParameters(host='192.168.174.129'))
channel = connection.channel()

channel.exchange_declare(exchange='topic_logs', exchange_type='topic')

result = channel.queue_declare(queue='', exclusive=True)
queue_name = result.method.queue

binding_keys = sys.argv[1:]
if not binding_keys:
    sys.stderr.write("Usage: %s [binding_key]...
" % sys.argv[0])
    sys.exit(1)

for binding_key in binding_keys:
    channel.queue_bind(exchange='topic_logs', queue=queue_name, routing_key=binding_key)

print(' [*] Waiting for logs. To exit press CTRL+C')

def callback(ch, method, properties, body):
    print(" [x] %r:%r" % (method.routing_key, body))

channel.basic_consume(queue=queue_name, on_message_callback=callback, auto_ack=True)

channel.start_consuming()

# 启动
python topic_customer.py info.*    # 可以接收以info.开头的所有消息  如info.123 abc  接收到abc
python topic_customer.py *.warning.*   # 中间包含.warning.的消息  如123.warning.345 abc  接收到abc
python topic_customer.py *.error msql.* # 可以接收多个
python topic_customer.py #    # #表示获取所有消息
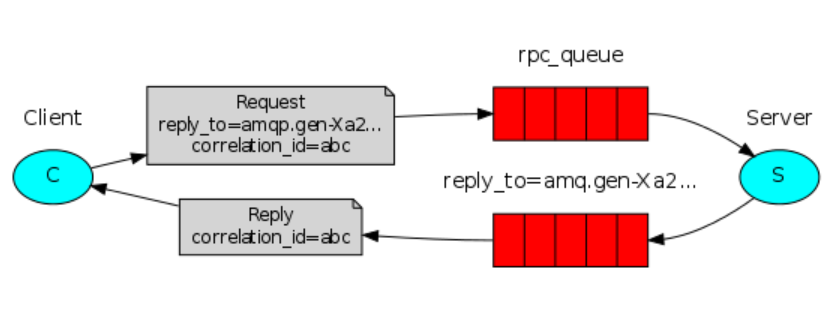
RPC
远程过程调用
# RPC client
import pika
import uuid

class FibonacciRpcClient(object):
    def __init__(self):
        self.connection=pika.BlockingConnection(pika.ConnectionParameters(host='192.168.174.129'))
        self.channel = self.connection.channel()
        result = self.channel.queue_declare(queue='', exclusive=True)
        self.callback_queue = result.method.queue  #声明请求响应回执的queue

        self.channel.basic_consume(queue=self.callback_queue, on_message_callback=self.on_response, auto_ack=True) #监听回执queue

    def on_response(self,ch,method,props,body):  #callback_queue的回调函数
        print(body)
        if self.corr_id == props.correlation_id:
            self.response = body

    def call(self,n):
        self.response = None
        # 设置一个唯一的ID,在callback的队列里通过查看属性来判断他对应哪个请求
        self.corr_id = str(uuid.uuid4())
        self.channel.basic_publish(exchange='', routing_key='rpc_queue',
                                   # reply_to 指定返回队列 correlation_id 携带唯一id
                                   properties=pika.BasicProperties(reply_to=self.callback_queue, correlation_id=self.corr_id),
                                   body=str(n))
        while self.response is None:
            self.connection.process_data_events()   #事件驱动,非阻塞版的start_consuming
        return int(self.response)


fibonacci_rpc = FibonacciRpcClient()
n = input('>>>')
print('[x] Requesting fib(%s)' % n)
response = fibonacci_rpc.call(n)
print(response)
# RPC server
import pika

connect = pika.BlockingConnection(pika.ConnectionParameters(host='192.168.174.129'))
channel = connect.channel()

channel.queue_declare(queue='rpc_queue')

def fib(n):
    if n == 0:
        return 0
    elif n == 1:
        return 1
    else:
        return fib(n-1)+fib(n-2)


def on_request(ch,method,props,body):
    n = int(body)
    print('[.]fib(%s)' % n)
    response = fib(n)
    print(response)

    ch.basic_publish(exchange='', routing_key=props.reply_to, # propos 获取返回队列名
                     properties=pika.BasicProperties(correlation_id=props.correlation_id), # 获取客户端发送过来的唯一id,并回传回去
                     body = str(response))
    print('send over')
    ch.basic_ack(delivery_tag=method.delivery_tag)   #确认client接收到消息


channel.basic_consume(queue='rpc_queue', on_message_callback=on_request)

print('[x]Awaitiong RPC requests')
channel.start_consuming()
RPC工作流程:
-
client启动,声明一个匿名的callback queue
-
建立RPC请求,请求里除了消息还包含两个参数:a.replay_to(告诉server响应的结论callback的队列里)
b.correlation_id:每个请求都被赋予一个独一无二的值
-
请求被发送给RPC_queue
-
server等待queue里的消息,一旦出现请求,server响应请求并把结论发送给通过replay_to要求的queue里
-
client在callback_queue里等待数据,一旦消息出现,他将correlation进行比对,如果相同就获取请求结果。