上几个章节我们探讨了Spring的IoC和AOP,这是Spring的重点,但是Spring对jdbc的支持同样我们也不能忘记,毕竟我们还要通过Spring来管理DAO框架(例如Hibernate或者MyBatis等)。
Spring对DAO的支持分为大体可以分为以下两个点:
- Spring与jdbc模板
- Spring对事务的管理
本节我们就来看看第一个知识点:
Spring为我们提供了一套jdbc模板,对JDBC进行了一些简单的封装。
想要使用jdbc模板我们首先需要搭建环境:
- 引入jar包
我们需要两个jar包:
①Spring的JDBCjar包
②Spring的事务jar包

(就是我黄色涂鸦两个jar包)
如果我们想要在后面使用c3p0数据库连接池的话我们还需要导入c3p0的jar包:

如果想要使用dbcp连接池的话,我们需要导入dbcp的jar包:

(涂鸦的两个)
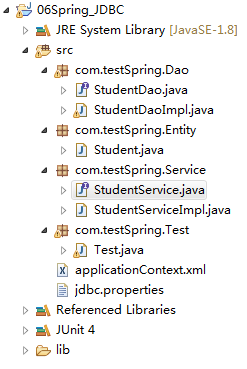
然后就要搭建使用的环境了:

以上的图片是我的测试目录结构,我们再来详细的看一下具体的代码:
首先是我们业务代码的接口,里面定义了增删改查七个方法:
public interface StudentService {
    void add(Student student);
    void remove(Student student);
    void modify(Student student);

    List <String>findAllStudentNames();

    String findStudentNameById(int id);

    List<Student> findAllStudents();

    Student findStudentById(int id);
}
接着是上面接口的实现类:
public class StudentServiceImpl implements StudentService {
    //我们定义了一个StudentDao的引用,但是我们并没有创建对象,由Spring注入
    private StudentDao studentdao;
    //StudentDao是由Spring注入的,所以我们需要设置setter方法
    @Override
    public void setStudentdao(StudentDao studentdao) {
        this.studentdao = studentdao;
    }

    @Override
    public void add(Student student) {
        studentdao.insert(student);
    }

    @Override
    public void remove(Student student) {
        studentdao.delete(student);

    }

    @Override
    public void modify(Student student) {
        studentdao.update(student);

    }

    @Override
    public List<String> findAllStudentNames() {
        return studentdao.selectAllStudentNames();
    }

    @Override
    public String findStudentNameById(int id) {
        return studentdao.selectStudentNameById(id);
    }

    @Override
    public List<Student> findAllStudents() {
        return studentdao.selectAllStudents();
    }

    @Override
    public Student findStudentById(int id) {
        return studentdao.selectStudentsById(id);
    }

}
上面进行了一些业务操作,调用了我们封装好的DAO,同样我们先写一个DAO的接口:
public interface StudentDao {
    void insert(Student student);
    void delete(Student student);
    void update(Student student);
    List <String>selectAllStudentNames();

    String selectStudentNameById(int id);

    List<Student> selectAllStudents();

    Student selectStudentsById(int id);
}
接着是实现类:
//这个DAO实现类需要继承JdbcDaoSupport接口,来调用父类的
//getJdbcTemplate()方法,获得JDBC模板
//**这里的增删改都是用Update来操作**
public class StudentDaoImpl extends JdbcDaoSupport implements StudentDao{
//插入这里我们的动态参数跟在Update的后边
//**jdbc模板是多例的,它的生命周期很短,是方法级的,所以每次使用都需要调用父类的方法获取!**
    @Override
    public void insert(Student student) {
        String sql = "insert into student values(?,?,?)";
        this.getJdbcTemplate().update(sql, null,student.getName(),student.getAge());
    }

    @Override
    public void delete(Student student) {
        String sql = "delete from student where id=?";
        this.getJdbcTemplate().update(sql,student.getId());
    }

    @Override
    public void update(Student student) {
        String sql = "update student set name=?,age=? where id=?";
        this.getJdbcTemplate().update(sql,student.getName(),student.getAge(),student.getId());
    }

    @Override
    public List<String> selectAllStudentNames() {
        String sql = "select name from student";
        //这里使用queryForList查询所有name,参数要加String.class
        return this.getJdbcTemplate().queryForList(sql,String.class);
    }

    @Override
    public String selectStudentNameById(int id) {
        String sql = "select name from student where id=?";
        //这里使用queryForObject,查询单个的结果,不要忘了加String.class,和后面的动态参数
        return this.getJdbcTemplate().queryForObject(sql, String.class,id);

    }

    @Override
    public List<Student> selectAllStudents() {
        //我们查询的是所有的学生,Spring无法解析,我们需要定义一个类来完成查询的结果集和对象之间的映射
        String sql = "select * from student";
        return this.getJdbcTemplate().query(sql, new StudentrowMapper());
    }

    @Override
    public Student selectStudentsById(int id) {
        String sql = "select * from student where id=?";
        return (Student) this.getJdbcTemplate().queryForObject(sql,new StudentrowMapper(),id);
    }
}
最后是我们的配置文件:
这里需要注意一点:
我在使用properties文件作为c3p0连接池的数据库链接参数的时候会出现乱码,在xml中填写数据库配置文件不会乱码!
在配置时分以下的几个步骤:
1.注册service业务bean
2.注册Dao bean
3.注册jdbcTemplate
4.注册数据源(这里提供了三种方法:Spring提供的连接池,c3p0连接池,dbcp连接池,根据需要自己选择)。
5.如果要外联数据库配置参数需要注册jdbc属性文件(分为两种方法,下面我都给出了示例(经测试c3p0会外联会乱码))。
<?xml version="1.0" encoding="UTF-8"?> <beans xmlns="http://www.springframework.org/schema/beans" xmlns:xsi="http://www.w3.org/2001/XMLSchema-instance" xmlns:context="http://www.springframework.org/schema/context" xsi:schemaLocation=" http://www.springframework.org/schema/beans http://www.springframework.org/schema/beans/spring-beans.xsd http://www.springframework.org/schema/context http://www.springframework.org/schema/context/spring-context.xsd"> <!-- 注册Spring内置数据源 --> <!-- <bean id="dataSource" class="org.springframework.jdbc.datasource.DriverManagerDataSource"> <property name="driverClassName" value="com.mysql.jdbc.Driver"/> <property name="url" value="jdbc:mysql:///test?useUnicode=true&characterEncoding=utf8"/> <property name="username" value="root"/> <property name="password" value="123"/> </bean> --> <!-- 注册dbcp连接池 --> <bean id="dataSource" class="org.apache.commons.dbcp2.BasicDataSource"> <property name="driverClassName" value="com.mysql.jdbc.Driver"/> <property name="url" value="jdbc:mysql:///test?useUnicode=true&characterEncoding=utf8"/> <property name="username" value="root"/> <property name="password" value="123"/> </bean> <!-- 注册c3p0数据源 --> <!-- <bean id="dataSource" class="com.mchange.v2.c3p0.ComboPooledDataSource"> <property name="driverClass" value="com.mysql.jdbc.Driver"/> <property name="jdbcUrl" value="jdbc:mysql:///test?useUnicode=true&characterEncoding=utf8"/> <property name="user" value="root"/> <property name="password" value="123"/> </bean> --> <!-- 注册c3p0数据源 --> <!-- <bean id="dataSource" class="com.mchange.v2.c3p0.ComboPooledDataSource"> <property name="driverClass" value="${jdbc.driver}"/> <property name="jdbcUrl" value="${jdbc.url}"/> <property name="user" value="${jdbc.username}"/> <property name="password" value="${jdbc.password}"/> </bean> --> <!-- 注册jdbc属性文件 --> <!-- <bean class="org.springframework.beans.factory.config.PropertyPlaceholderConfigurer"> <property name="location" value="classpath:jdbc.properties"/> </bean> --> <!-- 注册jdbc属性文件 --> <!-- <context:property-placeholder location="classpath:jdbc.properties"/> --> <!-- 注册jdbcTemplate --> <bean id="jdbcTemplate" class="org.springframework.jdbc.core.JdbcTemplate"> <property name="dataSource" ref="dataSource"></property> </bean> <!-- 注册studentDao --> <bean id="studentDao" class="com.testSpring.Dao.StudentDaoImpl"> <property name="jdbcTemplate" ref="jdbcTemplate"></property> </bean> <!-- 注册studentService --> <bean id="studentService" class="com.testSpring.Service.StudentServiceImpl"> <property name="studentdao" ref="studentDao"></property> </bean> </beans>
jdbc属性文件:jdbc.properties
**jdbc.properties**
jdbc.driver=com.mysql.jdbc.Driver
jdbc.url=jdbc:mysql:///test?useUnicode=true&characterEncoding=utf8
jdbc.username=root
jdbc.password=123
//最后别忘了实体类
public class Student {
    private Integer id;
    private String name;
    private int age;
    //省略了setter方法,getter方法,构造方法
}
如果完成了以上的几个步骤我们就可以进行测试了!
测试:
public class Test01 {
    private StudentService service;
    @Before
    public void before() {
        ApplicationContext ac = new ClassPathXmlApplicationContext("applicationContext.xml");
        service = (StudentService)ac.getBean("studentService");
    }

    @Test
    //插入
    public void test01() {
        service.add(new Student("中文",18));
        System.out.println("Success");
    }

    //删除
    @Test
    public void test02() {
        Student student = new Student();
        student.setId(9);
        service.remove(student);
    }

    //更改
    @Test
    public void test03() {
        Student student = new Student("李小四",25);
        student.setId(10);
        service.modify(student);
    }


    //查询所有学生名字
    @Test
    public void test04() {
        System.out.println(service.findAllStudentNames());
    }

    //查询指定id的学生名字
    @Test
    public void test05() {
        System.out.println(service.findStudentNameById(11));
    }

    //查询所有学生
    @Test
    public void test06() {
        System.out.println(service.findAllStudents());
    }

    //查询指定id的学生
    @Test
    public void test07() {
        System.out.println(service.findStudentById(11));
    }
}
以上的测试全是在Junit4环境下进行测试!
这样我们就完成了对Spring提供的jdbc模板的简单使用。
版权声明:本文为博主原创文章,如需转载请表明出处。 https://blog.csdn.net/qq_39266910/article/details/78814809