参考:https://segmentfault.com/a/1190000008010666?utm_source=tag-newest
https://segmentfault.com/a/1190000011381906?utm_source=tag-newest
https://segmentfault.com/a/1190000008570622?utm_source=tag-newest
https://cn.vuejs.org/v2/guide/instance.html#%E7%94%9F%E5%91%BD%E5%91%A8%E6%9C%9F%E5%9B%BE%E7%A4%BA
生命周期
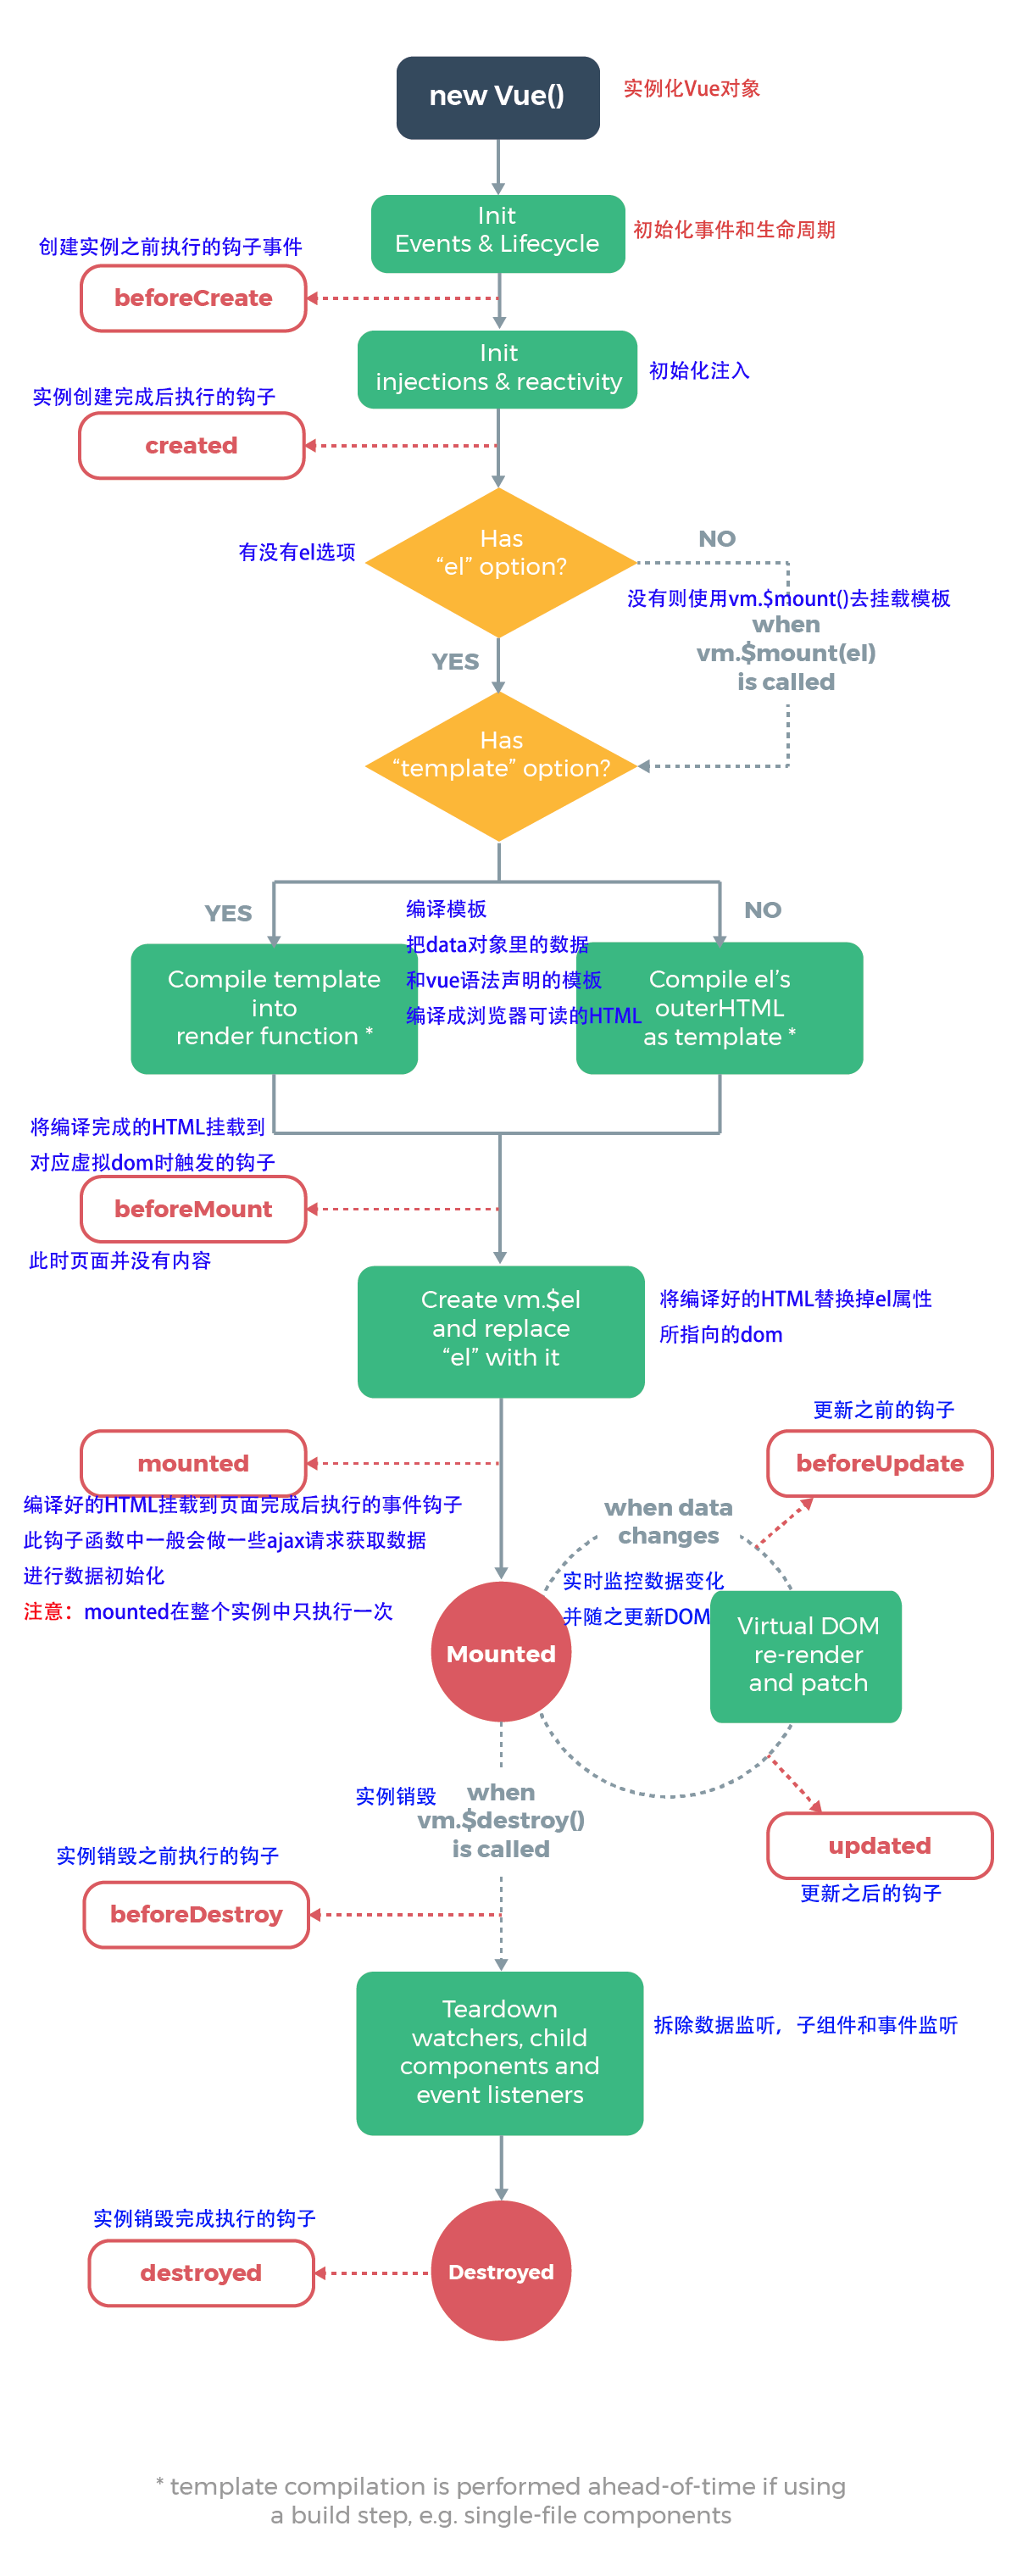
生命周期钩子

vue 2.5.0新增了errorCaptured
-
类型:
(err: Error, vm: Component, info: string) => ?boolean -
当捕获一个来自子孙组件的错误时被调用。此钩子会收到三个参数:错误对象、发生错误的组件实例以及一个包含错误来源信息的字符串。此钩子可以返回
false以阻止该错误继续向上传播。本质上是说“这个错误已经被搞定了且应该被忽略”。它会阻止其它任何会被这个错误唤起的errorCaptured钩子和全局的config.errorHandler。
beforeCreate
在实例初始化之后,数据观测(data observer) 和 event/watcher 事件配置(未完成)之前被调用。
created:完成了 data 数据的初始化(数据和data属性的绑定),没有el选项
实例已经创建完成之后被调用。在这一步,实例已完成以下的配置:数据观测(data observer),属性和方法的运算, watch/event 事件回调。然而,挂载阶段还没开始,$el 属性目前不可见。
beforeMount
在挂载开始之前被调用:相关的 render 函数首次被调用。
mounted
el 被新创建的 vm.$el 替换,并挂载到实例上,之后调用该钩子。
beforeUpdate
数据更新时调用,发生在虚拟 DOM 重新渲染和打补丁之前。 你可以在这个钩子中进一步地更改状态,这不会触发附加的重渲染过程。
updated
由于数据更改导致的虚拟 DOM 重新渲染和打补丁,在这之后会调用该钩子。
<!DOCTYPE html>
<html>
<head>
    <title></title>
    <script type="text/javascript" src="https://cdn.jsdelivr.net/vue/2.1.3/vue.js"></script>
</head>
<body>

<div id="app">
     <p>{{ message }}</p>
</div>

<script type="text/javascript">

  var app = new Vue({
      el: '#app',
      data: {
          message : "xuxiao is boy"
      },
       beforeCreate: function () {
                console.group('beforeCreate 创建前状态===============》');
               console.log("%c%s", "color:red" , "el     : " + this.$el); //undefined
               console.log("%c%s", "color:red","data   : " + this.$data); //undefined
               console.log("%c%s", "color:red","message: " + this.message)
        },
        created: function () {
            console.group('created 创建完毕状态===============》');
            console.log("%c%s", "color:red","el     : " + this.$el); //undefined
               console.log("%c%s", "color:red","data   : " + this.$data); //已被初始化
               console.log("%c%s", "color:red","message: " + this.message); //已被初始化
        },
        beforeMount: function () {
            console.group('beforeMount 挂载前状态===============》');
            console.log("%c%s", "color:red","el     : " + (this.$el)); //已被初始化
            console.log(this.$el);
               console.log("%c%s", "color:red","data   : " + this.$data); //已被初始化
               console.log("%c%s", "color:red","message: " + this.message); //已被初始化
        },
        mounted: function () {
            console.group('mounted 挂载结束状态===============》');
            console.log("%c%s", "color:red","el     : " + this.$el); //已被初始化
            console.log(this.$el);
               console.log("%c%s", "color:red","data   : " + this.$data); //已被初始化
               console.log("%c%s", "color:red","message: " + this.message); //已被初始化
        },
        beforeUpdate: function () {
            console.group('beforeUpdate 更新前状态===============》');
            console.log("%c%s", "color:red","el     : " + this.$el);
            console.log(this.$el);
               console.log("%c%s", "color:red","data   : " + this.$data);
               console.log("%c%s", "color:red","message: " + this.message);
        },
        updated: function () {
            console.group('updated 更新完成状态===============》');
            console.log("%c%s", "color:red","el     : " + this.$el);
            console.log(this.$el);
               console.log("%c%s", "color:red","data   : " + this.$data);
               console.log("%c%s", "color:red","message: " + this.message);
        },
        beforeDestroy: function () {
            console.group('beforeDestroy 销毁前状态===============》');
            console.log("%c%s", "color:red","el     : " + this.$el);
            console.log(this.$el);
               console.log("%c%s", "color:red","data   : " + this.$data);
               console.log("%c%s", "color:red","message: " + this.message);
        },
        destroyed: function () {
            console.group('destroyed 销毁完成状态===============》');
            console.log("%c%s", "color:red","el     : " + this.$el);
            console.log(this.$el);
               console.log("%c%s", "color:red","data   : " + this.$data);
               console.log("%c%s", "color:red","message: " + this.message)
        }
    })
</script>
</body>
</html>
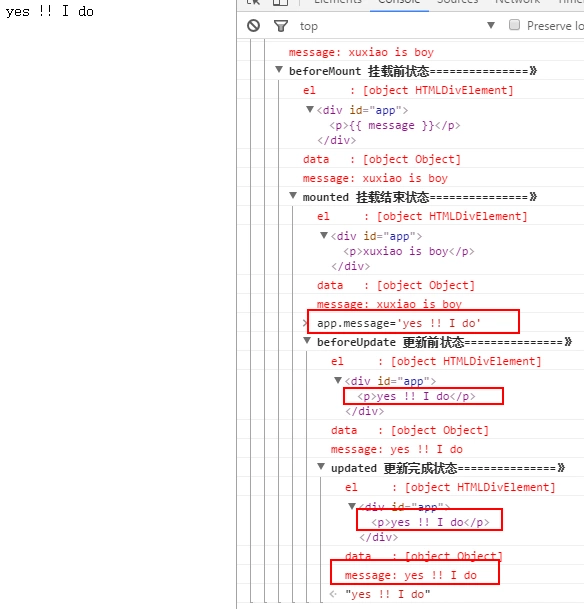
另外,在beforeMount中,我们能发现el还是 {{message}},因为Vue中应用了 Virtual DOM(虚拟Dom)技术。到mounted挂载阶段再把值渲染进去。
1.created钩子函数和beforeMount间的生命周期
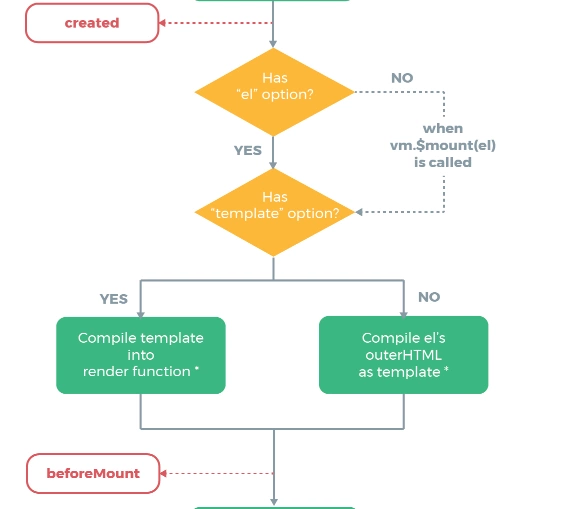
首先会判断对象是否有el选项。如果有的话就继续向下编译,如果没有el选项,则停止编译,也就意味着停止了生命周期,直到在该vue实例上调用vm.$mount(el)。
然后,看一下template参数选项的有无对生命周期的影响。
(1).如果vue实例对象中有template参数选项,则将其作为模板编译成render函数。
(2).如果没有template选项,则将外部HTML作为模板编译。
(3).可以看到template中的模板优先级要高于outer HTML的优先级。
<!DOCTYPE html>
<html lang="en">
<head>
  <meta charset="UTF-8">
  <meta name="viewport" content="width=device-width, initial-scale=1.0">
  <meta http-equiv="X-UA-Compatible" content="ie=edge">
  <title>vue生命周期学习</title>
  <script src="https://cdn.bootcss.com/vue/2.4.2/vue.js"></script>
</head>
<body>
  <div id="app">
    <!--html中修改的-->
    <h1>{{message + '这是在outer HTML中的'}}</h1>
  </div>
</body>
<script>
  var vm = new Vue({
    el: '#app',
    template: "<h1>{{message +'这是在template中的'}}</h1>", //在vue配置项中修改的
    data: {
      message: 'Vue的生命周期'
    }
})
</script>
</html>
执行后的结果可以看到在页面中显示的是:

那么将vue对象中template的选项注释掉后打印如下信息:

在vue对象中还有一个render函数,它是以createElement作为参数,然后做渲染操作,而且我们可以直接嵌入JSX.
new Vue({
    el: '#app',
    render: function(createElement) {
        return createElement('h1', 'this is createElement')
    }
})
可以看到页面中渲染的是:

所以综合排名优先级:
render函数选项 > template选项 > outer HTML
2.beforeMount和mounted 钩子函数间的生命周期
可以看到此时是给vue实例对象添加$el成员,并用$el替换掉实例化过程中的el属性所指的DOM。
3. 与update相关的钩子
在chrome的console中输入:
app.message= 'yes !! I do';
data里的值被修改后,将会触发update的操作。
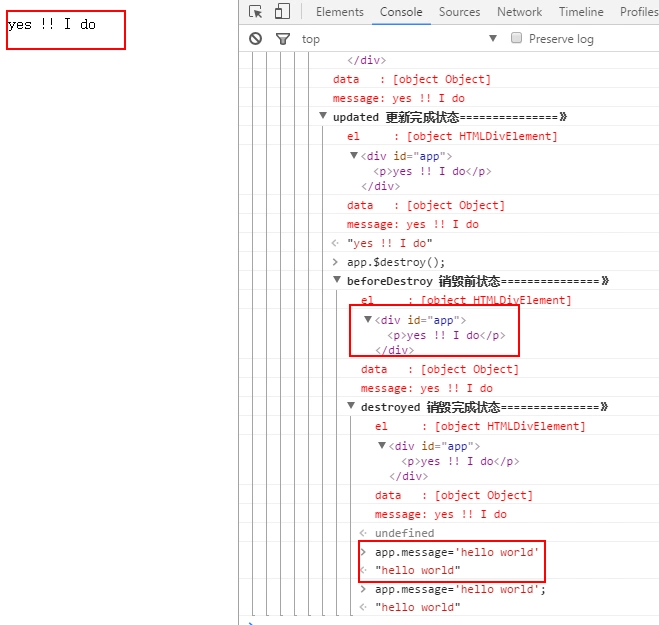
4.与destroy 相关的钩子
我们在console里执行下命令对 vue实例进行销毁。销毁完成后,我们再重新改变message的值,vue不再对此动作进行响应了。但是原先生成的dom元素还存在,可以这么理解,执行了destroy操作,后续就不再受vue控制了。
app.$destroy();
总结
beforecreate : 举个栗子:可以在这加个loading事件 created :在这结束loading(有data了),还做一些初始化,实现函数自执行 mounted : 在这里发起后端请求,拿回数据,配合路由钩子做一些事情beforeDestroy: 你确认删除XX吗? destroyed :当前组件已被删除,清空相关内容