1 网络概念
1.1 网络通信三要素
- IP地址:唯一标识网络上的每一台计算机。两台计算机之间通信的必备有素
- 端口号:计算机中应用的标号(代表一个应用程序)
- 0-1024 为系统使用或保留端口;
- 常见端口:http:80,stmp:25,ftp:21;
- 有效端口0-65536,开发者可以的端口是1025-65536之间。一些第三方引用如 mysql:3306,Oracle:1251。
- 通信协议:通信的规则 TCP,UDP
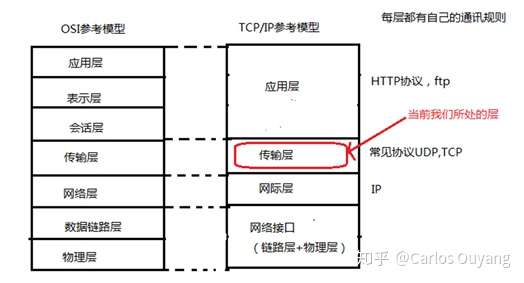
1.2 网络通信模型
2 InetAddress
 1 public class Test01 {
 2     public static void main(String[] args) {
 3         // 获取本机IP地址
 4         InetAddress ip1;
 5         try {
 6             ip1 = InetAddress.getLocalHost();
 7             // 将打印计算机名以及IP地址
 8             System.out.println(ip1.toString());
 9
10             // 获取主机名称
11             System.out.println(ip1.getHostName());
12             System.out.println(ip1.getHostAddress());
13
14         } catch (UnknownHostException e) {
15             e.printStackTrace();
16         }
17     }
18 }
3 TCP 编程
TCP编程中,如果要完成通信,通信双方必须要创建 socket,通过 socket 完成通信。
TCP通信步骤:
- 服务器启动 ServerSocket 作为通信的 Server 端,等待客户端链入。
- 客户端创建 Socket 作为通信的 Client 端
- Client 端链入 Server 端后建立可靠的、双向的、持续性的、点对点的通讯连接,即可通信。
案例一:完成一次单向通信
服务器端:
 1 import java.io.IOException;
 2 import java.io.OutputStream;
 3 import java.net.ServerSocket;
 4 import java.net.Socket;
 5
 6 public class Server01 {
 7     public static void main(String[] args) {
 8
 9         System.out.println("服务器启动...");
10
11         // 【1】创建server socket
12         ServerSocket serverSocket = null;
13         Socket clientSocket = null;
14         try {
15
16             serverSocket = new ServerSocket(8000);
17             // 【2】等待客户端的链入->阻塞式函数->监听8000端口,看是否有client链入
18             clientSocket = serverSocket.accept();
19
20             System.out.println(clientSocket.getInetAddress().getHostAddress()+"链入!");
21
22             // 【3】给客户端主动发信息
23             OutputStream out = clientSocket.getOutputStream();
24
25             String msg = "hello 兄弟";
26             byte[] buf = msg.getBytes("UTF-8");
27             out.write(buf);
28                         //输出结束后,要记得socket.shudownOutput()
29             clientSocket.shutdownOutput();
30
31             out.close();
32         } catch (IOException e) {
33             e.printStackTrace();
34         }
35     }
36 }
客户端:
 1 import java.io.IOException;
 2 import java.io.InputStream;
 3 import java.net.Socket;
 4
 5 public class Client01 {
 6     public static void main(String[] args) {
 7         System.out.println("客户端运行...");
 8
 9         // 【1】创建客户端socket
10         Socket socket = null;
11         try {
12             socket = new Socket("192.168.2.56", 8000);
13
14             // 【2】接收来自服务器的消息
15             InputStream in = socket.getInputStream();
16             byte[] buf = new byte[1024];
17             int len = in.read(buf);
18
19             String msg = new String(buf, 0, len, "UTF-8");
20             System.out.println(msg);
21             // 读取结束后,socket.shutdownInput()
22                         socket.shutdownInput();
23         } catch (IOException e) {
24             e.printStackTrace();
25         }
26     }
27 }
案例二:双向通信,模拟登录验证,采用传输对象的方式
服务器:
 1 package objectTCP.server;
 2
 3 import java.io.DataOutputStream;
 4 import java.io.IOException;
 5 import java.io.InputStream;
 6 import java.io.ObjectInputStream;
 7 import java.io.OutputStream;
 8 import java.net.ServerSocket;
 9 import java.net.Socket;
10
11 import objectTCP.User;
12
13 public class Server {
14     public static void main(String[] args) throws InterruptedException {
15         System.out.println("Server started");
16         try {
17                         //创建服务器端
18             ServerSocket server = new ServerSocket(8000);
19             Socket client = server.accept();
20             System.out.println(client.getInetAddress().getHostName() + " connected");
21                         //接收
22             InputStream in = client.getInputStream();
23             ObjectInputStream ois = new ObjectInputStream(in);
24             User user = (User)ois.readObject();
25             client.shutdownInput();
26
27             System.out.println(user.toString());
28                         //发送
29             if(user.getUsr().equals("admin") && user.getPsw().equals("12345")) {
30                 OutputStream out = client.getOutputStream();
31                 DataOutputStream dos = new DataOutputStream(out);
32                 dos.writeUTF("验证成功!");
33                 client.shutdownOutput();
34             }else {
35                 OutputStream out = client.getOutputStream();
36                 DataOutputStream dos = new DataOutputStream(out);
37                 dos.writeUTF("密码、或用户名错误,验证失败!");
38                 client.shutdownOutput();
39             }
40             client.close();
41             server.close();
42         } catch (IOException e) {
43             e.printStackTrace();
44         } catch (ClassNotFoundException e) {
45             e.printStackTrace();
46         }
47     }
48 }
客户端:
 1 package objectTCP.client;
 2
 3 import java.io.DataInputStream;
 4 import java.io.IOException;
 5 import java.io.InputStream;
 6 import java.io.ObjectOutputStream;
 7 import java.io.OutputStream;
 8 import java.net.Socket;
 9 import java.util.Scanner;
10
11 import objectTCP.User;
12
13 public class Client {
14     public static void main(String[] args) {
15         User user = new User();
16         Scanner input = new Scanner(System.in);
17         System.out.print("usrName: ");
18         user.setUsr(input.nextLine());
19         System.out.print("psw: ");
20         user.setPsw(input.nextLine());
21         try {
22             Socket server = new Socket("192.168.3.2", 8000);
23             OutputStream out = server.getOutputStream();
24             ObjectOutputStream oos = new ObjectOutputStream(out);
25             oos.writeObject(user);
26             server.shutdownOutput();
27
28             InputStream in = server.getInputStream();
29             DataInputStream dis = new DataInputStream(in);
30             System.out.println(dis.readUTF());
31             server.shutdownInput();
32             server.close();
33             input.close();
34         }catch (IOException e) {
35             e.printStackTrace();
36         }
37     }
38 }
这里要注意,服务器端的 User 类和客户端的 User 类要处于一样的包路径下,且拥有一样的序列化 ID,不然会出现类型转换异常。
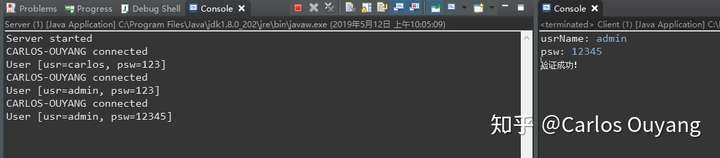
配合线程,可以实现多用户验证,效果如图:
4 UDP 编程
UDP 编程中,如果要完成通信,通信双方必须要创建 DatagramSocket,通过 DatagramSo-cket 完成通信。
DatagramPacket 数据报包用来实现无连接包投递服务。每条报文仅根据该包中包含的信息(字节数组,长度,目标ip,端口)从一台机器自动路由到另一台机器。TCP 类似于打电话,需要双方确认,而 UDP 类似于发短信,只要知道目的地即可发送。
UDP步骤:
- 创建一个DatagramSocket用于表示发送端,通过send方法发送数据报
- 创建一个DatagramSocket用于表示接收端,通过receive方法接收数据报
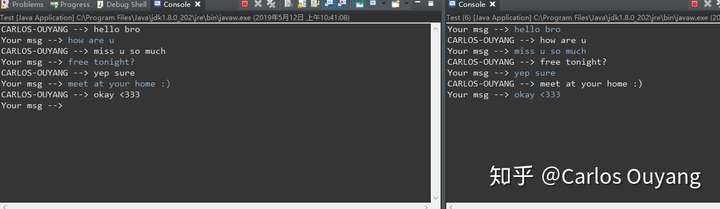
需求:两个客户端相互聊天
用户1:先接收消息再发送消息
 1 package UDPClient2;
 2
 3 import java.io.IOException;
 4 import java.io.UnsupportedEncodingException;
 5 import java.net.DatagramPacket;
 6 import java.net.DatagramSocket;
 7 import java.net.InetAddress;
 8 import java.net.SocketException;
 9 import java.net.UnknownHostException;
10 import java.util.Scanner;
11
12 public class Test {
13     public static void main(String[] args) {
14         Scanner input = new Scanner(System.in);
15         try {
16             // 指定此程序的端口
17             DatagramSocket socket = new DatagramSocket(4000);
18             // 指定接受端的ip
19             InetAddress desIp = InetAddress.getByName("192.168.2.138");
20             while(true) {
21                 //接收消息
22                 byte[] rcvBuf = new byte[1024];
23                 DatagramPacket rcvPack = new DatagramPacket(rcvBuf, rcvBuf.length);
24                 socket.receive(rcvPack);
25                 System.out.println(rcvPack.getAddress().getHostName() + " --> " + new String(rcvBuf, 0, rcvPack.getLength(), "utf8"));
26
27
28                 //发送消息
29                 System.out.print("Your msg --> ");
30                 String msg = input.nextLine();
31                 byte[] sndBuf = msg.getBytes("utf8");
32                 // 创建发送出的包,指定了内容、目的地ip、目的地端口
33                 DatagramPacket sndPack = new DatagramPacket(sndBuf, sndBuf.length, desIp, 3000);
34                 //发送
35                 socket.send(sndPack);
36             }
37         } catch (SocketException e) {
38             e.printStackTrace();
39         } catch (UnsupportedEncodingException e) {
40             e.printStackTrace();
41         } catch (UnknownHostException e) {
42             e.printStackTrace();
43         } catch (IOException e) {
44             e.printStackTrace();
45         }
46     }
47 }
用户2:先发送消息,再接收消息
 1 package UDPClient1;
 2
 3 import java.io.IOException;
 4 import java.io.UnsupportedEncodingException;
 5 import java.net.DatagramPacket;
 6 import java.net.DatagramSocket;
 7 import java.net.InetAddress;
 8 import java.net.SocketException;
 9 import java.net.UnknownHostException;
10 import java.util.Scanner;
11
12 public class Test {
13     public static void main(String[] args) {
14         Scanner input = new Scanner(System.in);
15         try {
16             // 指定此程序的端口
17             DatagramSocket socket = new DatagramSocket(3000);
18             // 指定接受端的ip
19             InetAddress desIp = InetAddress.getByName("192.168.2.138");
20             while(true) {
21                 //发送消息
22                 System.out.print("Your msg --> ");
23                 String msg = input.nextLine();
24                 byte[] sndBuf = msg.getBytes("utf8");
25                 // 创建发送出的包,指定了内容、目的地ip、目的地端口
26                 DatagramPacket sndPack = new DatagramPacket(sndBuf, sndBuf.length, desIp, 4000);
27                 //发送
28                 socket.send(sndPack);
29
30
31                 //接收消息
32                 byte[] rcvBuf = new byte[1024];
33                 DatagramPacket rcvPack = new DatagramPacket(rcvBuf, rcvBuf.length);
34                 socket.receive(rcvPack);
35                 System.out.println(rcvPack.getAddress().getHostName() + " --> " + new String(rcvBuf, 0, rcvPack.getLength(), "utf8"));
36             }
37         } catch (SocketException e) {
38             e.printStackTrace();
39         } catch (UnsupportedEncodingException e) {
40             e.printStackTrace();
41         } catch (UnknownHostException e) {
42             e.printStackTrace();
43         } catch (IOException e) {
44             e.printStackTrace();
45         }
46     }
47 }
实现效果: