参考文献:老师博客:http://www.cnblogs.com/wupeiqi/articles/4943406.html
范例一:
练习:元素分类
有如下值集合 [11,22,33,44,55,66,77,88,99,90...],将所有大于 66 的值保存至字典的第一个key中,将小于 66 的值保存至第二个key的值中。
即: {'k1': 大于66 , 'k2': 小于66}


 1 #!/usr/bin/env pyton
 2
 3 #coding:utf-8
 4
 5 a = [11,22,33,44,55,66,77,88,99,90]
 6
 7 dic = {}
 8
 9 for item in a:
10
11  if item > 66:
12
13  if 'k2' in dic.keys():
14
15  dic['k2'].append(item)
16
17  else:
18
19  dic['k2'] = [item,] #创建只有一项的元素列表
20
21 else:
22
23  if 'k1' in dic.keys():
24
25  dic['k1'].append(item)
26
27  else:
28
29  dic['k1'] = [item,]
30
31 print dic
范例二:
 1 #!/usr/bin/env pyton
 2
 3 #coding:utf-8
 4
 5
 6
 7 file_read = file('L1.txt','r')
 8
 9 file_list = file_read.readlines()
10
11 file_read.close()
12
13
14
15 #print file_list ['alex|123|1
', 'eric|123|1
', 'tony|123|1']
16
17 dic = {}
18
19 for item in file_list:
20
21  line = item.strip() #strip空格和换行去掉
22
23 line_value = line.split('|') #split分隔
24
25 #print line_value #['alex', '123', '1']
26
27  for i in line_value:
28
29  dic[line_value[0]] = line_value[1:] #line_value[1:]就是下标为1和后面的左右的值
30
31
32
33 print dic
一:collection系列
1:计数器:(Counter )
Counter是对字典类型的补充,用于追踪值的出现次数。
#!/usr/bin/env python
# -*- coding:utf-8 -*-
#导入模块
import collections
collections.Counter
#传一个字符串
1 c = collections.Counter('fegfdsagerqfads')
2 print c
3 #结果:Counter({'f': 3, 'a': 2, 'e': 2, 'd': 2, 'g': 2, 's': 2, 'q': 1, 'r': 1})
#传一个列表
d1 = [11,22,33,111,22,33,11]
d = collections.Counter(d1)
print d
#传一个元组
e = ('aa','bbb','aa','b')
e1 = collections.Counter(e)
print e1
#迭代器
for item in c.elements():
print item
2:有序字典
有序字典和字典是一样的,只不过有序字典在内部使用
它是将他所有的KEY放在一个列表中,列表是有序的,这样有序字典输出的内容就是有序的。
有序字典支队第一层生效。但是你可以把内部的字典继续进行
3、默认字典(defaultdict)
 1 obj_file = open('1.txt','r+')
 2
 3 obj_file.seek(3)
 4
 5 obj_file.truncate()
 6
 7 #不加则是将指针后面的全部删除
 8
 9 read_lines = obj_file.readlines()
10
11 print read_lines
12
13 结果:
14
15 ['123']
#使用默认字典,定义默认类型为list,
1 dic1 = {'k1':[]}
2 dic2 = collections.defaultdict(list) #可以定义list,元组,字典都行
3 dic1['k1'].append(1)
4、可命名元组(namedtuple)
import collections
#创建一个扩展元组tuple的类(主要用在坐标上)
1 Mytuple = collections.namedtuple('Mytuple',['x', 'y'])
2
3 new = Mytuple(1,2)
4
5 print new
6
7 print new.x
8
9 print new.y
#原始的元组的创建
 1 old = tuple([1,2])
 2
 3 print old
 4
 5 '''
 6
 7 Mytuple(x=1, y=2)
 8
 9 1
10
11 2
12
13 (1, 2)
14
15 '''
5、双向队列(deque)
两端都可以取、插。
线程安全。
 1 import collections
 2
 3 q = collections.deque()
 4
 5 q.append(1)
 6
 7 q.append(12)
 8
 9 q.append(13)
10
11 q.append(14)
12
13 print q
14
15 print q.pop()
16
17 print q
18
19 print q.popleft()
20
21 print q
22
23 '''
24
25 结果
26
27 deque([1, 12, 13, 14])
28
29 14
30
31 deque([1, 12, 13])
32
33 1
34
35 deque([12, 13])
36
37 '''
6:单向队列
队列,FIFO
栈,弹夹
线程安全的
 1 import Queue
 2
 3 #最多放几条数据,10条
 4
 5 a = Queue.Queue(10)
 6
 7 a.put(1)
 8
 9 a.put(21)
10
11 a.put(12)
12
13 print a.get()
14
15 print a.get()
16
17 print a.get()
18
19 print a.get()
二:迭代器和生成器
1:迭代器
对于Python 列表的 for 循环,他的内部原理:查看下一个元素是否存在,如果存在,则取出,如果不存在,则报异常 StopIteration。(python内部对异常已处理)
 1 class listiterator(object)
 2
 3  | Methods defined here:
 4
 5  |
 6
 7  | __getattribute__(...)
 8
 9  | x.__getattribute__('name') <==> x.name
10
11  |
12
13  | __iter__(...)
14
15  | x.__iter__() <==> iter(x)
16
17  |
18
19  | __length_hint__(...)
20
21  | Private method returning an estimate of len(list(it)).
22
23  |
24
25  | next(...)
26
27  | x.next() -> the next value, or raise StopIteration
实例:next函数的应用
 1 #!/usr/bin/python
 2
 3
 4
 5 # Open a file
 6
 7 fo = open("foo.txt", "r")
 8
 9 print "Name of the file: ", fo.name
10
11
12
13 # Assuming file has following 5 lines
14
15 # This is 1st line
16
17 # This is 2nd line
18
19 # This is 3rd line
20
21 # This is 4th line
22
23 # This is 5th line
24
25
26
27 for index in range(5):
28
29  line = fo.next()
30
31  print "Line No %d - %s" % (index, line)
32
33
34
35 # Close opend file
36
37 fo.close()
38
39 这将产生以下结果:
40
41 Name of the file: foo.txt
42
43 Line No 0 - This is 1st line
44
45 Line No 1 - This is 2nd line
46
47 Line No 2 - This is 3rd line
48
49 Line No 3 - This is 4th line
50
51 Line No 4 - This is 5th line
2:生成器
range不是生成器 和 xrange 是生成器
readlines不是生成器 和 xreadlines 是生成器
生成器内部基于yield创建,即:对于生成器只有使用时才创建,从而不避免内存浪费
1 print range(10)
2
3 [0, 1, 2, 3, 4, 5, 6, 7, 8, 9]
4
5 print xrange(10)
6
7 xrange(10)
3:冒泡算法
有如下列表
[13, 22, 6, 99, 11]
请按照一下规则计算:
13 和 22 比较,将大的值放在右侧,即:[13, 22, 6, 99, 11]
22 和 6 比较,将大的值放在右侧,即:[13, 6, 22, 99, 11]
22 和 99 比较,将大的值放在右侧,即:[13, 6, 22, 99, 11]
99 和 42 比较,将大的值放在右侧,即:[13, 6, 22, 11, 99,]
13 和 6 比较,将大的值放在右侧,即:[6, 13, 22, 11, 99,]
3.1思考
a = 1 , b = 2 , 如何才能让a与b的赋值相互转换呢?
 1 a = 1
 2
 3 b = 2
 4
 5 tmp = a
 6
 7 a = b
 8
 9 b = tmp
10
11 print a ,b
3.2:实例
 1 li = [13, 22, 6, 99, 11]
 2
 3 for m in range(len(li)-1):
 4
 5  for n in range(m+1,len(li)):
 6
 7  if li[m] > li[n]:
 8
 9  tmp = li[n]
10
11  li[n] = li[m]
12
13  li[m] = tmp
14
15 print li
三:函数
种类:内置函数、自定义函数、导入(第三方)函数
函数声明,不自动执行;调用后才执行
函数的参数
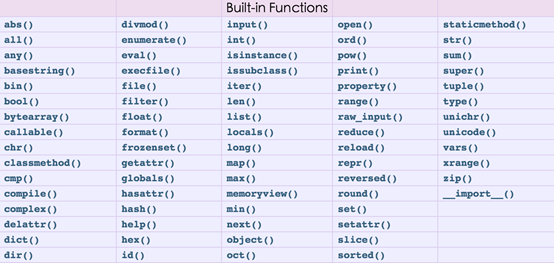
 1 vars()=====当前模块的所有变量
 2 print vars()
 3 print __doc__ #打印当前文件的注释
 4 print __name__
 5 if __name__ == '__main__': #确认是不是主函数
 6 print '这是主函数'
 7 print __file__ #打印文件的路径
 8 all()接受一个序列,判断所有的值都是真则返回值,否则为假
 9 any()只要有一个是真就是真,全部是假才为假
10 li = ['ccc',' ',15]
11 print all(li)
12 print any(li)
13 lli = ['']
14 print any(lli)
15 enumerate()
16 li = [11,22,33,44,55]
17 for k,v in enumerate(li):
18  print k,v
19 #默认从0开始,指定从1开始
20 for k,v in enumerate(li,1):
21  print k,v
1:常用的内置函数
函数式编程和面向过程编程的区别:
函数式:将某功能代码封装到函数中,日后便无需重复编写,仅调用函数即可
面向对象:对函数进行分类和封装,让开发"更快更好更强..."
函数式编程最重要的是增强代码的重用性和可读性
2:函数的定义和使用
def 函数名(参数):
函数体
函数的定义主要有如下要点
1:def:表示函数的关键字
2:函数名:函数的名称,日后根据函数名调用函数
3:函数体:函数中进行一系列的逻辑的计算
4:参数:为函数体提供数据
5:返回值:当函数执行完毕后,可以给调用者返回数据
3:参数:(形参和实参)
普通参数
普通参数必须传参
1 # ######### 定义函数 #########
2 # name 叫做函数func的形式参数,简称:形参
3 def func(name):
4  print name
5 # ######### 执行函数 #########
6 # '曹小贱' 叫做函数func的实际参数,简称:实参
7 func('曹小贱')
默认参数
1:不传;则使用默认值
2:默认参数必须放在参数列表的最后,也可以有多个默认参数
1 def func(name, age = 18):
2  print "%s:%s" %(name,age)
3 # 指定参数
4 func('曹小贱', 19)
5 # 使用默认参数
6 func('曹小贱')
注:默认参数需要放在参数列表最后
动态参数
1:def func(*args): 可以接收元组和列表
2:内部自动构造元组
3:如果传递的是序列,可以使用*来避免内部构造元组
4:def func(**kwargs): 可以接收字典
动态参数1:
 1 def func(*args):
 2
 3  print args
 4
 5 #执行方式一
 6
 7 func(11,22,33,44,55,6)
 8
 9 #执行方式二
10
11 li = [11,22,33,434,55]
12
13 func(*li)
14
15 结果:
16
17 (11, 22, 33, 44, 55, 6)
18
19 (11, 22, 33, 434, 55)
动态参数2:
 1 def func(**kwargs):
 2
 3  print kwargs
 4
 5 #执行方式一
 6
 7 func(name='caoxiaojian',age=18)
 8
 9 #执行方式二
10
11 li = {'name':'caoxiaojian','age':18,'sex':'man'}
12
13 func(**li)
14
15 结果:
16
17 {'age': 18, 'name': 'caoxiaojian'}
18
19 {'age': 18, 'name': 'caoxiaojian', 'sex': 'man'}
动态参数3:
 1 def func(*args, **kwargs):
 2
 3  print args
 4
 5  print kwargs
 6
 7 func(11,3243,12,31)
 8
 9 print '=========='
10
11 func(k1=111,k2=222)
12
13 print '=========='
14
15 func(1,2,43,45,k3=333,k4=444)
16
17 结果:
18
19 (11, 3243, 12, 31)
20
21 {}
22
23 ==========
24
25 ()
26
27 {'k2': 222, 'k1': 111}
28
29 ==========
30
31 (1, 2, 43, 45)
32
33 {'k3': 333, 'k4': 444}
4:邮件报警
范例一:
 1 def email(arg):
 2
 3  print arg
 4
 5 if __name__ == '__main__':
 6
 7  cpu = 100
 8
 9  disk = 500
10
11  ram = 50
12
13  for i in range(2):
14
15  if cpu > 90:
16
17  alert = 'CPU出问题'
18
19 email(alert)
20
21  #要发送的内容,将这个alert的值传到函数email中作为arg使用
22
23 if disk > 90:
24
25  alert = '硬盘出问题'
26
27 email(alert)
28
29  if ram > 80:
30
31  alert = '内存出问题'
32
33 email(alert)
范例二:
 1 #!/usr/bin/env python
 2
 3 # -*- coding:utf-8 -*-
 4
 5 import smtplib
 6
 7 from email.mime.text import MIMEText
 8
 9 from email.utils import formataddr
10
11
12
13 def email(message): #message邮件内容
14
15 msg = MIMEText(message, 'plain', 'utf-8')
16
17  msg['From'] = formataddr(["曹高田",'cs901129@163.com'])
18
19  msg['To'] = formataddr(["CGT",'1063578149@qq.com'])
20
21  msg['Subject'] = "曹高田监控"
22
23 server = smtplib.SMTP("smtp.163.com", 25)
24
25  server.login("cs901129@163.com", "caogaotian-0608")
26
27  server.sendmail('cs901129@163.com', ['1063578149@qq.com',], msg.as_string())
28
29  server.quit()
30
31
32
33 if __name__ == '__main__':
34
35  cpu = 100
36
37  disk = 500
38
39  ram = 50
40
41  for i in range(2):
42
43 if cpu > 90:
44
45  alert = 'CPU出问题'
46
47 email(alert)
48
49  #要发送的内容,将这个alert的值传到函数email中作为arg使用
50
51 if disk > 90:
52
53  alert = '硬盘出问题'
54
55 email(alert)
56
57  if ram > 80:
58
59  alert = '内存出问题'
60
61 email(alert)
四:文件操作
1:基础知识
操作文件的步骤:
打开文件-----操作文件-----关闭文件
打开方式:
obj_file = open('path','mode')
也有file的方式打开,但是open是调用file方式来执行的,推荐使用open
打开模式:
r:只读模式(默认)
w:只写模式,不可读;不存在则创建文件,存在则删除其中的内容
a:追加模式,可读,不存在则创建,存在则追加,但是会在指针的位置后面添加(下面会讲到指针的位置)
r+:可读写文件,还可以追加(一般常用)
U:表示在读取时,可以将 自动转换成 (一般与r、r+一起使用)
2:操作文档
  1 class file(object):
  2
  3  def close(self): # real signature unknown; restored from __doc__
  4
  5 关闭文件
  6
  7 """
  8
  9 close() -> None or (perhaps) an integer. Close the file.
 10
 11  Sets data attribute .closed to True. A closed file cannot be used for
 12
 13  further I/O operations. close() may be called more than once without
 14
 15 error. Some kinds of file objects (for example, opened by popen())
 16
 17  may return an exit status upon closing.
 18
 19  """
 20
 21  def fileno(self): # real signature unknown; restored from __doc__
 22
 23 文件描述符
 24
 25 """
 26
 27 fileno() -> integer "file descriptor".
 28
 29  This is needed for lower-level file interfaces, such os.read().
 30
 31  """
 32
 33  return 0
 34
 35  def flush(self): # real signature unknown; restored from __doc__
 36
 37 刷新文件内部缓冲区
 38
 39 """ flush() -> None. Flush the internal I/O buffer. """
 40
 41  pass
 42
 43  def isatty(self): # real signature unknown; restored from __doc__
 44
 45 判断文件是否是同意tty设备
 46
 47 """ isatty() -> true or false. True if the file is connected to a tty device. """
 48
 49  return False
 50
 51  def next(self): # real signature unknown; restored from __doc__
 52
 53 获取下一行数据,不存在,则报错
 54
 55 """ x.next() -> the next value, or raise StopIteration """
 56
 57  pass
 58
 59  def read(self, size=None): # real signature unknown; restored from __doc__
 60
 61 读取指定字节数据
 62
 63 """
 64
 65 read([size]) -> read at most size bytes, returned as a string.
 66
 67  If the size argument is negative or omitted, read until EOF is reached.
 68
 69  Notice that when in non-blocking mode, less data than what was requested
 70
 71  may be returned, even if no size parameter was given.
 72
 73  """
 74
 75  pass
 76
 77  def readinto(self): # real signature unknown; restored from __doc__
 78
 79 读取到缓冲区,不要用,将被遗弃
 80
 81 """ readinto() -> Undocumented. Don't use this; it may go away. """
 82
 83  pass
 84
 85  def readline(self, size=None): # real signature unknown; restored from __doc__
 86
 87 仅读取一行数据
 88
 89 """
 90
 91 readline([size]) -> next line from the file, as a string.
 92
 93  Retain newline. A non-negative size argument limits the maximum
 94
 95  number of bytes to return (an incomplete line may be returned then).
 96
 97  Return an empty string at EOF.
 98
 99  """
100
101  pass
102
103  def readlines(self, size=None): # real signature unknown; restored from __doc__
104
105 读取所有数据,并根据换行保存值列表
106
107 """
108
109 readlines([size]) -> list of strings, each a line from the file.
110
111  Call readline() repeatedly and return a list of the lines so read.
112
113  The optional size argument, if given, is an approximate bound on the
114
115  total number of bytes in the lines returned.
116
117  """
118
119  return []
120
121  def seek(self, offset, whence=None): # real signature unknown; restored from __doc__
122
123 指定文件中指针位置
124
125 """
126
127 seek(offset[, whence]) -> None. Move to new file position.
128
129  Argument offset is a byte count. Optional argument whence defaults to
130
131  0 (offset from start of file, offset should be >= 0); other values are 1
132
133  (move relative to current position, positive or negative), and 2 (move
134
135  relative to end of file, usually negative, although many platforms allow
136
137  seeking beyond the end of a file). If the file is opened in text mode,
138
139  only offsets returned by tell() are legal. Use of other offsets causes
140
141  undefined behavior.
142
143  Note that not all file objects are seekable.
144
145  """
146
147  pass
148
149  def tell(self): # real signature unknown; restored from __doc__
150
151 获取当前指针位置
152
153 """ tell() -> current file position, an integer (may be a long integer). """
154
155  pass
156
157  def truncate(self, size=None): # real signature unknown; restored from __doc__
158
159 截断数据,仅保留指定之前数据
160
161 """
162
163 truncate([size]) -> None. Truncate the file to at most size bytes.
164
165  Size defaults to the current file position, as returned by tell().
166
167  """
168
169  pass
170
171  def write(self, p_str): # real signature unknown; restored from __doc__
172
173 写内容
174
175 """
176
177 write(str) -> None. Write string str to file.
178
179  Note that due to buffering, flush() or close() may be needed before
180
181  the file on disk reflects the data written.
182
183  """
184
185  pass
186
187  def writelines(self, sequence_of_strings): # real signature unknown; restored from __doc__
188
189 将一个字符串列表写入文件
190
191 """
192
193 writelines(sequence_of_strings) -> None. Write the strings to the file.
194
195  Note that newlines are not added. The sequence can be any iterable object
196
197  producing strings. This is equivalent to calling write() for each string.
198
199  """
200
201  pass
202
203  def xreadlines(self): # real signature unknown; restored from __doc__
204
205 可用于逐行读取文件,非全部
206
207 """
208
209 xreadlines() -> returns self.
210
211  For backward compatibility. File objects now include the performance
212
213  optimizations previously implemented in the xreadlines module.
214
215  """
216
217  pass
3:例子
file.tell
显示指针所在的位置
 1 '''
 2
 3 文件内容是:123456
 4
 5 '''
 6
 7 obj_file = open('1.txt','r')
 8
 9 print obj_file.tell()
10
11 read_lines = obj_file.readlines()
12
13 print obj_file.tell()
file.seek
将指针放在执行的位置
1 obj_file.seek(3)
2
3 print obj_file.tell()
file.truncate
截取数据
原文件内容是:1234567
方式一:
 1 obj_file = open('1.txt','r+')
 2
 3 obj_file.truncate()
 4
 5 #不加则是将指针后面的全部删除
 6
 7 read_lines = obj_file.readlines()
 8
 9 print read_lines
10
11 结果:
12
13 []空
方式二:
 1 obj_file = open('1.txt','r+')
 2
 3 obj_file.seek(3)
 4
 5 obj_file.truncate()
 6
 7 #不加则是将指针后面的全部删除
 8
 9 read_lines = obj_file.readlines()
10
11 print read_lines
12
13 结果
14
15 []
方式三:
 1 obj_file = open('1.txt','r+')
 2
 3 obj_file.seek(3)
 4
 5 obj_file.truncate()
 6
 7 #不加则是将指针后面的全部删除
 8
 9 read_lines = obj_file.readlines()
10
11 print read_lines
12
13 结果:
14
15 ['123']
解析:
方式一是从文件开始,使用truncate,没有指定size,则将指针后面的全部删除。
方式二是从指针位置3开始删除。但是原文件中的前面的123还存在
方式三是指定size大小,仅仅保留前三个位置,打印出前面的123,且还存在在原文件中
4:with
with的出现是为了避免打开文件后忘记关闭文件,而造成进程占用。
使用方式:
with open('db',r) as read_file:
with open('db1') as read_file1,open('db2') as read_file2: