一、准备三台机器
主机的服务都正常,nginx与Tomcat构建负载均衡
主机名 IP地址
nginx 192.168.200.111
Tomcat1 192.168.200.112
Tomcat2 192.168.200.113
准备hosts文件,并修改主机名为nginx 、tomcat1 、tomcat2
[root@localhost ~]# vim /etc/hosts
127.0.0.1   localhost localhost.localdomain localhost4 localhost4.localdomain4
::1         localhost localhost.localdomain localhost6 localhost6.localdomain6
192.168.200.111 nginx
192.168.200.112 tomcat1
192.168.200.113 tomcat2
[root@localhost ~]# hostname nginx
[root@localhost ~]# bash
[root@nginx ~]#
使用scp将/etc/hosts文件传到其它两台上
[root@nginx ~]# scp /etc/hosts 192.168.200.112:/etc/hosts
hosts        hosts.allow  hosts.deny
[root@nginx ~]# scp /etc/hosts 192.168.200.112:/etc/hosts
The authenticity of host '192.168.200.112 (192.168.200.112)' can't be established.
ECDSA key fingerprint is a1:3a:d3:5a:d8:dc:83:73:ee:be:5c:83:73:47:c3:db.
Are you sure you want to continue connecting (yes/no)? yes
Warning: Permanently added '192.168.200.112' (ECDSA) to the list of known hosts.
root@192.168.200.112's password:
hosts
————————————————————————
[root@nginx ~]# scp /etc/hosts 192.168.200.113:/etc/hosts
The authenticity of host '192.168.200.113 (192.168.200.113)' can't be established.
ECDSA key fingerprint is d2:9d:0f:d3:4f:8b:35:f7:9d:e4:7c:9b:96:04:bc:25.
Are you sure you want to continue connecting (yes/no)? yes
Warning: Permanently added '192.168.200.113' (ECDSA) to the list of known hosts.
root@192.168.200.113's password:
hosts
_________________________________________________________________________
修改主机名
[root@localhost ~]# hostname tomcat1
[root@localhost ~]# bash
[root@localhost ~]# hostname tomcat2
[root@localhost ~]# bash
二、修改Tomcat配置文件开启session复制功能
[root@tomcat2 ~]# vim /usr/local/tomcat/conf/server.xml
 <Engine name="Catalina" defaultHost="localhost" jvmRoute="tomcat2">   #另一台改为Tomcat1
      <Cluster className="org.apache.catalina.ha.tcp.SimpleTcpCluster"/>
————————————————————————————————————————
[root@tomcat2 ~]# vim /usr/local/tomcat/webapps/ROOT/WEB-INF/web.xml
<distributable/>
三、准备测试文件,重启服务测试
[root@tomcat1 ~]# vim /usr/local/tomcat/webapps/ROOT/session.jsp
Session ID:<%= session.getId() %><BR>
SessionPort:<%= request.getServerPort() %>
<% out.println("This tomcat server 192.168.200.112");%>
————————————————————————————————————————————
[root@tomcat2 ~]# vim /usr/local/tomcat/webapps/ROOT/session.jsp
Session ID:<%= session.getId() %><BR>
SessionPort:<%= request.getServerPort() %>
<% out.println("This tomcat server 192.168.200.113");%>
[root@tomcat2 ~]# /usr/local/tomcat/bin/shutdown.sh
[root@tomcat2 ~]# /usr/local/tomcat/bin/startup.sh
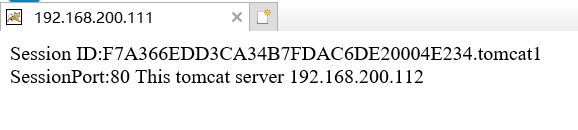
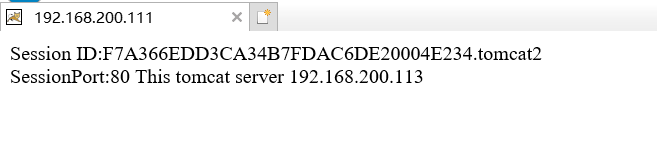
测试结果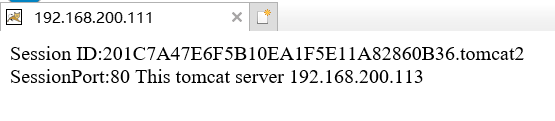
四、补充Tomcat官方session复制方式
注:其它更改还需要设置,与上边一样
别忘了加 jvmRoute=“tomcat2”
[root@tomcat2 ~]# vim /usr/local/tomcat/conf/server.xml
<!--<Cluster className="org.apache.catalina.ha.tcp.SimpleTcpCluster"/>
      -->
<Cluster className="org.apache.catalina.ha.tcp.SimpleTcpCluster"
                 channelSendOptions="8">
          <Manager className="org.apache.catalina.ha.session.DeltaManager"
                   expireSessionsOnShutdown="false"
                   notifyListenersOnReplication="true"/>
          <Channel className="org.apache.catalina.tribes.group.GroupChannel">
            <Membership className="org.apache.catalina.tribes.membership.McastService"
                        address="228.25.25.4"
                        port="45564"
                        frequency="500"
                        dropTime="3000"/>
            <Receiver className="org.apache.catalina.tribes.transport.nio.NioReceiver"
                      address="192.168.200.112"       #另一台将地址改为113
                      port="4000"
                      autoBind="100"
                      selectorTimeout="5000"
                      maxThreads="6"/>
            <Sender className="org.apache.catalina.tribes.transport.ReplicationTransmitter">
              <Transport className="org.apache.catalina.tribes.transport.nio.PooledParallelSender"/>
            </Sender>
            <Interceptor className="org.apache.catalina.tribes.group.interceptors.TcpFailureDetector"/>
            <Interceptor className="org.apache.catalina.tribes.group.interceptors.MessageDispatch15Interceptor"/>
          </Channel>
          <Valve className="org.apache.catalina.ha.tcp.ReplicationValve"
                 filter=""/>
          <Valve className="org.apache.catalina.ha.session.JvmRouteBinderValve"/>
          <Deployer className="org.apache.catalina.ha.deploy.FarmWarDeployer"
                    tempDir="/tmp/war-temp/"
                    deployDir="/tmp/war-deploy/"
                    watchDir="/tmp/war-listen/"
                    watchEnabled="false"/>
          <ClusterListener className="org.apache.catalina.ha.session.JvmRouteSessionIDBinderListener"/>
          <ClusterListener className="org.apache.catalina.ha.session.ClusterSessionListener"/>
       </Cluster>
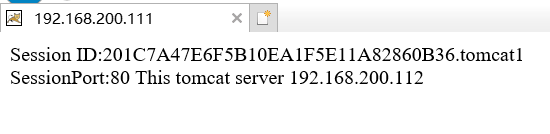
测试结果