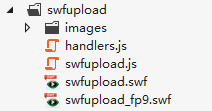
这里就不再介绍什么是SWFUpload啦,简单为大家写一个简单关于SWFUpload的Demo。
1.把SWFUpload 相关的文件引用进来

2.创建upload.aspx页面(页面名称可自定义),
-前台页面代码如下:

<!DOCTYPE html>

<html>
<head id="Head1" runat="server">
    <title>SWFUpload Application Demo (ASP.Net 2.0)</title>
    <link href="../assets/lib/ckeditor/plugins/codesnippet/lib/highlight/styles/default.css" rel="stylesheet" />
    <script src="../assets/lib/swfupload/swfupload.js"></script>
    <script src="../assets/lib/swfupload/handlers.js"></script>
    <script type="text/javascript">
        var swfu;
        window.onload = function () {
            swfu = new SWFUpload({
                // Backend Settings
                //上传请求处理地址
                upload_url: "upload.aspx",
                //POST提交同时伴随上传的键值对
                post_params: {
                    <%--"ASPSESSID": "<%=Session.SessionID %>"--%>
                },

                // File Upload Settings
                //最大文件限制
                file_size_limit: "2 MB",
                //上传的文件类型
                file_types: "*.jpg",
                //点击弹出浏览窗口的文件默认类型
                file_types_description: "JPG Images",
                file_upload_limit: 0,    // Zero means unlimited

                // Event Handler Settings - these functions as defined in Handlers.js
                //  The handlers are not part of SWFUpload but are part of my website and control how
                //  my website reacts to the SWFUpload events.
                swfupload_preload_handler: preLoad,
                swfupload_load_failed_handler: loadFailed,
                file_queue_error_handler: fileQueueError,
                file_dialog_complete_handler: fileDialogComplete,
                upload_progress_handler: uploadProgress,
                upload_error_handler: uploadError,
                upload_success_handler: function (file, serverData) {document.getElementById("img").src=serverData},
                upload_complete_handler: uploadComplete,

                // Button settings
                button_image_url: "../assets/lib/swfupload/images/XPButtonNoText_160x22.png",
                button_placeholder_id: "spanButtonPlaceholder",
                button_ 160,
                button_height: 22,
                button_text: '<span class="button">选择图片 <span class="buttonSmall">(2 MB Max)</span></span>',
                button_text_style: '.button { font-family: Helvetica, Arial, sans-serif; font-size: 14pt; } .buttonSmall { font-size: 10pt; }',
                button_text_top_padding: 1,
                button_text_left_padding: 5,

                // Flash Settings
                flash_url: "../assets/lib/swfupload/swfupload.swf",    // Relative to this file
                flash9_url: "../assets/lib/swfupload/swfupload_FP9.swf",    // Relative to this file

                custom_settings: {
                    upload_target: "divFileProgressContainer"
                },

                // Debug Settings
                debug: false
            });
        }
    </script>
</head>
<body>
    <form id="form1" runat="server">


    <div id="content">


        <div id="swfu_container" style="margin: 0px 10px;">
            <div>
                <span id="spanButtonPlaceholder"></span>
            </div>
            <div id="divFileProgressContainer" style="height: 75px;"></div>
            <div id="thumbnails">
                <img id="img" src="#" alt="" />
            </div>
        </div>
        </div>
    </form>
</body>
</html>
-后台页面代码如下:

 1 public partial class upload : System.Web.UI.Page
 2     {
 3         protected void Page_Load(object sender, EventArgs e)
 4         {
 5             if (Request.IsPostBack())
 6             {
 7                 //
 8                 foreach (string key in Request.Files)
 9                 {
10                     Request.Files[key].SaveAs(Server.MapPath("~/uploads/" + Request.Files[key].FileName));
11                     Response.Write("/uploads/" + Request.Files[key].FileName);
12                 }
13
14                 Response.End();
15             }
16         }
17     }
注:里面的一些使用方式已经为大家附上注释,自己可以简单看下。
