1. Graphviz介绍
Graphviz是大名鼎鼎的贝尔实验室的几位牛人开发的一个画图工具。
它的理念和一般的“所见即所得”的画图工具不一样,是“所想即所得”。
Graphviz提供了dot语言来编写绘图脚本。什么?!画个图也需要一个语言!!
不要急,dot语言是非常简单地,只要看了下面几个列子,就能使用了。
2. Graphviz的几个例子
下面的几个例子都来自于官方文档。详情请见:Graphviz官网.
2.1 Fancy graph


 digraph G{

	size = "4, 4";//图片大小
	main[shape=box];/*形状*/

	main->parse;
	parse->execute;

	main->init[style = dotted];//虚线

	main->cleanup;

	execute->{make_string; printf}//连接两个

	init->make_string;

	edge[color = red]; // 连接线的颜色

	main->printf[style=bold, label="100 times"];//线的 label

	make_string[label = "make a
string"]//
, 这个node的label,注意和上一行的区别

	node[shape = box, style = filled, color = ".7.3 1.0"];//一个node的属性

	execute->compare;
}
从上面的代码可以看出,dot语言非常简单,就是一个纯描述性的语言而已。
大家可以把上面的代码和下图中的连接对应起来看。

<图1. Fancy graph>
2.2 Polygon graph


 digraph G{
	size = "4, 4"
	a->b->c;
	b->d;

	a[shape = polygon, sides = 5, peripheries=3, color = lightblue, style = filled];
	//我的形状是多边形,有五条边,3条边框, 颜色的淡蓝色, 样式为填充
	c[shape = polygon, sides = 4, skew= 0.4, lable = "hello world"];
	//我的形状是4变形, 角的弯曲度0.4, 里面的内容为"hello world"
	d[shape = invtriange];
	//我是三角形
	e[shape = polygon, side = 4, distortion = .7];
	//我是梯形啊
}
下面是对应的图片:
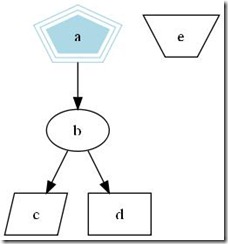
<图2. Polygon graph>
2.3 连接点的方向
我们可以用“n”,”ne”,”e”,””se”, “sw”,”w”,”nw”,
分别表示冲哪一个方向连接这个节点(图形)-“north, northeast……”
如:


 digraph G{
	//b->c[tailport = se];
	b->c:se;
}
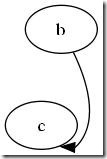
<图3. Se graph>
2.4 数据结构图
数据结构图是我们很容易用到的一类图形,一个简单地数据结构图代码如下:


 digraph g{
	node [shape = record,height=.1//我定义了我下面的样式;
 	node0[label = "<f0> |<f1> G|<f2> "];
	//我是一个node,我有三个属性,第二个的名字为G,其他两个为空
        node1[label = "<f0> |<f1> E|<f2> "];
       node2[label = "<f0> |<f1> B|<f2> "];
       node3[label = "<f0> |<f1> F|<f2> "];
       node4[label = "<f0> |<f1> R|<f2> "];
       node5[label = "<f0> |<f1> H|<f2> "];
       node6[label = "<f0> |<f1> Y|<f2> "];
       node7[label = "<f0> |<f1> A|<f2> "];
       node8[label = "<f0> |<f1> C|<f2> "];

	"node0": f2->"node4":f1;
	//我的第三个属性连到node4的第二个属性
	"node0": f0->"node1":f1;
	"node1": f0->"node2":f1;
	"node1": f2->"node3":f1;
	"node2": f2->"node8":f1;
	"node2": f0->"node7":f1;
	"node4": f2->"node6":f1;
	"node4": f0->"node5":f1;
}
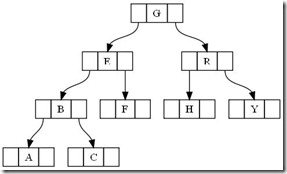
<图4. Data graph>
2.5 Hash table graph


 digraph g {
	nodesep = .05;
	rankdir = LR;

	node[shape = record, width = .1, height = .1];

	node0[label = "<f0> |<f1> |<f2> |<f3> |<f4> |<f5> |<f6> |", height = 2.5];
	//我是一个节点,我有7个属性
	node [width = 1.5];
	node1[label = "{<n> n14 | 719 |<p>}"];
	//我还是一个节点, 也定义了三个属性
	node2[label = "{<n> a1 | 719 |<p>}"];
	node3[label = "{<n> i9 | 512 |<p>}"];
	node4[label = "{<n> e5 | 632 |<p>}"];
	node5[label = "{<n> t20 | 959 |<p>}"];
	node6[label = "{<n> o15 | 794 |<p>}"];
	node7[label = "{<n> s19 | 659 |<p>}"];

	//好了,我开始连接了
	node0:f0->node1:n;
	node0:f1->node2:n;
	node0:f2->node3:n;
	node0:f5->node4:n;
	node0:f6->node5:n;
	node2:p->node6:n;
	node4:p->node7:n;
}
这是一个简单地哈希表,如下图所示
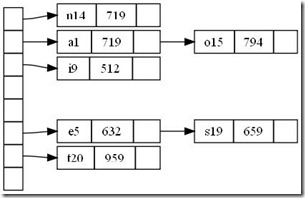
<图5. Hash table graph>
2.6 Process grahp
下面画一个轻量级的流程图。


 digraph g {
	subgraph cluster0 {
		//我是一个子图,subgraph定义了我,
		node[style = filled, color = white];
		//我之内的节点都是这种样式
		style = filled;
		//我的样式是填充
		color = lightgrey;
		//我的颜色
		a0->a1->a2->a3;
		label = "prcess #1"
		//我的标题
	}

	subgraph cluster1 {
		//我也是一个子图
		node[style = filled];
		b0->b1->b2->b3;
		label = "process #2";
		color = blue;
	}

	//定义完毕之后,下面还是连接了
	start->a0;
	start->b0;
	a1->b3;
	b2->a3;
	a3->end;
	b3->end;

	start[shape=Mdiamond];
	end[shape=Msquare];
}
结果输出图形如下:
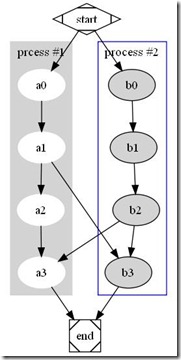
<图6. Hash table graph>
3. 小结
相信这几个列子下来,各位看官对graphviz也有了了解了吧,我个人用了一遍下来发现太爽了。
而对于dot语言,作为一个描述性的语言就非常简单了, 只要有编程基础的人,模仿几个列子下来
应该就能应用了。
各位看官,有没有心动啊。


