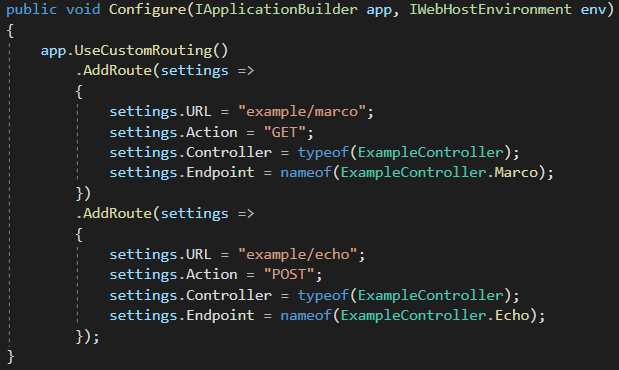
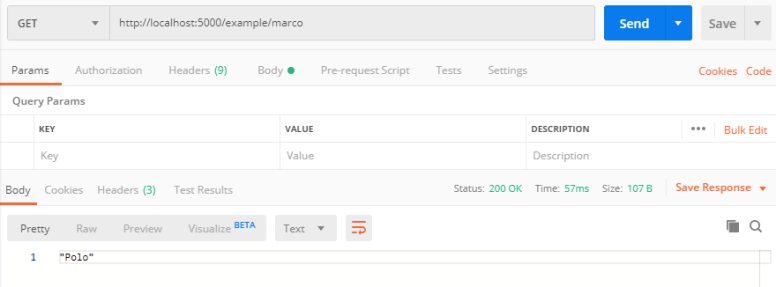
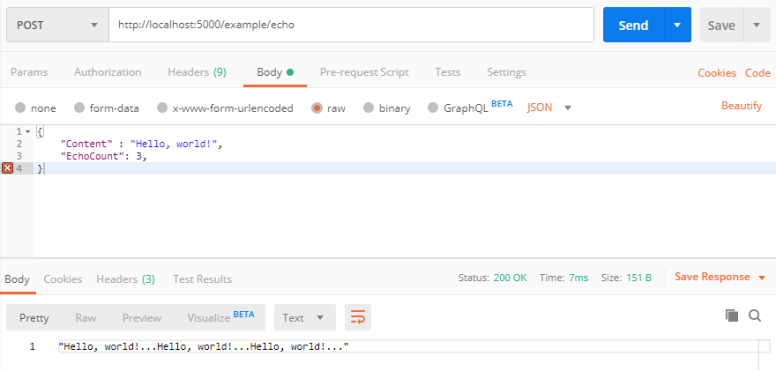
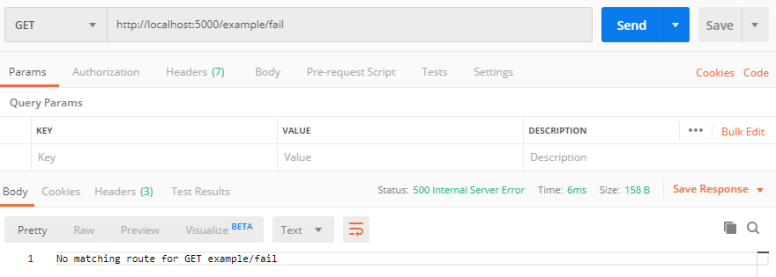
您是否曾经想停止使用Microsoft的内置URL路由并将其替换为自己的实现?在本教程中,我将向您展示如何在ASP.NET Core 3 Web API中实现自定义路由。这可以通过用我们自己的Microsoft替换请求管道中间件来实现。在本教程结束时,我们将使用以下路由语法提供一个具有两个端点的有效Web Api:

这篇文章将介绍以下内容:
1. 先决条件
2. 创建ExampleController
3. 创建RouteSettings
4. 创建RouteManager
5. 创建EndpointActivator
6. 创建CustomRoutingMiddleware
7. 注册中间件并测试
先决条件
在开始本教程之前,您应该熟悉反射和ASP.NET Core Web API请求管道。
首先,创建一个ASP.NET Core 3 Web API项目并删除Startup.ConfigureServices和Startup.Configure中的方法主体。
 1 public class Startup
 2 {
 3     public Startup(IConfiguration configuration)
 4     {
 5         Configuration = configuration;
 6     }
 7
 8     public IConfiguration Configuration { get; }
 9
10     // This method gets called by the runtime. Use this method to add services to the container.
11     public void ConfigureServices(IServiceCollection services)
12     {
13
14     }
15
16     // This method gets called by the runtime. Use this method to configure the HTTP request pipeline.
17     public void Configure(IApplicationBuilder app, IWebHostEnvironment env)
18     {
19
20     }
21 }
创建控制器
创建控制器很简单-我们将有两个端点。一个不接受任何输入并返回一个字符串,另一个接受一个请求对象并重复该字符串x次。
 1 public class ExampleController
 2 {
 3     public async Task<string> Marco()
 4     {
 5         return await Task.FromResult("Polo");
 6     }
 7
 8     public async Task<string> Echo(EchoRequest echoRequest)
 9     {
10         StringBuilder echoBuilder = new StringBuilder();
11
12         for(int i = 0; i < echoRequest.EchoCount; i++)
13         {
14             echoBuilder.Append($"{ echoRequest.Content}...");
15         }
16
17         return await Task.FromResult(echoBuilder.ToString());
18     }
19 }
20
21 public class EchoRequest
22 {
23     public string Content { get; set; }
24     public int EchoCount { get; set; }
25 }
创建RouteSettings
RouteSettings只是一个模型类,用于存储每个路由的设置。
1 public class RouteSettings
2 {
3     public string URL { get; set; }
4     public string Action { get; set; }
5     public Type Controller { get; set; }
6     public string Endpoint { get; set; }
7 }
创建RouteManager
RouteManager承担两项职责-添加路由和解析URL。
添加路由时,该类将使用反射来获取设置中描述的端点的MethodInfo,然后使用“(Action)(URL)”作为路由键添加路由。
要解析URL,RouteManager会根据给定的路由键返回MethodInfo。
 1 public class RouteManager
 2 {
 3     private IDictionary<string, MethodInfo> _routes = new Dictionary<string, MethodInfo>();
 4
 5     public RouteManager AddRoute(Action<RouteSettings> setup)
 6     {
 7         var routeSettings = new RouteSettings();
 8         setup(routeSettings);
 9
10         string routeKey = $"{routeSettings.Action} {routeSettings.URL}";
11
12         var endpointMethod = Assembly.GetExecutingAssembly()
13             .GetTypes()
14             .FirstOrDefault(type => type.Equals(routeSettings.Controller))
15             .GetMethod(routeSettings.Endpoint);
16
17         _routes.Add(routeKey, endpointMethod);
18
19         return this;
20     }
21
22     public MethodInfo Resolve(string action, string url)
23     {
24         if (url.StartsWith("/"))
25         {
26             url = url.Remove(0, 1);
27         }
28
29         string routeKey = $"{action} {url}";
30
31         if(_routes.TryGetValue(routeKey, out MethodInfo methodEndpoint))
32         {
33             return methodEndpoint;
34         }
35
36         throw new Exception($"No matching route for {routeKey}");
37     }
38 }
创建EndpointActivator
EndPointActivator创建Controller的实例,然后执行给定的Endpoint。如果端点需要参数,例如ExampleController.Echo,则通过反序列化请求正文来初始化参数。
 1 public class EndpointActivator
 2 {
 3     public async Task<object> ActivateAsync(MethodInfo endpointMethod, string requestBody)
 4     {
 5         // create an instance of the controller
 6         var controllerType = endpointMethod.DeclaringType;
 7         var controller = Activator.CreateInstance(controllerType);
 8
 9         var endpointParameter = endpointMethod.GetParameters().FirstOrDefault();
10
11         if (endpointParameter is null)
12         {
13             var endpointResponse = endpointMethod.Invoke(controller, null);
14             var response = await IfAsync(endpointResponse);
15             return response;
16         }
17         else
18         {
19             var requestBodyParameter = DeserializeRequestBody(requestBody, endpointParameter);
20             var endpointResponse = endpointMethod.Invoke(controller, new object[] { requestBodyParameter });
21             var response = await IfAsync(endpointResponse);
22             return response;
23         }
24     }
25
26     private static object DeserializeRequestBody(string requestBody, ParameterInfo endpointParameter)
27     {
28         var deserializedParamter = JsonConvert.DeserializeObject(requestBody, endpointParameter.ParameterType);
29
30         if (deserializedParamter is null)
31         {
32             throw new ArgumentException($"Unable to deserialze request body to type {endpointParameter.ParameterType.Name}");
33         }
34
35         return deserializedParamter;
36     }
37
38     private static async Task<object> IfAsync(object endpointResponse)
39     {
40         var responseTask = endpointResponse as Task;
41
42         if (responseTask is null)
43         {
44             return endpointResponse;
45         }
46
47         await responseTask;
48
49         var responseTaskResult = responseTask.GetType()
50             .GetProperty("Result")
51             .GetValue(responseTask);
52
53         return responseTaskResult;
54     }
55 }
创建CustomRoutingMiddleware
CustomRoutingMiddleware汇集了RouteManager和EndpointActivator来处理从请求管道传递的HttpContext对象。它还公开了一个IApplicationBuilder扩展方法,该方法将自身注册到应用程序的请求管道中并返回RouteManager实例,以便我们可以添加路由。
 1 public static class CustomRoutingMiddleware
 2 {
 3     private static RouteManager _routeManager = new RouteManager();
 4     private static EndpointActivator _endpointActivator = new EndpointActivator();
 5
 6     public static RouteManager UseCustomRouting(this IApplicationBuilder app)
 7     {
 8         // Add TryProcess() to request pipeline
 9         app.Use(async (context, next) =>
10         {
11             await TryProcess(context);
12         });
13
14         return _routeManager;
15     }
16
17     public static async Task TryProcess(HttpContext context)
18     {
19         try
20         {
21             // get endpoint method
22             var endpointMethod = _routeManager.Resolve(context.Request.Method, context.Request.Path);
23
24             // read request body
25             string requestBody = await new StreamReader(context.Request.Body, Encoding.UTF8).ReadToEndAsync();
26
27             // activate the endpoint
28             var response = await _endpointActivator.ActivateAsync(endpointMethod, requestBody);
29
30             // serialize the response
31             var serializedResponse = JsonConvert.SerializeObject(response, Formatting.Indented);
32
33             // return response to client
34             await context.Response.WriteAsync(serializedResponse);
35         }
36         catch(Exception error)
37         {
38             context.Response.StatusCode = (int) HttpStatusCode.InternalServerError;
39             await context.Response.WriteAsync(error.Message);
40         }
41     }
42 }
注册中间件并测试
现在,我们要做的就是调用IApplicationBuilder.UseCustomRouting并将路由添加到Startup.Configure方法中。
 1 public class Startup
 2 {
 3     public Startup(IConfiguration configuration)
 4     {
 5         Configuration = configuration;
 6     }
 7
 8     public IConfiguration Configuration { get; }
 9
10     // This method gets called by the runtime. Use this method to add services to the container.
11     public void ConfigureServices(IServiceCollection services)
12     {
13
14     }
15
16     // This method gets called by the runtime. Use this method to configure the HTTP request pipeline.
17     public void Configure(IApplicationBuilder app, IWebHostEnvironment env)
18     {
19         app.UseCustomRouting()
20             .AddRoute(settings =>
21             {
22                 settings.URL = "example/marco";
23                 settings.Action = "GET";
24                 settings.Controller = typeof(ExampleController);
25                 settings.Endpoint = nameof(ExampleController.Marco);
26             })
27             .AddRoute(settings =>
28             {
29                 settings.URL = "example/echo";
30                 settings.Action = "POST";
31                 settings.Controller = typeof(ExampleController);
32                 settings.Endpoint = nameof(ExampleController.Echo);
33             });
34     }
35 }
我将使用Postman来测试API。


