bean相关
- bean的作用域
- 四种: prototype, request, session, singleton
- 若scope="singleton", 则会在初始化容器时就创建此对象.
<bean id="person2" class="top.binwenhome.spring.bean.Person" scope="singleton">
        <property name="id" value="222"></property>
        <property name="name" value="李四"></property>
    </bean>
-
而多例即原型的bean, 会在使用时创建.
- bean的生命周期
-
springIOC容器可以管理bean的生命周期, Spring允许在bean生命周期内特定的时间点执行指定的任务.
-
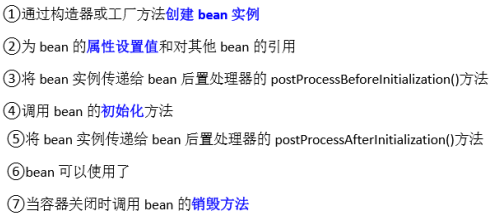
SpringIOC容器对bean生命周期管理的过程
-
通过构造器或工厂方法创建bean实例
-
为bean的属性设置值和对其他bean的应用(依赖注入)
-
bean的初始化
-
使用bean
-
当容器关闭时, 调用bean的销毁方法.
-
-
配置bean时, 通过init-method和destroy-method属性为bean指定初始化和销毁方法.
- Person
@Data
@NoArgsConstructor
@AllArgsConstructor
public class Person {

    private Integer id;
    private String name;

    public void init() {
        System.out.println("初始化bean");
    }

    public void destory() {
        System.out.println("销毁bean");
    }
}
- 配置文件
    <bean id="person" class="bean.Person" init-method="init" destroy-method="destory">
        <constructor-arg name="id" value="333"></constructor-arg>
        <constructor-arg name="name" value="张三"></constructor-arg>
    </bean>
- Person
-
- bean的后置处理器
-
bean后置处理器允许在调用初始化方法前后对bean进行额外的处理.
-
bean后置处理器对Spring管理的bean逐一全部处理
-
典型应用: 检查bean属性的正确性.
-
-
bean的后置处理器需要实现接口BeanPostProcessor. 实现两个抽象方法.
- postProcessBeforeInitialization(Object bean, String beanName) 初始化之前处理.
-
参数: 要处理的bean和其id.
-
返回值: 经过处理后的新的bean
-
-
postProcessAfterInitialization(Object bean, String beanName) 初始化之后处理.
- postProcessBeforeInitialization(Object bean, String beanName) 初始化之前处理.
- 添加bean后置处理器后bean的生命周期
- 代码演示
- PostHandler
public class PostHandler implements BeanPostProcessor {

    @Override
    public Object postProcessBeforeInitialization(Object bean, String beanName) throws BeansException {
        System.out.println(beanName + "aa");
        Person p = (Person) bean;
        if("张三".equals(p.getName())) {
            p.setName("张无忌");
            p.setId(10001);
        } else {
            p.setName("郭靖");
            p.setId(1001);
        }
        return p;
    }

    @Override
    public Object postProcessAfterInitialization(Object bean, String beanName) throws BeansException {
        return bean;
    }
}
- 配置文件
    <bean id="person" class="bean.Person" init-method="init" destroy-method="destory">
        <constructor-arg name="id" value="333"></constructor-arg>
        <constructor-arg name="name" value="张三"></constructor-arg>
    </bean>

    <bean class="handler.PostHandler"></bean>
- PostHandler
-

引用外部资源文件
- 介绍
-
当bean的配置信息逐渐增多时, 查找和修改一些bean的配置信息就变得困难. 这时可以将一部分信息提取到bean配置文件的外部, 以properties格式的属性文件保存起来, 同时在bean的配置文件中引用properties属性文件中内容, 从而实现一部分属性值在发生变化时仅修改properties文件即可.
- 这种技术多用于连接数据库的基本信息.
-
- 要引入外部配置文件时, 用${ }括住.
- 方式一
    <bean class="org.springframework.context.support.PropertySourcesPlaceholderConfigurer">
        <property name="location" value="classpath:conf/db.properties"></property>
    </bean>

    <bean id="dataSource" class="com.alibaba.druid.pool.DruidDataSource">
        <property name="driverClassName" value="${jdbc.driver}"></property>
        <property name="url" value="${jdbc.url}"></property>
        <property name="username" value="${jdbc.username}"></property>
        <property name="password" value="${jdbc.password}"></property>
    </bean>
- 方式二
- 要引入context名称空间.
- 使用<context:property-placeholder/>标签, location属性.
    <context:property-placeholder location="classpath:conf/db.properties" />

    <bean id="dataSource" class="com.alibaba.druid.pool.DruidDataSource">
        <property name="driverClassName" value="${jdbc.driver}"></property>
        <property name="url" value="${jdbc.url}"></property>
        <property name="username" value="${jdbc.username}"></property>
        <property name="password" value="${jdbc.password}"></property>
    </bean>
自动装配
- 自动装配的概念
- 手动注入: 以value或ref的方式明确指定属性值都是手动装配.
- 自动装配: 根据指定的装配规则, 不需要明确指定, Spring自动将匹配的属性值注入到bean中.
-
自动装配只支持非字面量的属性.
- 装配模式
- 在bean标签中使用autowire属性, 有两个值: byName, byType
- 根据名称自动装配
- 某个bean的id和要赋值的属性名一致
<bean id="person" class="bean.Person" autowire="byName">
        <property name="id" value="222"></property>
        <property name="name" value="张三"></property>
    </bean>

    <bean id="car" class="bean.Car">
        <property name="brand" value="bench"></property>
        <property name="price" value="300000D"></property>
    </bean>

这里Person中有car属性
- 某个bean的id和要赋值的属性名一致
- 根据类型自动装配
-
将类型匹配的bean作为属性注入到另一个bean中
<bean id="person" class="top.binwenhome.spring.bean.Person" autowire="byType">
        <property name="id" value="222"></property>
        <property name="name" value="张三"></property>
    </bean>

    <bean id="car" class="top.binwenhome.spring.bean.Car">
        <property name="brand" value="bench"></property>
        <property name="price" value="300000D"></property>
    </bean>
-
若IOC容器中有多个与目标bean类型一致的bean, 则Spring无法判定哪个bean最适合该属性, 故无法自动装配.
- 兼容性: 目标bean类型的父类型或接口, 也能自动装配.
-
-
选用建议: 这两种都太笨拙, 实际都不用, 应使用注解实现自动装配.
通过注解配置bean
-
相对于xml方式, 通过注解配置bean更加简洁和优雅, 并且和MVC组件化开发的理念十分契合.
-
使用注解标识组件
-
普通组件: @Component
-
标识一个受SpringIOC容器管理的组件.
-
该注解加在类上.
-
若一个类加上了该注解, 则Spring会对这个类产生的对象进行管理.
-
-
持久化层组件: @Repository
-
标识一个受SpringIOC容器管理的持久层组件.
-
-
业务逻辑层组件: @Service
- 标识一个受SpringIOC容器管理的业务逻辑层组件.
-
表述层控制器组件: @Controller
-
标识一个受SpringIOC容器管理的表述层控制器组件.
-
- 组件命名规则
-
默认使用组件的类名的首字母变小写作为bean的id
-
或使用组件注解的value属性指定bean的id, 如@Controller(value="aaa")
-
-
注意: 实际上Spring并没有能力标识一个组件到底是不是它所标记的类型.
- 如, 将@Respository用在一个表述层控制器组件上也不会报错.
-
所以@Respository, @Service, @Controller仅仅让开发人员明确当前组件.
- 举例
@Repository
public class UserDAO {
}

@Service
public class UserService {
}

@Controller
public class UserController {
}
- 扫描组件
-
组件被上述注解标识后还需通过Spring进行扫描才能被侦测到.
- 必须加入spring-aop的jar包
        <dependency>
            <groupId>org.springframework</groupId>
            <artifactId>spring-aop</artifactId>
            <version>${spring.version}</version>
        </dependency>
-
在xml配置文件中使用<context:component-scan/>标签
- 指定被扫描的package: base-package属性, 这样Spring容器会扫描这个基包及其子包中所有类.
<!--
        <context:component-scan>: 扫描组件, 对设置的包下面的类进行扫描, 会将加上注解的类作为Spring的组件进行加载.
        组件: 指Spring中管理的bean.
        作为Spring的组件进行加载: 会自动在spring的配置文件中生成相对的bean, 这些bean的id以类的首字母变小写为值.
    -->
    <context:component-scan base-package="ioc" />

    <!-- 相当于生成了以下等代码 -->
    <bean id="userController" class="ioc.controller.UserController"></bean>
-
当需要扫描多个包时可用逗号分隔.
- 指定被扫描的package: base-package属性, 这样Spring容器会扫描这个基包及其子包中所有类.
-
若希望扫描特定的类而非基包下所有类, 用包含与排除
-
包含: <context:include-filter>子标签
-
在设定的包结构下, 再次通过注解或类型具体包含到某个或某几个类.
-
在使用包含时, 一定要设置use-default-filters="false", 将默认的过滤(扫描包下所有类)关闭.
-
当type="annotation"时, expression填注解的全类型.
-
当type="assignable"时, expression填全类名(也会包含其子类)
    <context:component-scan base-package="ioc" use-default-filters="false">
        <context:include-filter type="annotation" expression="org.springframework.stereotype.Service"/>
        <context:include-filter type="assignable" expression="ioc.service.UserService"/>
    </context:component-scan>
-
-
排除: <context:exclude-filter>子标签
-
在设定的包结构下, 扫描所有的类的同时排除某个或某几个类.
-
在使用排除时, 一定要设置use-default-filters="true", 将默认的过滤(扫描包下所有类)打开.
    <context:component-scan base-package="ioc" use-default-filters="true">
        <context:exclude-filter type="annotation" expression="org.springframework.stereotype.Controller"/>
        <context:exclude-filter type="assignable" expression="ioc.dao.UserDAO"/>
    </context:component-scan>
-
-
基于注解的自动配置

- 组件装配
- 需求
-
Controller组件中往往需要用到Service组件的实例, Service组件中往往需要用到Repository组件的实例.
-
Spring可以通过注解的方式帮我们实现属性的装配.
-
-
实现依据
-
在指定要扫描的包时, <context:component-scan>会自动注册一个bean的后置处理器: AutowiredAnnotationBeanPostProcessor的实例.
-
该后置处理器可以自动装配标记了@Autowired, @Resource或@Inject的属性.
-
-
@Autowired注解
-
会默认使用byType的方式, 此时要求spring只有一个bean为其赋值.
-
当byType实现不了装配时, 会自动切换到byName, 此时要求spring容器中有一个bean的id和属性名一致.
-
-
构造器, 普通字段, 一切具有参数的方法都可以应用@Autowired注解.
-
默认情况下, 所有使用@Autowired注解的属性都需要被设置, 当Spring找不到匹配的bean装配属性时, 会抛出异常.
-
若某一属性允许不被设置, 可设置@Autowired的required属性为false.(装配不成功也能继续往下执行)
- 若自动装配时, 匹配到多个能够赋值的bean, 可使用@Qualifier(value="beanId")指定使用的bean.
-
@Autowired和@Qualifier(value="beanId")可以一起作用于带形参的方法上, 此时@Qualifier(value="beanId")所指定的bean作用于形参.
-
-
- @Resource注解
- @Resource注解要求提供一个bean名称的属性(按名称注入), 若该属性为空, 则自动采用标注处的变量或方法名作为bean的名称.
- @Inject
- @Inject和@Autowired注解一样也是按类型注入匹配的bean,但没有reqired属性.
- 代码
- 持久层
@Repository
public class UserDAOImpl implements UserDAO {

    public void addUser() {
        System.out.println("UserDAO: 添加成功");
    }
}

@Repository
public class UserOtherDAOImpl implements UserDAO {

    public void addUser() {
        System.out.println("UserOtherDAO: 添加成功");
    }
}
- 业务层
@Service
public class UserService {

    @Autowired
    @Qualifier("userOtherDAOImpl")
    private UserDAO userDAO;

    public void addUser() {
        userDAO.addUser();
    }
}
- 控制层
@Controller("aaa") public class UserController { public UserController() { System.out.println("UserController"); } @Autowired private UserService userService; public void addUser() { userService.addUser(); } } - 测试
public class TestBySpring {

    public static void main(String[] args) {
        //初始化容器
        ClassPathXmlApplicationContext cac = new ClassPathXmlApplicationContext("applicationContext.xml");

        UserController uc = cac.getBean("aaa", UserController.class);
        uc.addUser();

        UserService us = cac.getBean("userService", UserService.class);
        System.out.println(us);

        UserDAOImpl ud = cac.getBean("userDAOImpl", UserDAOImpl.class);
        System.out.println(ud);


        cac.close();
    }
}
- 持久层
@Resource注解要求提供一个bean名称的属性,若该属性为空,则自动采用标注处的变量或方法名作为bean的名称