写在前面
在【冰河技术】微信公众号的【分布式存储】专题中,我们分别搭建了单节点FastDFS环境和高可用FastDFS集群环境。但是,之前的环境都是基于CentOS 6.8服务器进行搭建的。很多小伙伴反馈说:自己在CentOS 8服务器上,按照我写的文章搭建FastDFS环境时,会失败!看到小伙伴们的这些问题,我今天就给大家分享下如何在CentOS 8服务器上搭建FastDFS环境。
什么是FastDFS?
这里,我就摘录下百度百科上对于FastDFS的描述。
FastDFS是一个开源的轻量级分布式文件系统,它对文件进行管理,功能包括:文件存储、文件同步、文件访问(文件上传、文件下载)等,解决了大容量存储和负载均衡的问题。特别适合以文件为载体的在线服务,如相册网站、视频网站等等。
FastDFS为互联网量身定制,充分考虑了冗余备份、负载均衡、线性扩容等机制,并注重高可用、高性能等指标,使用FastDFS很容易搭建一套高性能的文件服务器集群提供文件上传、下载等服务。
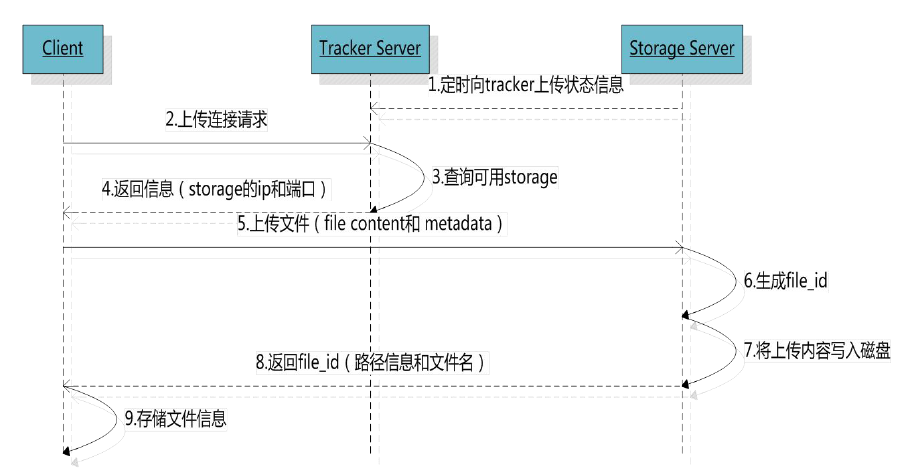
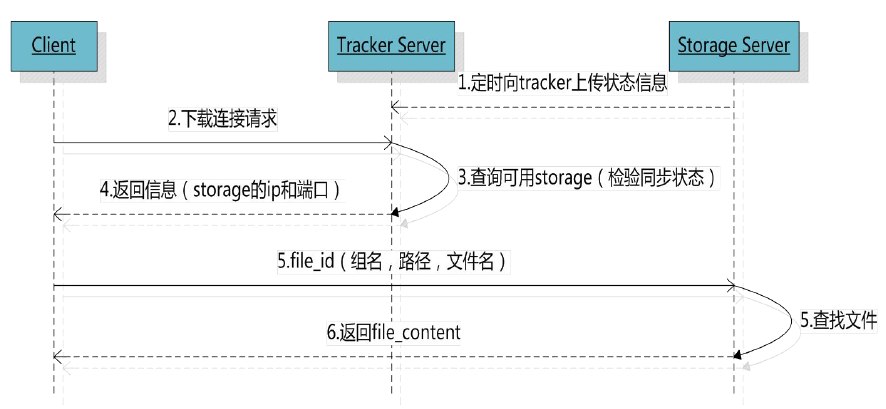
文件上传下载流程
这里,我们用两张图分别来说明下FastDFS文件上传和下载的过程。这样,小伙伴们也能一目了然的看到FastDFS的执行流程。
文件上传
文件下载
了解了FastDFS的这些基本知识之后。接下来,我们就一起来看看如何在CentOS 8服务器上搭建FastDFS环境。
服务器版本
在正式开始搭建FastDFS环境之前,我们先确定下服务器的版本,这里我使用的CentOS服务器的内核版本为:release 8.1.1911,如下所示。
[root@binghe lib]# cat /etc/redhat-release
CentOS Linux release 8.1.1911 (Core)
下载FastDFS
这里,我们使用的FastDFS版本为6.0.6,官方的地址为:https://github.com/happyfish100
在FastDFS 6.0.6中,有三个子模块,如下所示。
fastdfs v6.06
libfastcommon v1.0.43
fastdfs-nginx-module   v 1.22
我们可以在CentOS 8服务器的命令行执行如下命令来下载这些模块。
[root@binghe source]# wget https://github.com/happyfish100/fastdfs/archive/V6.06.tar.gz
[root@binghe source]# wget https://github.com/happyfish100/fastdfs-nginx-module/archive/V1.22.tar.gz
[root@binghe source]# wget https://github.com/happyfish100/libfastcommon/archive/V1.0.43.tar.gz
下载Nginx
Nginx的官方网址为:http://nginx.org/
我们可以在CentOS 8服务器命令行输入如下命令下载Nginx。
[root@binghe source]# wget http://nginx.org/download/nginx-1.17.8.tar.gz
安装FastDFS依赖
[root@binghe dest]# yum install gcc gcc-c++
[root@binghe dest]# yum install libtool zlib zlib-devel openssl openssl-devel
[root@binghe dest]# yum -y install pcre pcre-devel libevent libevent-devel perl unzip net-tools wget
安装libfastcommon
解压libfastcommon的压缩包
[root@binghe source]# tar -zxvf V1.0.43.tar.gz
编译并安装
[root@binghe source]# cd libfastcommon-1.0.43/
[root@binghe libfastcommon-1.0.43]# ./make.sh && ./make.sh install
测试安装结果
[root@binghe libfastcommon-1.0.43]# ls /usr/lib64|grep libfastcommon
libfastcommon.so
[root@binghe libfastcommon-1.0.43]# ls /usr/lib|grep libfastcommon
libfastcommon.so
编译安装fastdfs
解压FastDFS
[root@binghe source]# tar -zxvf V6.06.tar.gz
安装FastDFS
[root@binghe source]# cd fastdfs-6.06/
[root@binghe fastdfs-6.06]# ./make.sh && ./make.sh install
查看FastDFS的安装情况
[root@binghe fastdfs-6.06]# ls /usr/bin|grep fdfs
fdfs_appender_test
fdfs_appender_test1
fdfs_append_file
fdfs_crc32
fdfs_delete_file
fdfs_download_file
fdfs_file_info
fdfs_monitor
fdfs_regenerate_filename
fdfs_storaged
fdfs_test
fdfs_test1
fdfs_trackerd
fdfs_upload_appender
fdfs_upload_file
修改FastDFS配置文件
[root@binghe fastdfs-6.06]# cd /etc/fdfs/
[root@binghe fdfs]# cp storage.conf.sample storage.conf
[root@binghe fdfs]# cp client.conf.sample client.conf
[root@binghe fdfs]# cp tracker.conf.sample tracker.conf
启动FastDFS
启动tracker服务
(1)创建tracker服务所需的目录
[root@binghe fdfs]# mkdir /data/fastdfs
[root@binghe fdfs]# mkdir /data/fastdfs/tracker
[root@binghe fdfs]# chmod 777 /data/fastdfs/tracker
(2)配置tracker服务
修改 tracker.conf 文件。
[root@binghe fdfs]# vi /etc/fdfs/tracker.conf
只修改base_path一项的值为我们在上面所创建的目录即可。
base_path = /data/fastdfs/tracker
(3)启动 tracker 服务
[root@binghe fdfs]# /etc/init.d/fdfs_trackerd start
(4)检查tracker服务启动是否成功
[root@binghe fdfs]# ps auxfww | grep fdfs
root      15067  0.0  0.0  12320   964 pts/0    S+   01:14   0:00  |   |           \_ grep --color=auto fdfs
root      15026  0.0  0.1  90160  5940 ?        Sl   01:13   0:00 /usr/bin/fdfs_trackerd /etc/fdfs/tracker.conf
能看到 fdfs_trackerd,表示tracker服务启动成功
(5)检查tracker服务是否已绑定端口 22122
[root@binghe dest]# netstat -anp | grep 22122
tcp        0      0 0.0.0.0:22122           0.0.0.0:*               LISTEN      15026/fdfs_trackerd
说明: 22122端口是在/etc/fdfs/tracker.conf中定义的。如下所示:
# the tracker server port
port = 22122
启动storage服务
(1)创建storage服务所需的目录
[root@binghe fdfs]# mkdir /data/fastdfs/storage
[root@binghe fdfs]# chmod 777 /data/fastdfs/storage/
(2)配置storage服务
编辑storage的配置文件:
[root@binghe fdfs]# vi /etc/fdfs/storage.conf
各配置项包括:
配置base_path为上面所创建的storage目录,其中,store_path 为存储所在的目录,可以设置多个,注意从0开始。
base_path = /data/fastdfs/storage
store_path0 = /data/fastdfs/storage
配置tracker_server的ip和端口。
tracker_server = 192.168.175.100:22122
指定http服务的端口
http.server_port = 80
(3)启动storage服务
[root@binghe fdfs]# /etc/init.d/fdfs_storaged start
正在启动 fdfs_storaged (via systemctl):                   [  确定  ]
(4)检查storage服务启动是否成功?
[root@binghe fdfs]# ps auxfww | grep fdfs
root      15630  0.0  0.0  12320   972 pts/0    S+   15:46   0:00  |   |           \_ grep --color=auto fdfs
root      15026  0.0  0.1 155696  6964 ?        Sl   15:13   0:00 /usr/bin/fdfs_trackerd /etc/fdfs/tracker.conf
root      15573  2.7  1.7 150736 66292 ?        Sl   15:45   0:02 /usr/bin/fdfs_storaged /etc/fdfs/storage.conf
说明:看到fdfs_storaged,表示storage服务启动成功
(5)检查storage服务是否已绑定到端口:23000?
[root@binghe fdfs]# netstat -anp | grep 23000
tcp        0      0 0.0.0.0:23000           0.0.0.0:*               LISTEN      15573/fdfs_storaged
说明:23000 端口是在配置文件 /etc/fdfs/storage.conf中定义的,如下所示。
# the storage server port
port = 23000
配置客户端文件
(1)配置客户端要使用的client.conf
[root@binghe fdfs]# vi /etc/fdfs/client.conf
以下两项配置用到的tracker目录和服务器地址端口
base_path = /data/fastdfs/tracker
tracker_server = 192.168.175.100:22122
(2)从客户端的配置可以看到:客户端只需要了解tracker_server的信息,Tracker server作用也正是负载均衡和调度
(3)Storage server作用是文件存储,客户端上传的文件最终存储在 Storage 服务器上。
安装nginx及fastdfs-nginx-module
解压nginx:
[root@binghe source]# tar -zxvf nginx-1.17.8.tar.gz
解压fastdfs-nginx-module
[root@binghe source]# tar -zxvf V1.22.tar.gz
修改config文件
修改config文件,把/usr/local 替换成 /usr
[root@binghe source]# cd fastdfs-nginx-module-1.22/
[root@binghe fastdfs-nginx-module-1.22]# cd src
[root@binghe src]# vi config
配置Nginx
Nginx配置,添加fastdfs-nginx-module和http_stub_status_module 模块
[root@binghe fdfs]# cd /usr/local/source/nginx-1.17.8/
[root@binghe nginx-1.17.8]# ./configure --prefix=/usr/local/soft/nginx --with-http_stub_status_module --add-module=/usr/local/source/fastdfs-nginx-module-1.22/src/
编译安装Nginx
[root@binghe nginx-1.17.8]# make && make install
检查安装是否成功?
[root@binghe nginx-1.17.8]# ls /usr/local/soft/ | grep nginx
nginx
验证Nginx配置
[root@binghe fdfs]# /usr/local/soft/nginx/sbin/nginx -V
nginx version: nginx/1.17.8
built by gcc 8.3.1 20190507 (Red Hat 8.3.1-4) (GCC)
configure arguments: --prefix=/usr/local/soft/nginx --with-http_stub_status_module --add-module=/usr/local/source/fastdfs-nginx-module-1.22/src/
配置fastdfs-nginx-module
复制配置文件
[root@binghe nginx-1.17.8]# cp /usr/local/source/fastdfs-nginx-module-1.22/src/mod_fastdfs.conf /etc/fdfs/
编辑配置文件
[root@binghe nginx-1.17.8]# vi /etc/fdfs/mod_fastdfs.conf
配置以下几项
connect_timeout=10
tracker_server=192.168.175.100:22122
url_have_group_name = true
store_path0=/data/fastdfs/storage
复制Web配置文件
复制另两个web访问用到配置文件到fdfs配置目录下:
[root@binghe nginx-1.17.8]# cd /usr/local/source/fastdfs-6.06/conf/
[root@binghe conf]# cp http.conf /etc/fdfs/
[root@binghe conf]# cp mime.types /etc/fdfs/
配置nginx
编辑nginx的配置文件:
[root@binghe conf]# vi /usr/local/soft/nginx/conf/nginx.conf
在server listen 80 的这个server配置下面,
增加一个location
location ~/group([0-9]) {
	root  /data/fastdfs/storage/data;
	ngx_fastdfs_module;
}
启动nginx
启动Nginx
[root@binghe storage]# /usr/local/soft/nginx/sbin/nginx
检查nginx是否已成功启动
[root@binghe storage]# ps auxfww | grep nginx
root      24590  0.0  0.0  12320   980 pts/0    S+   16:44   0:00  |   |           \_ grep --color=auto nginx
root      24568  0.0  0.0  41044   428 ?        Ss   16:44   0:00  \_ nginx: master process /usr/local/soft/nginx/sbin/nginx
nobody    24569  0.0  0.1  74516  4940 ?        S    16:44   0:00      \_ nginx: worker process
测试图片上传
(1)命令行上传图片
[root@binghe storage]# /usr/bin/fdfs_upload_file /etc/fdfs/client.conf /home/binghe/image/test.jpg
group1/M00/00/00/Ch8FQl9txnyAfrePAADhyYH1AP4653.jpg
注意fdfs所返回的地址,我们需要使用这个地址进行访问
(2)打开浏览器:访问这个地址
http://192.168.175.100/group1/M00/00/00/Ch8FQl9txnyAfrePAADhyYH1AP4653.jpg
可以看到图片
其中,192.168.175.100是拼接的本地服务器的ip
我门可以通过命令行来查看图片在服务器上的真实存储路径。
[root@binghe data]# pwd
/data/fastdfs/storage/data
[root@binghe data]# ls 00/00
Ch8FQl9txnyAfrePAADhyYH1AP4653.jpg
可见/group1/M00这两个目录是由fdfs所管理生成的目录,它们分别代表fdfs生成的组名和磁盘
FastDFS其他命令
查看fdfs的版本
[root@binghe data]# fdfs_monitor /etc/fdfs/client.conf | grep version
[2020-09-24 01:58:01] DEBUG - base_path=/data/fastdfs/tracker, connect_timeout=5, network_timeout=60, tracker_server_count=1, anti_steal_token=0, anti_steal_secret_key length=0, use_connection_pool=0, g_connection_pool_max_idle_time=3600s, use_storage_id=0, storage server id count: 0

version = 6.06
查看fdfs的运行状态
[root@binghe data]# fdfs_monitor /etc/fdfs/client.conf
好了,今天我们就到这儿吧,我是冰河,我们下期见!!