参考:https://www.cnblogs.com/bigbrotherer/p/7241845.html#top
1、在CentOS中默认安装有MariaDB,这个是MySQL的分支,但为了需要,还是要在系统中安装MySQL,而且安装完成之后可以直接覆盖掉MariaDB。
下载并安装MySQL官方的 Yum Repository。当然,虽然都是照着操作的,一定保证你联网成功哈,不然无法下载。
开始执行了命令报错了:[root@slaver4 ~]# wget -i -c http://dev.mysql.com/get/mysql57-community-release-el7-10.noarch.rpm
 1 [root@slaver4 ~]# wget -i -c http://dev.mysql.com/get/mysql57-community-release-el7-10.noarch.rpm
 2 --2019-07-09 22:04:21--  http://dev.mysql.com/get/mysql57-community-release-el7-10.noarch.rpm
 3 正在解析主机 dev.mysql.com (dev.mysql.com)... 137.254.60.11
 4 正在连接 dev.mysql.com (dev.mysql.com)|137.254.60.11|:80... 已连接。
 5 已发出 HTTP 请求,正在等待回应... 301 Moved Permanently
 6 位置:https://dev.mysql.com/get/mysql57-community-release-el7-10.noarch.rpm [跟随至新的 URL]
 7 --2019-07-09 22:04:22--  https://dev.mysql.com/get/mysql57-community-release-el7-10.noarch.rpm
 8 正在连接 dev.mysql.com (dev.mysql.com)|137.254.60.11|:443... 失败:拒绝连接。
 9 正在解析主机 dev.mysql.com (dev.mysql.com)... 137.254.60.11
10 正在连接 dev.mysql.com (dev.mysql.com)|137.254.60.11|:443... 失败:拒绝连接。
11 -c: 没有那个文件或目录
12 在 -c 中找不到 URL。
我再次执行了,好像不报错了:
 1 [root@slaver4 package]# wget -i -c http://dev.mysql.com/get/mysql57-community-release-el7-10.noarch.rpm
 2 --2019-07-09 22:06:47--  http://dev.mysql.com/get/mysql57-community-release-el7-10.noarch.rpm
 3 正在解析主机 dev.mysql.com (dev.mysql.com)... 137.254.60.11
 4 正在连接 dev.mysql.com (dev.mysql.com)|137.254.60.11|:80... 已连接。
 5 已发出 HTTP 请求,正在等待回应... 301 Moved Permanently
 6 位置:https://dev.mysql.com/get/mysql57-community-release-el7-10.noarch.rpm [跟随至新的 URL]
 7 --2019-07-09 22:06:51--  https://dev.mysql.com/get/mysql57-community-release-el7-10.noarch.rpm
 8 正在连接 dev.mysql.com (dev.mysql.com)|137.254.60.11|:443... 已连接。
 9 已发出 HTTP 请求,正在等待回应... 302 Found
10 位置:https://repo.mysql.com//mysql57-community-release-el7-10.noarch.rpm [跟随至新的 URL]
11 --2019-07-09 22:06:53--  https://repo.mysql.com//mysql57-community-release-el7-10.noarch.rpm
12 正在解析主机 repo.mysql.com (repo.mysql.com)... 23.53.253.129
13 正在连接 repo.mysql.com (repo.mysql.com)|23.53.253.129|:443... 已连接。
14 已发出 HTTP 请求,正在等待回应... 200 OK
15 长度:25548 (25K) [application/x-redhat-package-manager]
16 正在保存至: “mysql57-community-release-el7-10.noarch.rpm”
17
18 100%[=============================================================================>] 25,548      55.0KB/s 用时 0.5s
19
20 2019-07-09 22:06:55 (55.0 KB/s) - 已保存 “mysql57-community-release-el7-10.noarch.rpm” [25548/25548])
21
22 -c: 没有那个文件或目录
23 在 -c 中找不到 URL。
24 FINISHED --2019-07-09 22:06:55--
25 Total wall clock time: 8.0s
26 Downloaded: 1 files, 25K in 0.5s (55.0 KB/s)
27 [root@slaver4 package]#
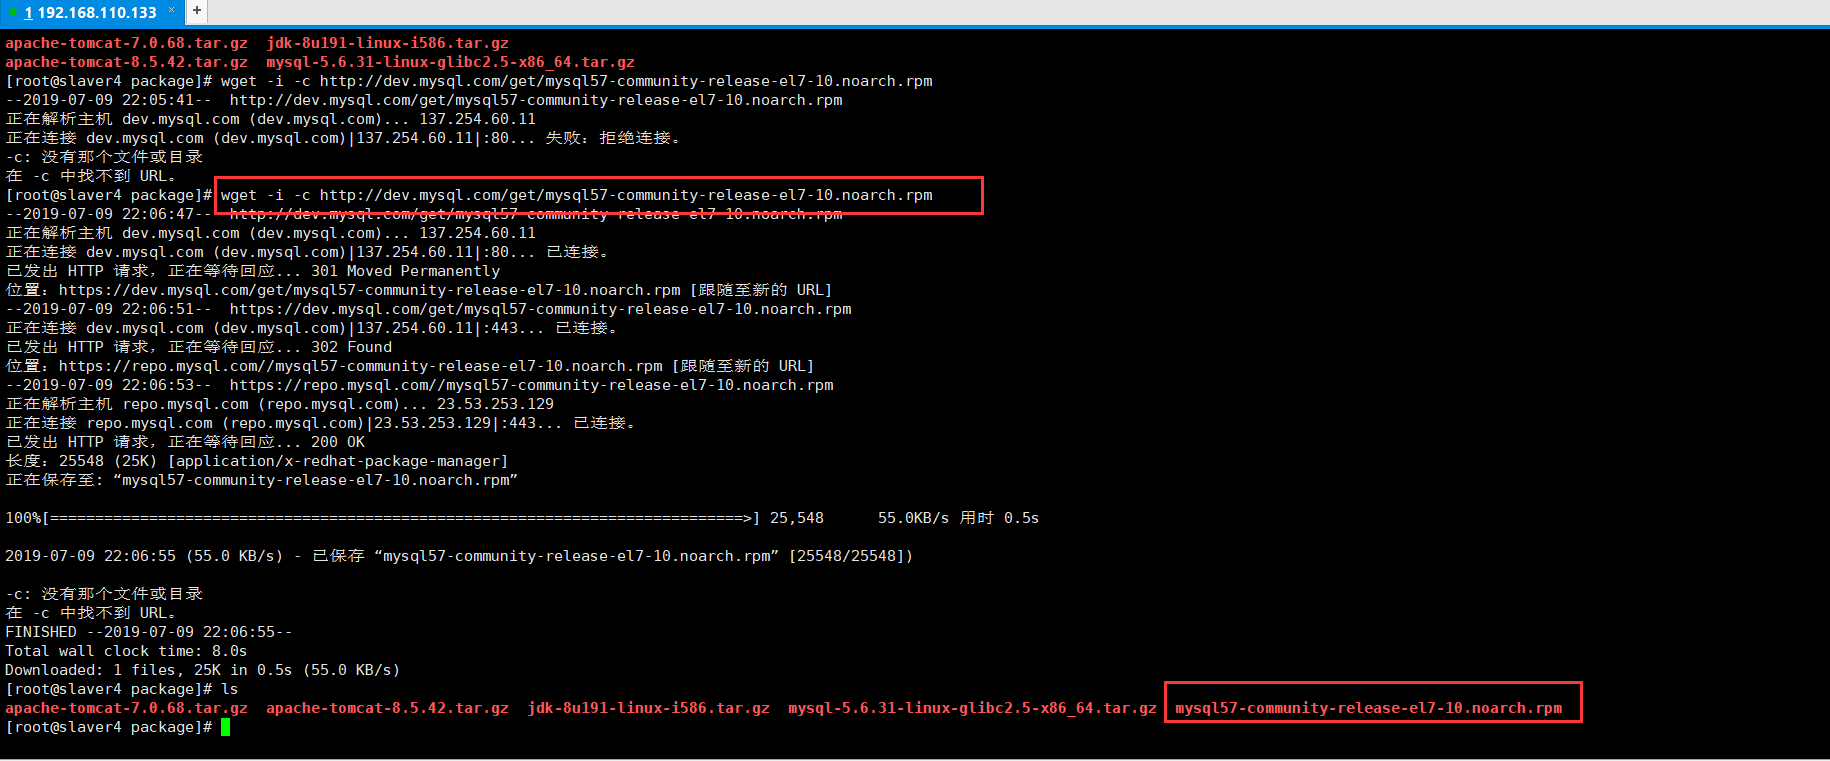
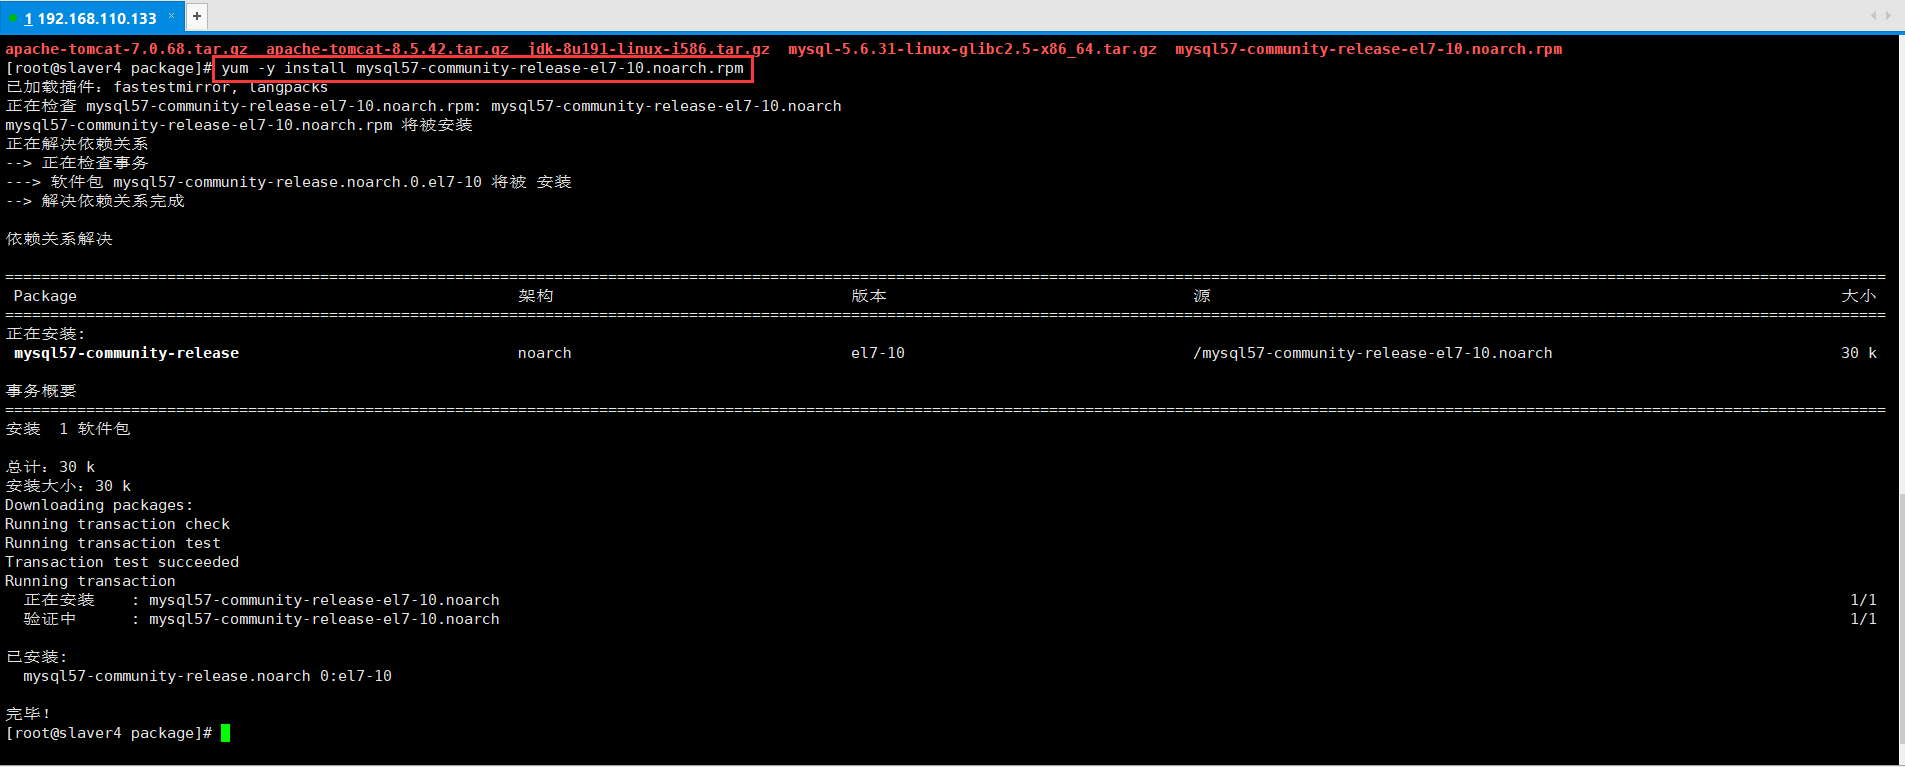
使用上面的命令就直接下载了安装用的Yum Repository,大概25KB的样子,然后就可以直接yum安装了。
 1 [root@slaver4 package]# yum -y install mysql57-community-release-el7-10.noarch.rpm
 2 已加载插件:fastestmirror, langpacks
 3 正在检查 mysql57-community-release-el7-10.noarch.rpm: mysql57-community-release-el7-10.noarch
 4 mysql57-community-release-el7-10.noarch.rpm 将被安装
 5 正在解决依赖关系
 6 --> 正在检查事务
 7 ---> 软件包 mysql57-community-release.noarch.0.el7-10 将被 安装
 8 --> 解决依赖关系完成
 9
10 依赖关系解决
11
12 =================================================================================================================================================================================================================
13  Package                                                 架构                                 版本                                  源                                                                      大小
14 =================================================================================================================================================================================================================
15 正在安装:
16  mysql57-community-release                               noarch                               el7-10                                /mysql57-community-release-el7-10.noarch                                30 k
17
18 事务概要
19 =================================================================================================================================================================================================================
20 安装  1 软件包
21
22 总计:30 k
23 安装大小:30 k
24 Downloading packages:
25 Running transaction check
26 Running transaction test
27 Transaction test succeeded
28 Running transaction
29   正在安装    : mysql57-community-release-el7-10.noarch                                                                                                                                                      1/1
30   验证中      : mysql57-community-release-el7-10.noarch                                                                                                                                                      1/1
31
32 已安装:
33   mysql57-community-release.noarch 0:el7-10
34
35 完毕!
之后就开始安装MySQL服务器。这步可能会花些时间,等了大概15分钟左右吧,这个看自己网速了都,安装完成后就会覆盖掉之前的mariadb。
 1 [root@slaver4 package]# yum -y install mysql-community-server
 2 已加载插件:fastestmirror, langpacks
 3 Loading mirror speeds from cached hostfile
 4  * base: mirror.jdcloud.com
 5  * extras: mirrors.aliyun.com
 6  * updates: mirrors.aliyun.com
 7 正在解决依赖关系
 8 --> 正在检查事务
 9 ---> 软件包 mysql-community-server.x86_64.0.5.7.26-1.el7 将被 安装
10 --> 正在处理依赖关系 mysql-community-common(x86-64) = 5.7.26-1.el7,它被软件包 mysql-community-server-5.7.26-1.el7.x86_64 需要
11 --> 正在处理依赖关系 mysql-community-client(x86-64) >= 5.7.9,它被软件包 mysql-community-server-5.7.26-1.el7.x86_64 需要
12 --> 正在检查事务
13 ---> 软件包 mysql-community-client.x86_64.0.5.7.26-1.el7 将被 安装
14 --> 正在处理依赖关系 mysql-community-libs(x86-64) >= 5.7.9,它被软件包 mysql-community-client-5.7.26-1.el7.x86_64 需要
15 ---> 软件包 mysql-community-common.x86_64.0.5.7.26-1.el7 将被 安装
16 --> 正在检查事务
17 ---> 软件包 mariadb-libs.x86_64.1.5.5.60-1.el7_5 将被 取代
18 --> 正在处理依赖关系 libmysqlclient.so.18()(64bit),它被软件包 2:postfix-2.10.1-7.el7.x86_64 需要
19 --> 正在处理依赖关系 libmysqlclient.so.18(libmysqlclient_18)(64bit),它被软件包 2:postfix-2.10.1-7.el7.x86_64 需要
20 ---> 软件包 mysql-community-libs.x86_64.0.5.7.26-1.el7 将被 舍弃
21 --> 正在检查事务
22 ---> 软件包 mysql-community-libs-compat.x86_64.0.5.7.26-1.el7 将被 舍弃
23 --> 解决依赖关系完成
24
25 依赖关系解决
26
27 =================================================================================================================================================================================================================
28  Package                                                       架构                                     版本                                           源                                                   大小
29 =================================================================================================================================================================================================================
30 正在安装:
31  mysql-community-libs                                          x86_64                                   5.7.26-1.el7                                   mysql57-community                                   2.2 M
32       替换  mariadb-libs.x86_64 1:5.5.60-1.el7_5
33  mysql-community-libs-compat                                   x86_64                                   5.7.26-1.el7                                   mysql57-community                                   2.0 M
34       替换  mariadb-libs.x86_64 1:5.5.60-1.el7_5
35  mysql-community-server                                        x86_64                                   5.7.26-1.el7                                   mysql57-community                                   166 M
36 为依赖而安装:
37  mysql-community-client                                        x86_64                                   5.7.26-1.el7                                   mysql57-community                                    24 M
38  mysql-community-common                                        x86_64                                   5.7.26-1.el7                                   mysql57-community                                   274 k
39
40 事务概要
41 =================================================================================================================================================================================================================
42 安装  3 软件包 (+2 依赖软件包)
43
44 总下载量:194 M
45 Downloading packages:
46 警告:/var/cache/yum/x86_64/7/mysql57-community/packages/mysql-community-common-5.7.26-1.el7.x86_64.rpm: 头V3 DSA/SHA1 Signature, 密钥 ID 5072e1f5: NOKEY                      ]  92 kB/s | 366 kB  00:35:58 ETA
47 mysql-community-common-5.7.26-1.el7.x86_64.rpm 的公钥尚未安装
48 (1/5): mysql-community-common-5.7.26-1.el7.x86_64.rpm                                                                                                                                     | 274 kB  00:00:02
49 (2/5): mysql-community-libs-5.7.26-1.el7.x86_64.rpm                                                                                                                                       | 2.2 MB  00:00:11
50 (3/5): mysql-community-libs-compat-5.7.26-1.el7.x86_64.rpm                                                                                                                                | 2.0 MB  00:00:10
51 (4/5): mysql-community-client-5.7.26-1.el7.x86_64.rpm                                                                                                                                     |  24 MB  00:02:34
52 (5/5): mysql-community-server-5.7.26-1.el7.x86_64.rpm                                                                                                                                     | 166 MB  00:12:19
53 -----------------------------------------------------------------------------------------------------------------------------------------------------------------------------------------------------------------
54 总计                                                                                                                                                                             260 kB/s | 194 MB  00:12:44
55 从 file:///etc/pki/rpm-gpg/RPM-GPG-KEY-mysql 检索密钥
56 导入 GPG key 0x5072E1F5:
57  用户ID     : "MySQL Release Engineering <mysql-build@oss.oracle.com>"
58  指纹       : a4a9 4068 76fc bd3c 4567 70c8 8c71 8d3b 5072 e1f5
59  软件包     : mysql57-community-release-el7-10.noarch (installed)
60  来自       : /etc/pki/rpm-gpg/RPM-GPG-KEY-mysql
61 Running transaction check
62 Running transaction test
63 Transaction test succeeded
64 Running transaction
65   正在安装    : mysql-community-common-5.7.26-1.el7.x86_64                                                                                                                                                   1/6
66   正在安装    : mysql-community-libs-5.7.26-1.el7.x86_64                                                                                                                                                     2/6
67   正在安装    : mysql-community-client-5.7.26-1.el7.x86_64                                                                                                                                                   3/6
68   正在安装    : mysql-community-server-5.7.26-1.el7.x86_64                                                                                                                                                   4/6
69   正在安装    : mysql-community-libs-compat-5.7.26-1.el7.x86_64                                                                                                                                              5/6
70   正在删除    : 1:mariadb-libs-5.5.60-1.el7_5.x86_64                                                                                                                                                         6/6
71   验证中      : mysql-community-server-5.7.26-1.el7.x86_64                                                                                                                                                   1/6
72   验证中      : mysql-community-client-5.7.26-1.el7.x86_64                                                                                                                                                   2/6
73   验证中      : mysql-community-libs-5.7.26-1.el7.x86_64                                                                                                                                                     3/6
74   验证中      : mysql-community-libs-compat-5.7.26-1.el7.x86_64                                                                                                                                              4/6
75   验证中      : mysql-community-common-5.7.26-1.el7.x86_64                                                                                                                                                   5/6
76   验证中      : 1:mariadb-libs-5.5.60-1.el7_5.x86_64                                                                                                                                                         6/6
77
78 已安装:
79   mysql-community-libs.x86_64 0:5.7.26-1.el7                        mysql-community-libs-compat.x86_64 0:5.7.26-1.el7                        mysql-community-server.x86_64 0:5.7.26-1.el7
80
81 作为依赖被安装:
82   mysql-community-client.x86_64 0:5.7.26-1.el7                                                            mysql-community-common.x86_64 0:5.7.26-1.el7
83
84 替代:
85   mariadb-libs.x86_64 1:5.5.60-1.el7_5
86
87 完毕!
88 [root@slaver4 package]#
2、Mysql的配置。
首先启动Mysql。然后查看MySQL运行状态,运行状态如图:
 1 [root@slaver4 package]# systemctl start  mysqld.service
 2 [root@slaver4 package]# systemctl status mysqld.service
 3 ● mysqld.service - MySQL Server
 4    Loaded: loaded (/usr/lib/systemd/system/mysqld.service; enabled; vendor preset: disabled)
 5    Active: active (running) since 二 2019-07-09 22:27:30 CST; 20s ago
 6      Docs: man:mysqld(8)
 7            http://dev.mysql.com/doc/refman/en/using-systemd.html
 8   Process: 9204 ExecStart=/usr/sbin/mysqld --daemonize --pid-file=/var/run/mysqld/mysqld.pid $MYSQLD_OPTS (code=exited, status=0/SUCCESS)
 9   Process: 9122 ExecStartPre=/usr/bin/mysqld_pre_systemd (code=exited, status=0/SUCCESS)
10  Main PID: 9207 (mysqld)
11     Tasks: 27
12    CGroup: /system.slice/mysqld.service
13            └─9207 /usr/sbin/mysqld --daemonize --pid-file=/var/run/mysqld/mysqld.pid
14
15 7月 09 22:27:15 slaver4 systemd[1]: Starting MySQL Server...
16 7月 09 22:27:30 slaver4 systemd[1]: Started MySQL Server.
17 [root@slaver4 package]#

此时MySQL已经开始正常运行,不过要想进入MySQL还得先找出此时root用户的密码,通过如下命令可以在日志文件中找出密码:
1 [root@slaver4 package]# grep "password" /var/log/mysqld.log
2 2019-07-09T14:27:27.564729Z 1 [Note] A temporary password is generated for root@localhost: 1j:nj40f35%N

如下命令进入数据库:

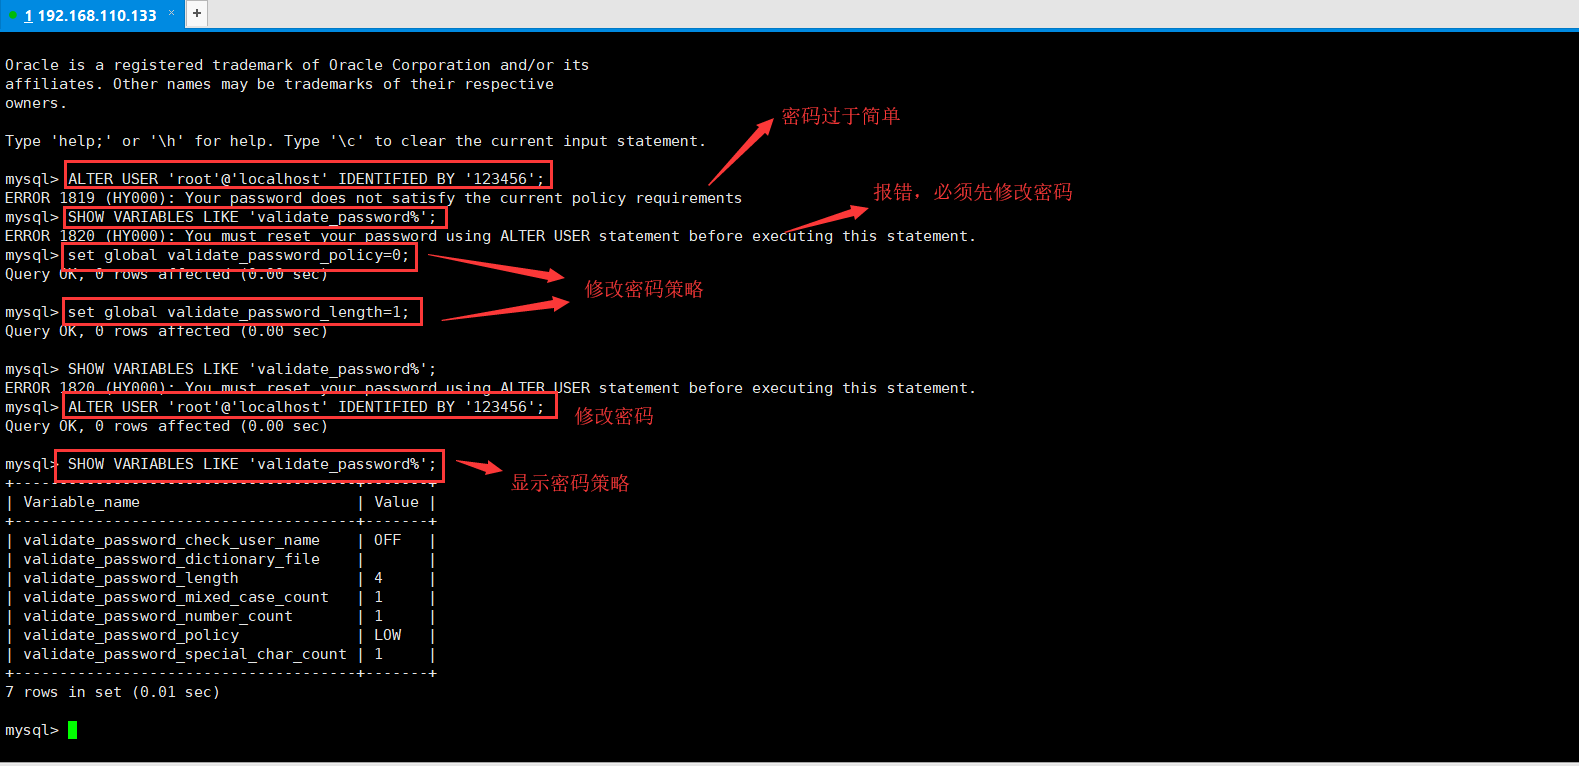
输入初始密码,此时不能做任何事情,因为MySQL默认必须修改密码之后才能操作数据库:
1 mysql> ALTER USER 'root'@'localhost' IDENTIFIED BY '123456';
2 ERROR 1819 (HY000): Your password does not satisfy the current policy requirements
这里有个问题,新密码设置的时候如果设置的过于简单会报错:
具体原因可以查看参考的链接:https://www.cnblogs.com/bigbrotherer/p/7241845.html#top

MySQL完整的初始密码规则可以通过如下命令查看:
mysql> set global validate_password_policy=0;
mysql> set global validate_password_length=1;
设置之后就是我上面查出来的那几个值了,此时密码就可以设置的很简单,例如1234之类的。到此数据库的密码设置就完成了。
 1 mysql> ALTER USER 'root'@'localhost' IDENTIFIED BY '123456';
 2 ERROR 1819 (HY000): Your password does not satisfy the current policy requirements
 3 mysql> SHOW VARIABLES LIKE 'validate_password%';
 4 ERROR 1820 (HY000): You must reset your password using ALTER USER statement before executing this statement.
 5 mysql> set global validate_password_policy=0;
 6 Query OK, 0 rows affected (0.00 sec)
 7
 8 mysql> set global validate_password_length=1;
 9 Query OK, 0 rows affected (0.00 sec)
10
11 mysql> SHOW VARIABLES LIKE 'validate_password%';
12 ERROR 1820 (HY000): You must reset your password using ALTER USER statement before executing this statement.
13 mysql> ALTER USER 'root'@'localhost' IDENTIFIED BY '123456';
14 Query OK, 0 rows affected (0.00 sec)
15
16 mysql> SHOW VARIABLES LIKE 'validate_password%';
17 +--------------------------------------+-------+
18 | Variable_name                        | Value |
19 +--------------------------------------+-------+
20 | validate_password_check_user_name    | OFF   |
21 | validate_password_dictionary_file    |       |
22 | validate_password_length             | 4     |
23 | validate_password_mixed_case_count   | 1     |
24 | validate_password_number_count       | 1     |
25 | validate_password_policy             | LOW   |
26 | validate_password_special_char_count | 1     |
27 +--------------------------------------+-------+
28 7 rows in set (0.01 sec)
29
30 mysql>
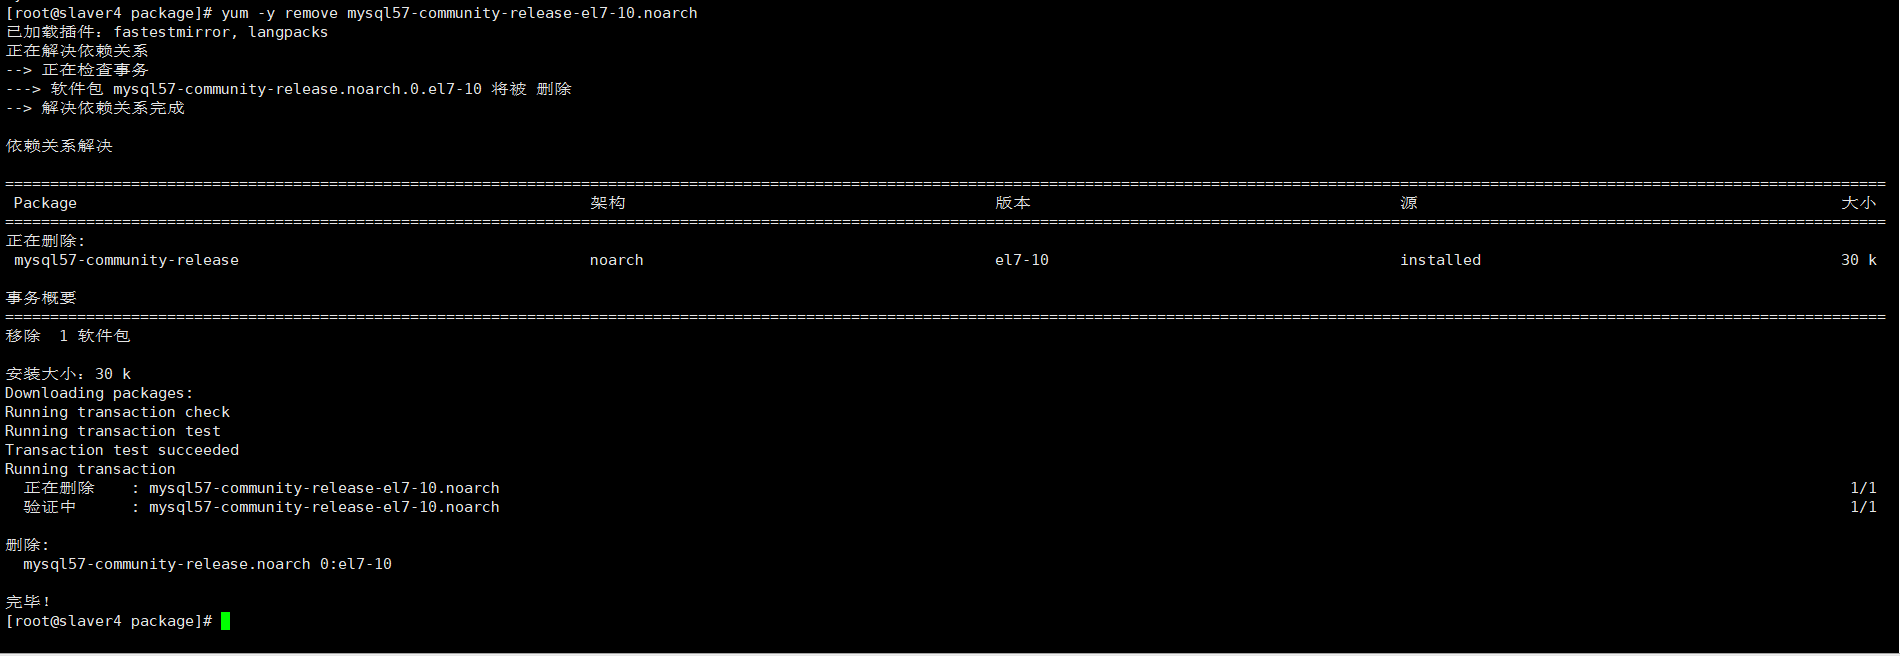
但此时还有一个问题,就是因为安装了Yum Repository,以后每次yum操作都会自动更新,需要把这个卸载掉:
 1 [root@slaver4 package]# yum -y remove mysql57-community-release-el7-10.noarch
 2 已加载插件:fastestmirror, langpacks
 3 正在解决依赖关系
 4 --> 正在检查事务
 5 ---> 软件包 mysql57-community-release.noarch.0.el7-10 将被 删除
 6 --> 解决依赖关系完成
 7
 8 依赖关系解决
 9
10 =================================================================================================================================================================================================================
11  Package                                                         架构                                         版本                                         源                                               大小
12 =================================================================================================================================================================================================================
13 正在删除:
14  mysql57-community-release                                       noarch                                       el7-10                                       installed                                        30 k
15
16 事务概要
17 =================================================================================================================================================================================================================
18 移除  1 软件包
19
20 安装大小:30 k
21 Downloading packages:
22 Running transaction check
23 Running transaction test
24 Transaction test succeeded
25 Running transaction
26   正在删除    : mysql57-community-release-el7-10.noarch                                                                                                                                                      1/1
27   验证中      : mysql57-community-release-el7-10.noarch                                                                                                                                                      1/1
28
29 删除:
30   mysql57-community-release.noarch 0:el7-10
31
32 完毕!
33 [root@slaver4 package]#
然鹅报错了:

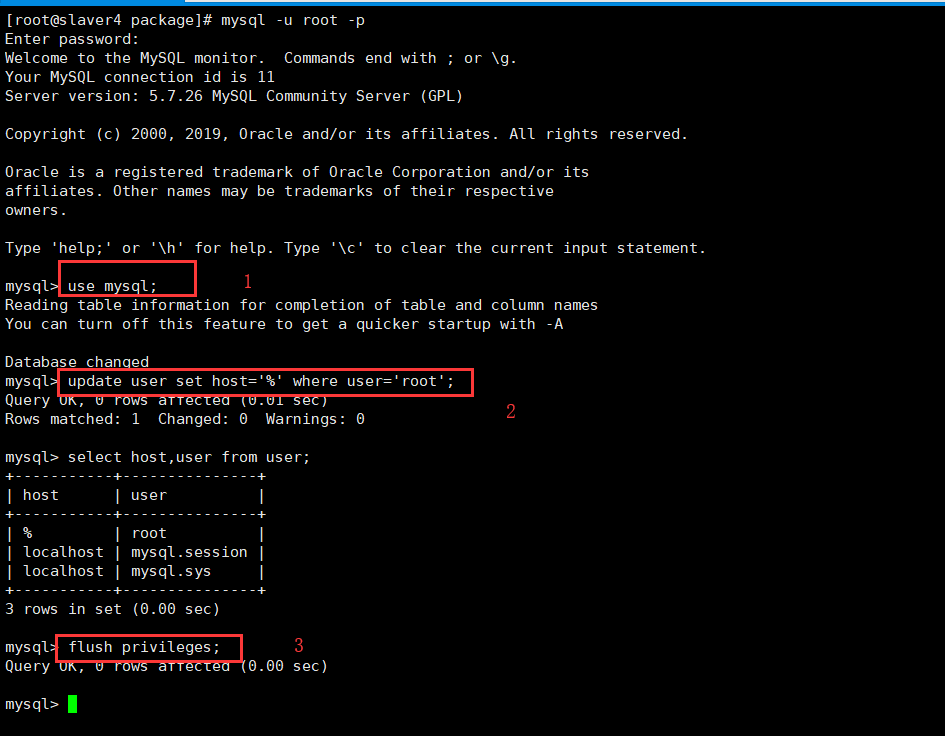
解决Navicat 出错:1130-host . is not allowed to connect to this MySql server,MySQL。
 1 [root@slaver4 package]# mysql -u root -p
 2 Enter password:
 3 Welcome to the MySQL monitor.  Commands end with ; or g.
 4 Your MySQL connection id is 11
 5 Server version: 5.7.26 MySQL Community Server (GPL)
 6
 7 Copyright (c) 2000, 2019, Oracle and/or its affiliates. All rights reserved.
 8
 9 Oracle is a registered trademark of Oracle Corporation and/or its
10 affiliates. Other names may be trademarks of their respective
11 owners.
12
13 Type 'help;' or 'h' for help. Type 'c' to clear the current input statement.
14
15 mysql> use mysql;
16 Reading table information for completion of table and column names
17 You can turn off this feature to get a quicker startup with -A
18
19 Database changed
20 mysql> update user set host='%' where user='root';
21 Query OK, 0 rows affected (0.01 sec)
22 Rows matched: 1  Changed: 0  Warnings: 0
23
24 mysql> select host,user from user;
25 +-----------+---------------+
26 | host      | user          |
27 +-----------+---------------+
28 | %         | root          |
29 | localhost | mysql.session |
30 | localhost | mysql.sys     |
31 +-----------+---------------+
32 3 rows in set (0.00 sec)
33
34 mysql> flush privileges;
35 Query OK, 0 rows affected (0.00 sec)
36
37 mysql>
待续......