数据源
通过jdbc连接数据库,多建立几条连接放在数据源里面。可以设置数据源的最大连接数,同时活跃的连接数,最少空闲的连接数,能够同时接收处理的连接数等等。
dbcp数据源
需要的jar包:
commons-dbcp.jar;
commons-pool.jar
mysql-connector-java.jar
前两个jar包到阿帕奇官网下载。第三个jar包到mysql官网下载。
他是对jdbc的封装。底层还是要通过jdbc连接数据库的。实现了java.sql.DataSource接口的类有BasicDataSourceFactory和BasicDataSource。
这两个类是启动database的。
![]()
![]()
其中BasicDataSourceFactory底层实际上是先创建了BasicDataSource的对象,然后给BasicDataSource对象
进行分钟相关属性的赋值。比如username,password,url,driverClassName等等。BasicDataSource则是直接通过set方法对这些属性直接赋值。
通过getConnection方法获取数据库连接(Connection接口)。之后的操作就和jdbc一样了。
C3P0数据源
需要的jar包
c3p0-0.9.5.2.jar
mchange-commons-java-0.2.11.jar
mysql-connector-java-5.1.40-bin.jar
这些资源网上很多一找一大片。
(一)这个类(ComboPooledDataSource)是启动datadase数据源的
1   ComboPooledDataSource source = new ComboPooledDataSource();
3    source.setDriverClass("com.mysql.jdbc.Driver");
4     source.setUser("root");
5     source.setPassword("1213265442");
6     source.setJdbcUrl("jdbc:mysql://localhost:3306/user");
通过set方法即可设置数据池的相关参数(最大连接数,同时活跃的连接数,最少空闲的连接数,能够同时接收处理的连接数等等)
(二)ComboPooledDataSource source = new ComboPooledDataSource("intergalactoApp");
编写c3p0-config.xml文件放在src目录下面。内容如下(注意加黑的部分)
 1 <c3p0-config>
 2   <!-- This app is massive! -->
 3   <named-config name="intergalactoApp">
 4     <property name="acquireIncrement">50</property>       <!--连接池在无空闲连接可用时一次性创建的新数据库连接数 -->
 5     <property name="initialPoolSize">100</property>           <!--连接池初始化时创建的连接数-->
 6     <property name="minPoolSize">50</property>               <!--连接池最少保持的可用连接数->
 7     <property name="maxPoolSize">1000</property>           <!--连接池最多保持的可用连接数->
 8
 9       <property name="user">root</property>
10       <property name="password">1213265442</property>
11       <property name="driverClassName">com.mysql.jdbc.Driver</property>
12       <property name="jdbcUrl">jdbc:mysql://localhost:3306/user</property>
13   </named-config>
14 </c3p0-config>
通过source.getConnection()的方法就可以得到Connection接口对象。剩下的就是jdbc的操作了。
通过hibernate和datasource连接
我使用的是hibernate4.3当前稳定的最高版本。查看project/etc/hibernate.proterties文件,这个文件是hibernate所有的的配置了。
查看可知
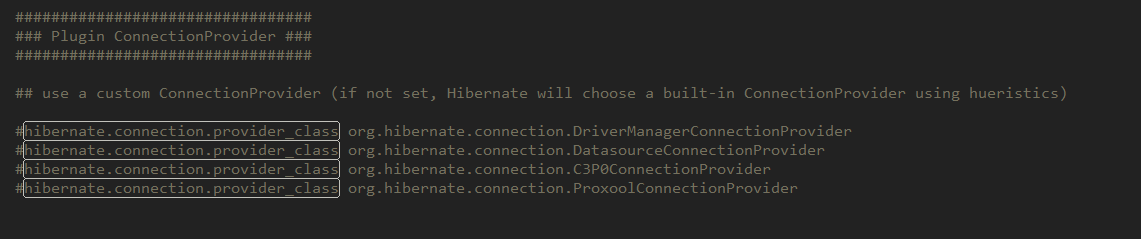
hibernate支持C3P0ConnectionProvider,ProxoolConnectionProvider,DatasourceConnectionProvider,DriverManagerConnectionProvider这四种jdbc连接池
并不包括dbcp,但是支持c3p0。下面我们来给hibernate配置C3P0.
需要的jar包
c3p0-0.9.2.2.jar
mchange-commons-java-0.2.11.jar
mysql-connector-java-5.1.40-bin.jar
hibernate-c3p0-4.3.5.Final
还有一些hibernate的必须包,在required文件夹下面。
hibernate.cfg.xml配置文件中加入
<property name="hibernate.connection.provider_class">org.hibernate.connection.C3P0ConnectionProvider</property>
这就代表了不使用hibernate自己的连接池,而是使用我们自己的C3P0连接池
使用hibernate和c3p0做数据库的数据源前面都要加上“hibernate.c3p0”
<property name="hibernate.c3p0.idle_test_period">3000</property>
有关于jdcb的连接还是按照hibernate的jdbc连接。而有关c3p0数据源的属性配置比如启动多少个connection连接,属性前面都要加上“hibernate.c3p0”就像这样

其他的就跟正常的hibernate配置一样了。其实我们就是把hibernate自带的数据池换成了我们自己的。其他都一样。
1、 Install Your JDBC Driver
Use of the JDBC Data Sources JNDI Resource Factory requires that you make an appropriate JDBC driver available to both Tomcat internal classes and to your web application. This is most easily accomplished by installing the driver’s JAR file(s) into the $CATALINA_HOME/lib directory, which makes the driver available both to the resource factory and to your application.
2、Declare Your Resource Requirements
Next, modify the web application deployment descriptor (/WEB-INF/web.xml) to declare the JNDI name under which you will look up preconfigured data source. By convention, all such names should resolve to the jdbc subcontext (relative to the standard java:comp/env naming context that is the root of all provided resource factories. A typical web.xmlentry might look like this:
 1 <resource-ref>
 2   <description>
 3     Resource reference to a factory for java.sql.Connection
 4     instances that may be used for talking to a particular
 5     database that is configured in the <Context>
 6     configuration for the web application.
 7   </description>
 8   <res-ref-name>
 9     jdbc/EmployeeDB
10   </res-ref-name>
11   <res-type>
12     javax.sql.DataSource
13   </res-type>
14   <res-auth>
15     Container
16   </res-auth>
17 </resource-ref>
3、 Code Your Application’s Use Of This Resource
1     Context initCtx = new InitialContext();
2     Context envCtx = (Context) initCtx.lookup("java:comp/env");
3     DataSource ds = (DataSource)
4       envCtx.lookup("jdbc/EmployeeDB");
5     Connection conn = ds.getConnection();
6     use this connection to access the database ...
7     conn.close();
4、To configure Tomcat’s resource factory, add an element like this to the <Context>element for the web application.
 1 <Context >
 2   <Resource name="jdbc/EmployeeDB"
 3             auth="Container"
 4             type="javax.sql.DataSource"
 5             username="dbusername"
 6             password="dbpassword"
 7             driverClassName="org.hsql.jdbcDriver"
 8             url="jdbc:HypersonicSQL:database"
 9             maxTotal="8"
10             maxIdle="4"/>
11 </Context>