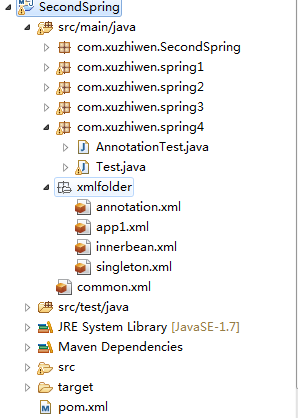
第一步:新建工程 SecondSpring
文件目录结构如下:

第二步:导入相应的spring jar包
略...
第三步: 新建类
AnnotationTest.java
package com.xuzhiwen.spring4;

import org.springframework.context.annotation.Scope;
import org.springframework.stereotype.Service;


@Service
@Scope("singleton")
public class AnnotationTest {
    public String name;

    public String getName() {
        return name;
    }

    public void setName(String name) {
        this.name = name;
    }
}
第四步: 新建配置文件
common.xml
<beans xmlns="http://www.springframework.org/schema/beans"
    xmlns:xsi="http://www.w3.org/2001/XMLSchema-instance"
    xsi:schemaLocation="http://www.springframework.org/schema/beans
    http://www.springframework.org/schema/beans/spring-beans-2.5.xsd">

    <import resource="xmlfolder/app1.xml" />
    <import resource="xmlfolder/innerbean.xml" />
    <import resource="xmlfolder/singleton.xml" />
    <import resource="xmlfolder/annotation.xml" />

</beans>
第五步:新建配置文件
annotation.xml
<beans xmlns="http://www.springframework.org/schema/beans"
    xmlns:xsi="http://www.w3.org/2001/XMLSchema-instance"
    xmlns:context="http://www.springframework.org/schema/context"
    xsi:schemaLocation="http://www.springframework.org/schema/beans
    http://www.springframework.org/schema/beans/spring-beans-2.5.xsd
    http://www.springframework.org/schema/context
    http://www.springframework.org/schema/context/spring-context-2.5.xsd">

    <context:component-scan base-package="com.xuzhiwen.spring4" />

</beans>
第六步: 编写测试类
package com.xuzhiwen.spring4;

import org.springframework.context.ApplicationContext;
import org.springframework.context.support.ClassPathXmlApplicationContext;

public class Test {
    public static void main(String[] args) {
        ApplicationContext app = new ClassPathXmlApplicationContext("common.xml");
        AnnotationTest test1 = (AnnotationTest) app.getBean("annotationTest");
        test1.setName("helloworld");


        AnnotationTest test2 = (AnnotationTest) app.getBean("annotationTest");
        System.out.println(test2.getName());
    }
}
第七步:运行结果如下

注: 同理可实现原型