ELF(Executable and Linkable Format)可执行的和可链接的格式。(对应Windows为PE)
其包含了以下三类:
- 可重定位文件:保存着代码和适当的数据,用来和其它的目标文件一起来创建一个可执行文件、静态库文件或者是一个共享目标文件
- 可执行文件:保存着一个用来执行的程序,一般由多个可重定位文件结合生成,是完成了所有重定位工作和符号解析(除了运行时解析的共享库符号)的文件。
- 共享目标文件:保存着代码和合适的数据,用来被两个链接器链接。第一个是链接编辑器(静态链接),可以和其它的可重定位和共享目标文件来创建其它的object。第二个是动态链接器,联合一个可执行文件和其它的共享目标文件来创建一个进程映象。
ELF文件格式如下图:

程序编译
程序从源代码到可执行文件的步骤:预处理、编译、汇编、衔接--以hello12.c为例。
预处理: gcc -E hello12.c -o hello12.i  -m32
编译:gcc -S hello12.i  -o hello12.s -m32
汇编:gcc -c hello12.s -o hello12.o -m32
默认衔接(动态库):gcc hello12.o -o hello12 -m32
衔接静态库:gcc hello12.o -o hello12.static -m32 -static
Linux内核如何装载和启动一个可执行程序
实验1:
编程使用exec* 库函数加载一个可执行文件,动态链接分为可执行程序装载时动态链接和运行时动态链接,编程练习动态链接库的这两种使用方式。
shlibexample.h
#ifndef  _SH_LTB_EXAMPLE_H_
#define  _SH_LTB_EXAMPLE_H_
#define SUCCESS 0
#define FAILURE (-1)
#ifdef __cplusplus
extern "C" {
#endif
int SharedLibApi();
#ifdef __cplusplus
}
#endif
#endif

dllibexample.h
#ifndef  _DL_LTB_EXAMPLE_H_
#define  _DL_LTB_EXAMPLE_H_
#ifdef _cplusplus
extern "C"{
#endif
int DynamicalLoadingLibApi();
#ifdef _cplusplus
}
#endif
#endif

shlibexample.c
#include <stdio.h>
#include "shlibexample.h"
int SharedLibApi()
{
printf("This is a shared libary!
");
return SUCCESS;
}

dllibexample.c
#include <stdio.h>
#include "dllibexample.h"
#define SUCCESS 0
#define FAILURE(-1)
int DynamicalLoadingLibApi()
{
printf(“This is a Dynamical Loading library”!
”);
return SUCCESS;
}
2、编译成libshlibexample.so文件
$ gcc -shared shlibexample.c -o libshlibexample.so -m32
$ gcc -shared dllibexample.c -o libdllibexample.so -m32
3、mian函数中分别以共享库和动态加载共享库的方式使用libshlibexample.so文件和libdllibexample.so文件
main.c
#include <stdio.h>
#include "shlibexample.h"
#include <dlfcn.h>

int main()
{
   printf("This is a Main program!
");
/* Use Shared Lib */
  printf("Calling SharedLibApi() function of libshlibexample.so!
");
 SharedLibApi(); //直接调用共享库
/* Use Dynamical Loading Lib */
  void * handle = dlopen("libdllibexample.so",RTLD_NOW);//打开动态库并将其加载到内存
  if(handle == NULL)
{
    printf("Open Lib libdllibexample.so Error:%s
",dlerror());
    return   FAILURE;
}
int (*func)(void);
char * error;
func = dlsym(handle,"DynamicalLoadingLibApi");
if((error = dlerror()) != NULL)
{
    printf("DynamicalLoadingLibApi not found:%s
",error);
    return   FAILURE;
}
printf("Calling DynamicalLoadingLibApi() function of libdllibexample.so!
");
func();
dlclose(handle); //卸载库
return SUCCESS;
}
4、动态衔接运行测试
因为shilibexample在衔接时就需要提供路径,对应的头文件shilibexample.h也需要在编译器能找到位置。使用参数-L表明文件路径,-l表示库文件名。
dllibexample只有在程序运行到相关语句才会访问,在编译时不需要任何的相关信息,使用-ldl指明其所需要的共享库dlopen,同时修改LD_LIBRARY_PATH确保dllibexample.so可以查到。
gcc main.c -o main -L./ -l shlibexample -ldl -m32
export LD_LIBRARY_PATH=$PWD
./main
实验二
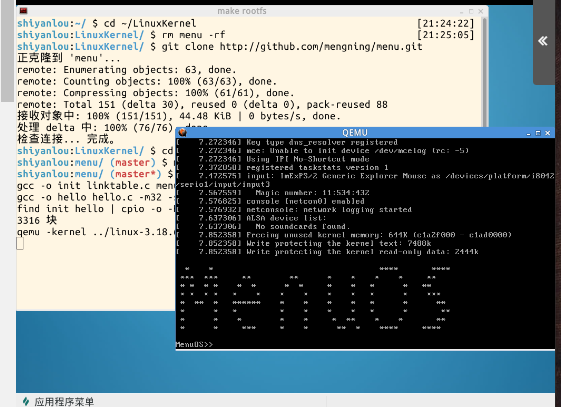
1、首先从github上下载包含test_exec.c文件的文件夹,进行编译。
cd ~/LinuxKernel
rm menu -rf
git clone https://github.com/mengning/menu.git
cd menu
mv test_exec.c test.c
make rootfs

2、启动qemu。
qemu -kernel linux-3.18.6/arch/x86/boot/bzImage -initrd rootfs.img -s -S
3、加载内核和端口。
gdb
file ../linux-3.18.6/vmlinux
target remote:1234
5、设置sys_execve和load_elf_binary和start_thread三个断点。
b sys_execve
b load_elf_binary
b start_thread

6、调试运行程序。
int do_execve(struct filename *filename,
    const char __user *const __user *__argv,
    const char __user *const __user *__envp)
{
    return do_execve_common(filename, argv, envp);
}


static int do_execve_common(struct filename *filename,
                struct user_arg_ptr argv,
                struct user_arg_ptr envp)
{
    // 检查进程的数量限制

    // 选择最小负载的CPU,以执行新程序
    sched_exec();

    // 填充 linux_binprm结构体
    retval = prepare_binprm(bprm);

    // 拷贝文件名、命令行参数、环境变量
    retval = copy_strings_kernel(1, &bprm->filename, bprm);
    retval = copy_strings(bprm->envc, envp, bprm);
    retval = copy_strings(bprm->argc, argv, bprm);

    // 调用里面的 search_binary_handler
    retval = exec_binprm(bprm);

    // exec执行成功

}

static int exec_binprm(struct linux_binprm *bprm)
{
    // 扫描formats链表,根据不同的文本格式,选择不同的load函数
    ret = search_binary_handler(bprm);
    // ...
    return ret;
}
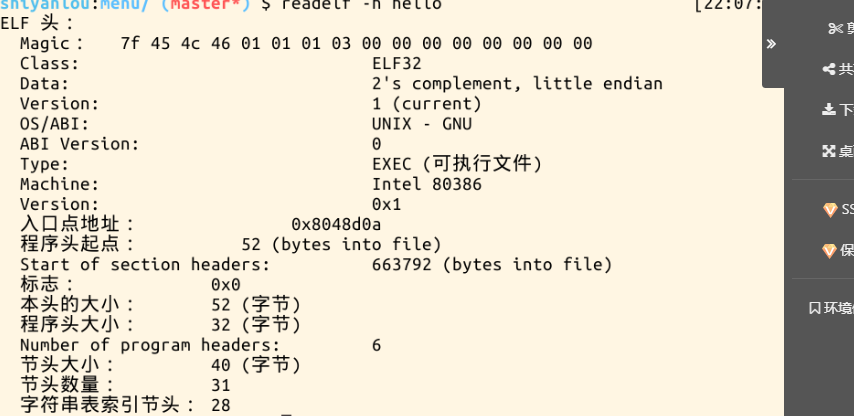
输入redelf -h hello可以查看hello的EIF头部
