1、第一个spingboot程序

1.2 原理初探
POM.xml
-
spring-boot-dependencies: 核心依赖存在于父工程中,版本号管理也存在于父工程中,只需要引入依赖即可,不需要指定版本。
启动器
-
启动器即spring boot的启动场景,引入某一starter时,自动引入相关环境。
<dependency>
    <groupId>org.springframework.boot</groupId>
    <artifactId>spring-boot-starter-web</artifactId>
</dependency>
需要时找到对应的环境即可。
主程序
-
@SpringBootApplication标注这是springboot应用。
-
注解,springbootapplication注解层级如下
@SpringBootConfiguration springboot的配置注解
@Configuration spring的配置类
@Component spring的一个组件
@EnableAutoConfiguration 自动配置包
@AutoConfigurationPackage 自动配置包
@Import({Registrar.class}) 自动配置包的注册
@Import({AutoConfigurationImportSelector.class}) 自动配置的导入选择
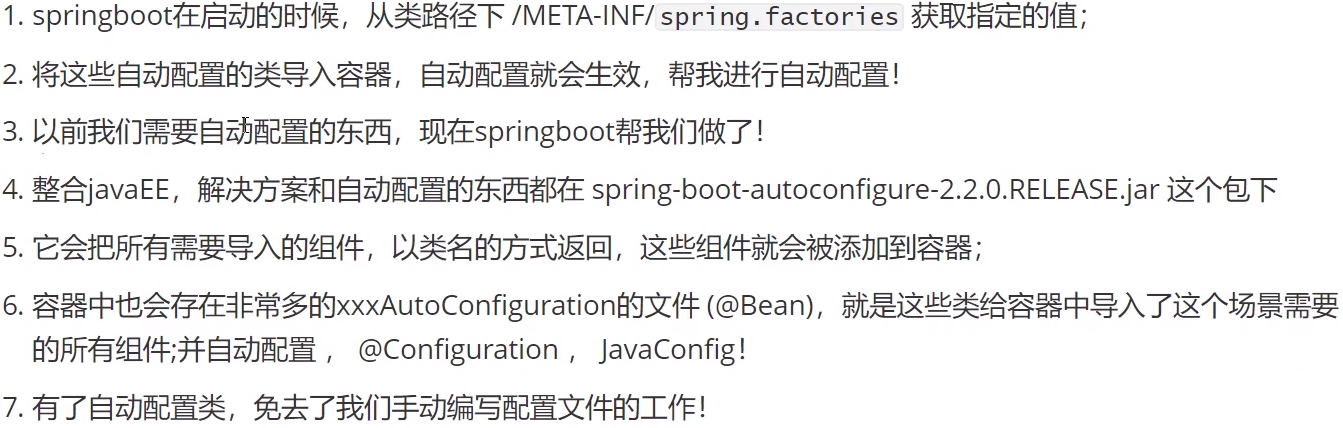
AutoConfigurationImportSelector中获取已经配置了的配置
protected List<String> getCandidateConfigurations(AnnotationMetadata metadata, AnnotationAttributes attributes) {
    List<String> configurations = SpringFactoriesLoader.loadFactoryNames(this.getSpringFactoriesLoaderFactoryClass(), this.getBeanClassLoader());
    Assert.notEmpty(configurations, "No auto configuration classes found in META-INF/spring.factories. If you are using a custom packaging, make sure that file is correct.");
    return configurations;
}
加载文件如下。
spring.factories文件中配置了autoconfiguration的内容。
# Auto Configure
org.springframework.boot.autoconfigure.EnableAutoConfiguration=
org.springframework.boot.autoconfigure.admin.SpringApplicationAdminJmxAutoConfiguration,
org.springframework.boot.autoconfigure.aop.AopAutoConfiguration,
org.springframework.boot.autoconfigure.amqp.RabbitAutoConfiguration,
org.springframework.boot.autoconfigure.batch.BatchAutoConfiguration,
org.springframework.boot.autoconfigure.cache.CacheAutoConfiguration,
Properties properties = PropertiesLoaderUtils.loadProperties(resource);
将所有资源封装在静态类中。
结论:springboot所有要自动配置都是在启动时扫描并加载。spring.factories所有的配置类都在这里,但不一定生效,需要通过@ConditionOn等注解判断指定资源是否存在,如果存在,再加载自动装配。
SpringApplication.run(args).
该过程分两部分,一部分是SpringApplication的初始化,一部分是run方法。
主要做了以下事:
1、判断应用是普通应用还是WEB应用;
2、查找并加载所有可用初始化器,设置到initializers中;
3、找出所有的应用程序监听器,设置到listeners中;
4、推断并设置mian方法的定义类,找到运行的主类。
1.3 配置文件
-
yaml(yml) 基本语法:
属性名: 值。
对象:
student: {age: 12,name: haha}
数组:
pets:
-dog
-cat
pets: [cat,dog,pig] 行内写法。
-
给实体类赋值
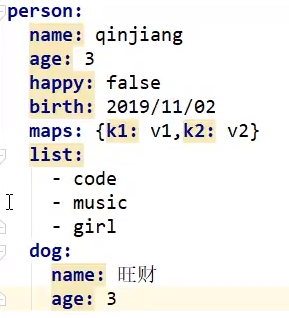
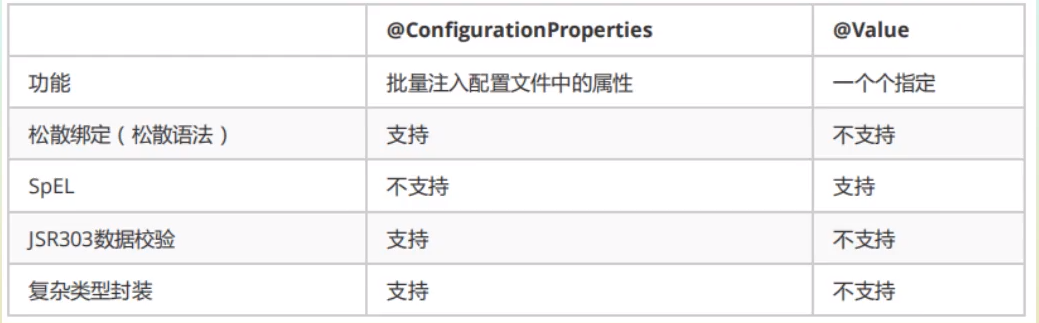
使用@ConfigurationProperties(prefix="person")加在实体上即可自动注入。
使用构造器注入,需要加上无参及有参构造器。
-
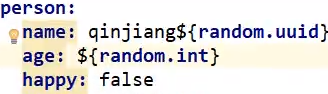
properties也可以注入:
使用@PropertiesSources导入。
当name不符合要求时会报错。
-
1、项目config目录下
2、项目路径下
3、resources/config目录下
4、resources目录下
配置文件切换
properties :
建立application-dev.propertiesapplication-pro.properties等文件。
使用sping.profiles.active=dev进行切换即可。
yml:
可以在同一个文件中,使用---分割。
server:
  port: 8080
spring:
  profiles:
    active: test
---
server:
  port: 8081
spring:
  profiles: dev
---
server:
  port: 8082
spring:
  profiles: test
哪些内容可以配置


debug: true可以看到更多输出。
2.1 静态资源位置
-
webjars: 可以以jar包的形式导入静态资源文件。
-
{"classpath:/META-INF/resources/", "classpath:/resources/", "classpath:/static/", "classpath:/public/"} /**多个路径均可以。优先级 resources>static>public
一旦在配置文件中进行了静态资源自定义,以上文件夹就失效了。
spring.mvc.....location。
2.2 首页定制
一般将首页放在static下。
首页图标:
Spring Boot在配置的静态内容位置和类路径的根(按此顺序)中查找favicon.ico。如果存在这样的文件,它将自动用作应用程序的favicon。
2.3 模板引擎(thymeleaf)
JSP在springboot存在缺陷,官方推荐使用thymeleaf。
Thymeleaf基本语法:
引入命名空间->取值。
<html lang="en" xmlns:th="http://www.thymeleaf.org">
<div th:text="${msg}"></div>
2.4 springMVC功能扩展
- 自定义视图解析器
先自定义配置类实现WebMvcConfigurer,然后自定义视图解析器,在将自定义解析器用bean注入,springboot会自动装配上
@Configuration
public class MyConfig implements WebMvcConfigurer {

    @Bean
    public ViewResolver myView(){
        return new MyView();
    }

    public static class MyView implements ViewResolver{
        @Override
        public View resolveViewName(String s, Locale locale) throws Exception {
            return null;
        }
    }
}
不怎么使用。
- Formatter,格式化器
日期格式化:spring.mvc.date-format:进行配置。
- 自定义视图跳转
    //添加视图解析跳转
    @Override
    public void addViewControllers(ViewControllerRegistry registry) {
        registry.addViewController("/abc").setViewName("index");
    }

使用时不能加@EnableWebMvc,这个类会导入指定的类,导致自动配置失效,不能实现覆盖自定义。
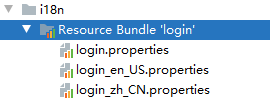
2.5 国际化配置
- 为不同语言建立不同的properties文件,分别为某一个值配置不同语言的显示。配置文件需添加spring.message.basename属性为i8n.login
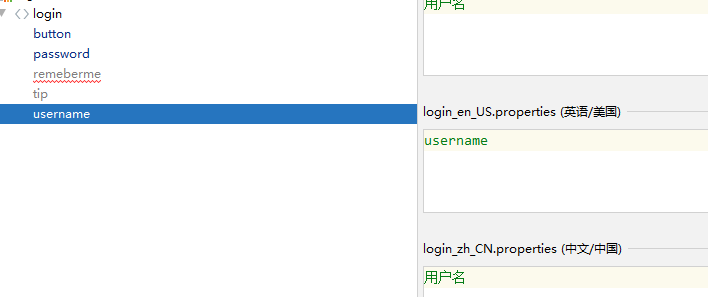
- 页面中的值用properties中的变量名替代,并增加几个不同语言切换的按钮。(Thymeleaf中消息使用#{},如下所示!)
    <form method="post">
        <input name="username" type="text" th:placeholder="#{login.username}">
        <input name="password" type="password" th:placeholder="#{login.password}">
        <input type="submit" th:value="#{login.button}">
    </form>
    <div>
        <a th:href="@{/login(l='zh_CN')}">中文</a>
        <a th:href="@{/login(l='en_US')}">English</a>
    </div>
- 自定义类实现LocaleResolver,并将该类作为返回的LocaleResolver bean
public class MyLocaleResolver implements LocaleResolver {
    @Override
    public Locale resolveLocale(HttpServletRequest httpServletRequest) {
        String l = httpServletRequest.getParameter("l");
        Locale aDefault = Locale.getDefault();
        if(StringUtils.isEmpty(l)){
        }else{
            String[] s = l.split("_");
            aDefault = new Locale(s[0],s[1]);
        }
        return aDefault;
    }
    @Bean
    public LocaleResolver localeResolver(){
        return new MyLocaleResolver();
    }
现在可以在页面进行语言切换了。点击不同语言按钮时,发送请求带不同参数,在自定义的LocaleResolver中解析,返回一个Locale对象,以该对象作为语言基础返回页面。
2.6 实现拦截器
只需要实现Interceptor类,并将自定义的拦截器添加至拦截器注册中:

2.7 THymeleaf
包含:于jsp类似,还可以传递参数给包含片段,实现不同的操作。

在片段内再次判断
thymeleaf循环与日期格式化:
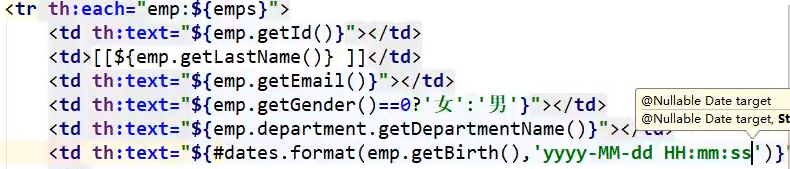
前端传入日期时,默认使用yyyy/MM/dd,如果要自定义应做以下配置

2.8 数据源与servlet功能
Druid数据源自带监控功能
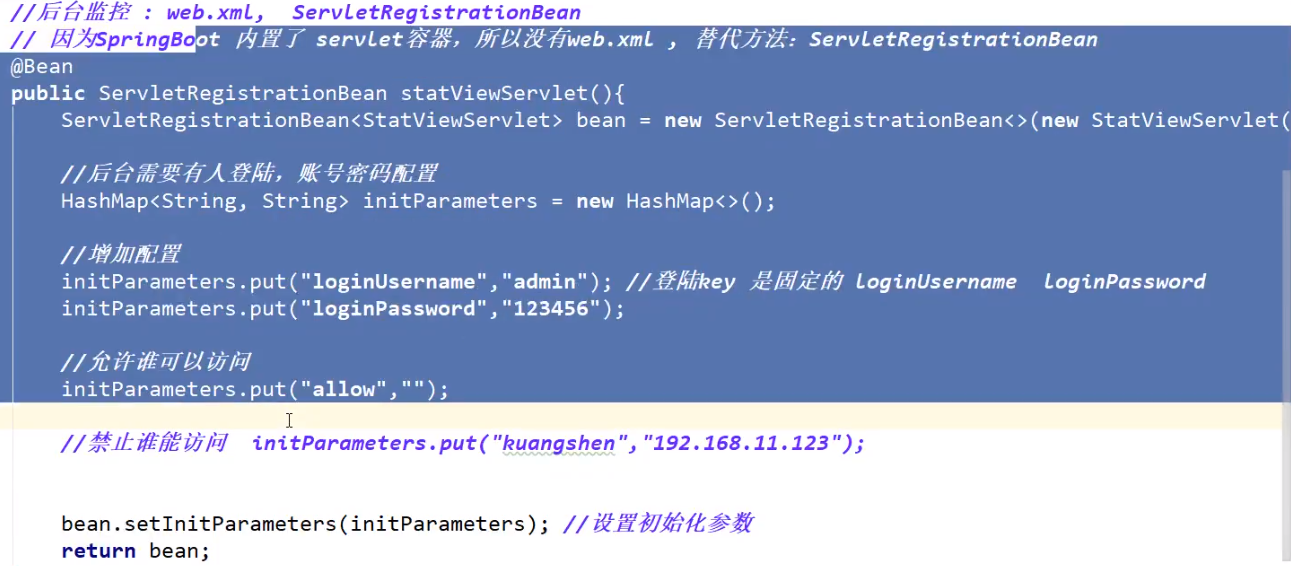
@Configuration
public class DruidConfig {

    @ConfigurationProperties(prefix = "spring.datasource")
    @Bean
    public DataSource druidDataSource(){
        return new DruidDataSource();
    }

    @Bean
    public ServletRegistrationBean statViewServlet(){
        ServletRegistrationBean<StatViewServlet> bean =
                new ServletRegistrationBean<>(new StatViewServlet(), "/druid/*");
        HashMap<String, String> hashMap = new HashMap<>();
        hashMap.put("loginUsername","admin");
        hashMap.put("loginPassword","admin");
        bean.setInitParameters(hashMap);
        return bean;
    }
}
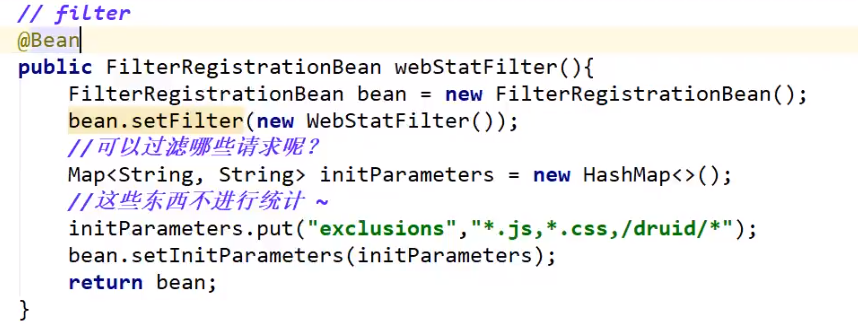
也可以配置filter
2.9 与mybatis整合
引入starter.
2.10 springsecurity
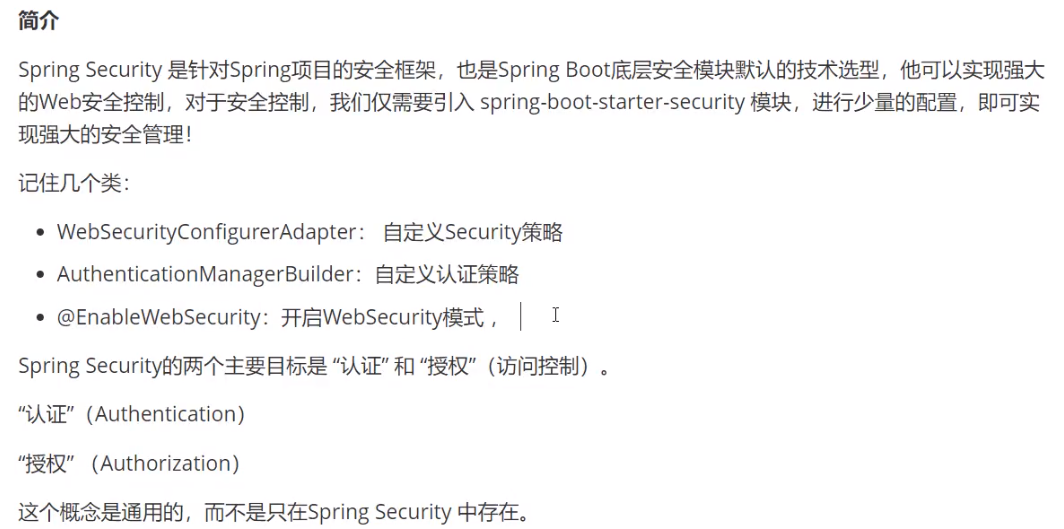
用户认证与授权:可以在内存中读取用户信息(2.2以上需要对密码进行加密)并指定用户角色。
    /*认证*/
    @Override
    protected void configure(AuthenticationManagerBuilder auth) throws Exception {
        /*可以从内存中读取*/
        auth.inMemoryAuthentication().passwordEncoder(new BCryptPasswordEncoder())
                .withUser("root").password(new BCryptPasswordEncoder().encode("root")).roles("vip1","vip2")
                .and()
                .withUser("user").password(new BCryptPasswordEncoder().encode("admin")).roles("vip3");
    }
指定页面所需权限
    @Override
    protected void configure(HttpSecurity http) throws Exception {
        http.authorizeRequests().antMatchers("/").permitAll()
                .antMatchers("/level1/**").hasAnyRole("vip1")
                .antMatchers("/level2/**").hasAnyRole("vip2")
                .antMatchers("/level3/**").hasAnyRole("vip3");
        http.formLogin();
    }
@EnableWebSecurity
public class SecurityConfig extends WebSecurityConfigurerAdapter {
以上步骤开启后即可看见需要指定权限访问指定页面。
spring securiity整个授权过程。包含登录及登出
    @Override
    protected void configure(HttpSecurity http) throws Exception {
        http.authorizeRequests().antMatchers("/").permitAll()
                .antMatchers("/level1/**").hasAnyRole("vip1")
                .antMatchers("/level2/**").hasAnyRole("vip2")
                .antMatchers("/level3/**").hasAnyRole("vip3");
        http.formLogin().loginPage("/toLogin").loginProcessingUrl("/login");
        http.rememberMe().rememberMeParameter("remeberme");
        //注销,注销时需要关闭crsf,不然必须发post请求登出。
        http.csrf().disable();
        http.logout().logoutUrl("/logout").logoutSuccessUrl("/index");
        //http.rememberMe();
    }
2.11 Shiro

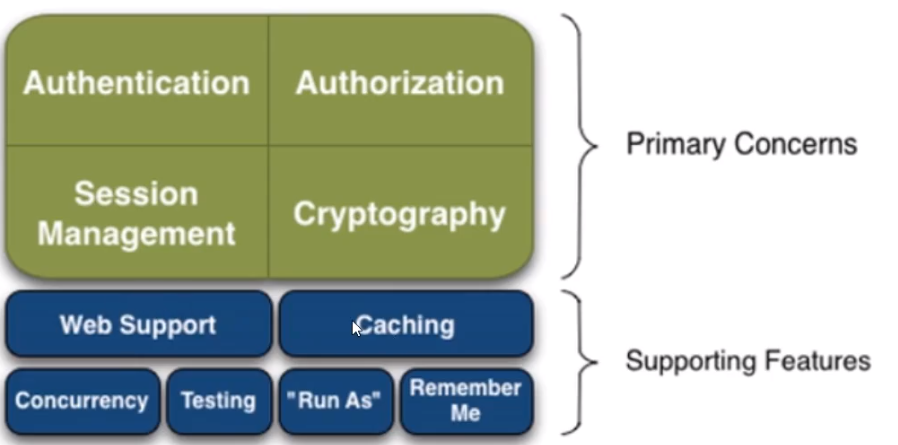
架构

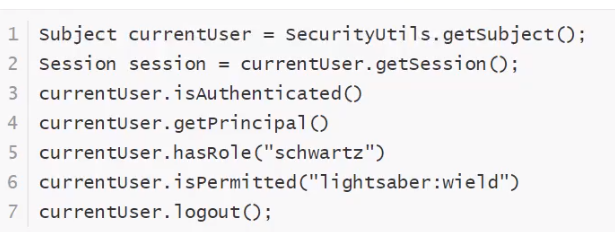
常用方法如上。
与springboot整合
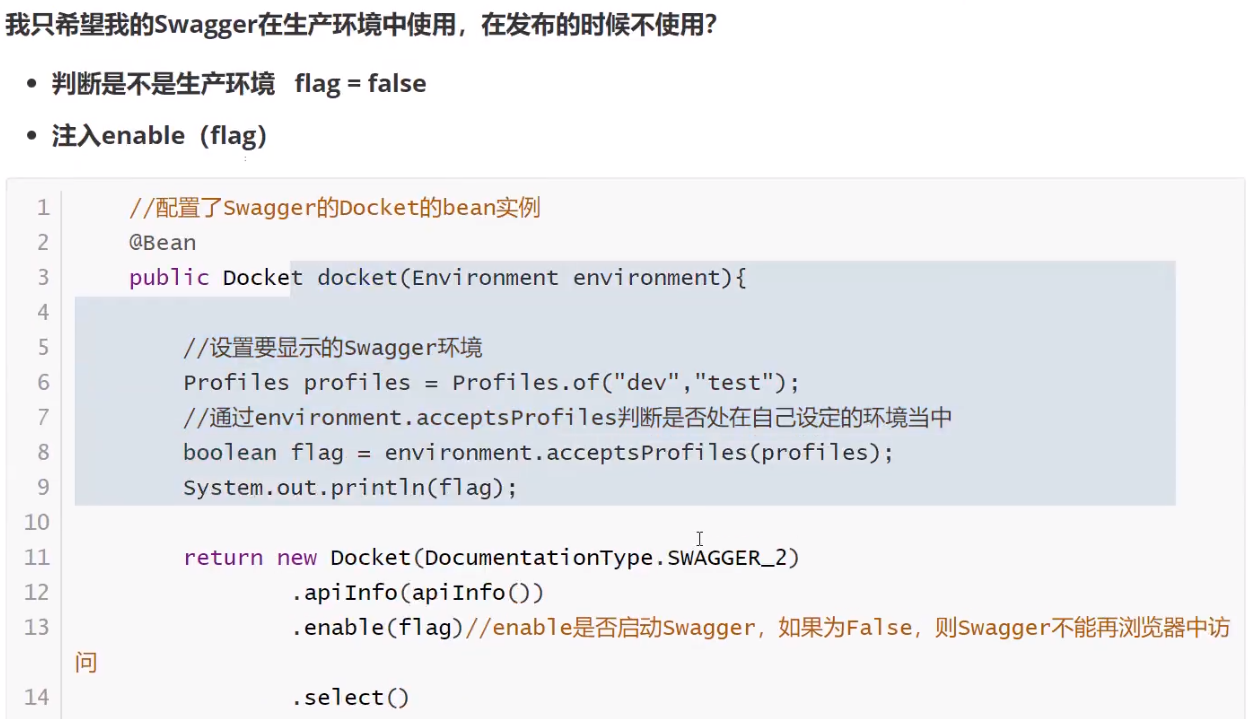
2.12 swagger
swagger使用:
        <dependency>
            <groupId>io.springfox</groupId>
            <artifactId>springfox-boot-starter</artifactId>
            <version>3.0.0</version>
        </dependency>
访问/swagger-ui/index.html即可。
自定义配置:过滤路径,配置包扫描

可以自定义显示信息:
    private ApiInfo apiInfo(){
        return new ApiInfo("My Documentation",
                "Api Documentation", "1.111111",
                "urn:tos", ApiInfo.DEFAULT_CONTACT,
                "Apache 2.0", "http://www.apache.org/licenses/LICENSE-2.0",
                new ArrayList());

    }

2.13 异步任务
异步任务由spring实现
在service中添加异步方法@Async,在类上添加则整个类都是异步方法
    @Async
    public void testAsync() throws InterruptedException {
        Thread.sleep(3000);
        System.out.println("一部热舞完成");
    }
主启动类加上
@EnableAsync
controller调用异步方法即可看见效果。
2.14 邮件发送
引入starter:
        <dependency>
            <groupId>org.springframework.boot</groupId>
            <artifactId>spring-boot-starter-mail</artifactId>
        </dependency>
简单邮件发送,自动注入JavaMailSenderImpl类,新建简单邮件消息发送类进行发送。
    @Autowired
    private JavaMailSenderImpl javaMailSender;

    @Test
    void contextLoads() {
        //发送邮件
        SimpleMailMessage mailMessage = new SimpleMailMessage();
        mailMessage.setSubject("标题");
        mailMessage.setText("正文");
        mailMessage.setTo("1710476708@qq.com");
        mailMessage.setFrom("1710476708@qq.com");
        javaMailSender.send(mailMessage);
    }
复杂邮件类,可以添加附件,解析html,由helper类辅助信息填充。
    public void test2() throws MessagingException {
        //复杂邮件发送
        MimeMessage mimeMessage = javaMailSender.createMimeMessage();
        //使用helper组装
        MimeMessageHelper helper = new MimeMessageHelper(mimeMessage,true);
        helper.setSubject("标题");
        //设置为true可以解析HTML
        helper.setText("zhengwen1",true);
        //附件
        helper.addAttachment("1.jpg",new File("/"));
        helper.addAttachment("2.jpg",new File("/"));

        helper.setTo("3940293@qq.com");
        helper.setFrom("fjdls@qq.com");

        javaMailSender.send(mimeMessage);
    }
配置文件。发送邮件的邮箱需要开启SMTP服务,获取其中的码作为密码。
spring.mail.username=1720476708@qq.com
spring.mail.password=---
spring.mail.host=smtp.qq.com
#qq邮箱需要开启ssl验证
spring.mail.properties.mail.smtp.ssl.enable=true
2.15 定时任务
使用SpringBoot创建定时任务非常简单,目前主要有以下三种创建方式:
- 一、基于注解(@Scheduled)
- 二、基于接口(SchedulingConfigurer) 前者相信大家都很熟悉,但是实际使用中我们往往想从数据库中读取指定时间来动态执行定时任务,这时候基于接口的定时任务就派上用场了。
- 三、基于注解设定多线程定时任务
基于注解@Scheduled默认为单线程,开启多个任务时,任务的执行时机会受上一个任务执行时间的影响。
1、创建定时器
使用SpringBoot基于注解来创建定时任务非常简单,只需几行代码便可完成。 代码如下
@Configuration      //1.主要用于标记配置类,兼备Component的效果。
@EnableScheduling   // 2.开启定时任务
public class SaticScheduleTask {
    //3.添加定时任务
    @Scheduled(cron = "0/5 * * * * ?")
    //或直接指定时间间隔,例如:5秒
    //@Scheduled(fixedRate=5000)
    private void configureTasks() {
        System.err.println("执行静态定时任务时间: " + LocalDateTime.now());
    }
}
Cron表达式参数分别表示:
- 秒(0~59) 例如0/5表示每5秒
- 分(0~59)
- 时(0~23)
- 日(0~31)的某天,需计算
- 月(0~11)
- 周几( 可填1-7 或 SUN/MON/TUE/WED/THU/FRI/SAT)
@Scheduled:除了支持灵活的参数表达式cron之外,还支持简单的延时操作,例如 fixedDelay ,fixedRate 填写相应的毫秒数即可。
基于接口(SchedulingConfigurer)
1、导入依赖包:
数据库连接依赖,在数据库中写好cron表达式。
3、创建定时器
数据库准备好数据之后,我们编写定时任务,注意这里添加的是TriggerTask,目的是循环读取我们在数据库设置好的执行周期,以及执行相关定时任务的内容。
具体代码如下:
@Configuration      //1.主要用于标记配置类,兼备Component的效果。
@EnableScheduling   // 2.开启定时任务
public class DynamicScheduleTask implements SchedulingConfigurer {

    @Mapper
    public interface CronMapper {
        @Select("select cron from cron limit 1")
        public String getCron();
    }

    @Autowired      //注入mapper
    @SuppressWarnings("all")
    CronMapper cronMapper;

    /**
     * 执行定时任务.
     */
    @Override
    public void configureTasks(ScheduledTaskRegistrar taskRegistrar) {

        taskRegistrar.addTriggerTask(
                //1.添加任务内容(Runnable)
                () -> System.out.println("执行动态定时任务: " + LocalDateTime.now().toLocalTime()),
                //2.设置执行周期(Trigger)
                triggerContext -> {
                    //2.1 从数据库获取执行周期
                    String cron = cronMapper.getCron();
                    //2.2 合法性校验.
                    if (StringUtils.isEmpty(cron)) {
                        // Omitted Code ..
                    }
                    //2.3 返回执行周期(Date)
                    return new CronTrigger(cron).nextExecutionTime(triggerContext);
                }
        );
    }
}
此时修改数据库可以立即生效,但出现错误后会停止。
基于注解设定多线程定时任务
1、创建多线程定时任务
//@Component注解用于对那些比较中立的类进行注释;
//相对与在持久层、业务层和控制层分别采用 @Repository、@Service 和 @Controller 对分层中的类进行注释
@Component
@EnableScheduling   // 1.开启定时任务
@EnableAsync        // 2.开启多线程
public class MultithreadScheduleTask {

        @Async
        @Scheduled(fixedDelay = 1000)  //间隔1秒
        public void first() throws InterruptedException {
            System.out.println("第一个定时任务开始 : " + LocalDateTime.now().toLocalTime() + "
线程 : " + Thread.currentThread().getName());
            System.out.println();
            Thread.sleep(1000 * 10);
        }

        @Async
        @Scheduled(fixedDelay = 2000)
        public void second() {
            System.out.println("第二个定时任务开始 : " + LocalDateTime.now().toLocalTime() + "
线程 : " + Thread.currentThread().getName());
            System.out.println();
        }
    }
从控制台可以看出,第一个定时任务和第二个定时任务互不影响;
并且,由于开启了多线程,第一个任务的执行时间也不受其本身执行时间的限制,所以需要注意可能会出现重复操作导致数据异常。
2.16 整合redis
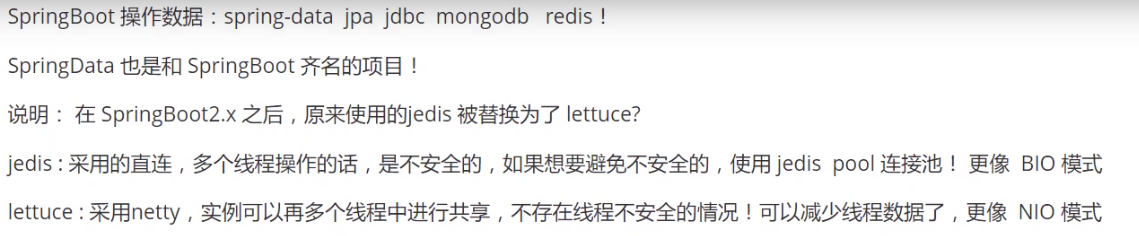
    @Bean
    @ConditionalOnMissingBean(name = "redisTemplate")
    public RedisTemplate<Object, Object> redisTemplate(RedisConnectionFactory redisConnectionFactory)
            throws UnknownHostException {
        RedisTemplate<Object, Object> template = new RedisTemplate<>();
        template.setConnectionFactory(redisConnectionFactory);
        return template;
    }

    @Bean
    @ConditionalOnMissingBean
    public StringRedisTemplate stringRedisTemplate(RedisConnectionFactory redisConnectionFactory)
            throws UnknownHostException {
        StringRedisTemplate template = new StringRedisTemplate();
        template.setConnectionFactory(redisConnectionFactory);
        return template;
    }
2.17 自定义starter
https://www.cnblogs.com/hello-shf/p/10864977.html