
友情提示:这篇有点长,有点绕,加油!
上一篇文章,简单的说明了一下.net项目模板的创建,主要是通过在项目文件*.csproj同目录下添加.template.config文件夹和里面的template.json,再用dotnet new -i来安装项目模板的,本篇继续深入。
首先定个小目标:
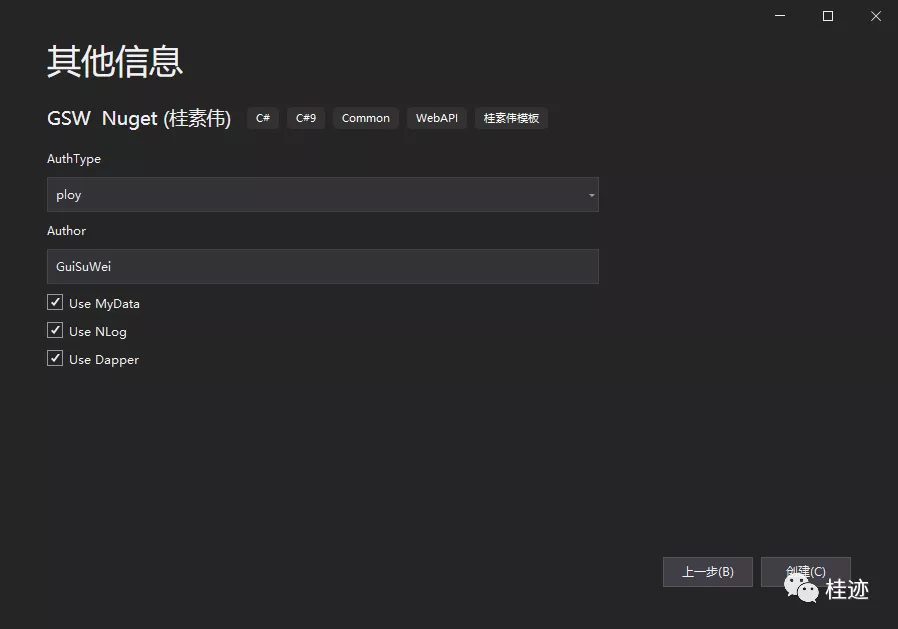
实现一个web api项目模板,可以选择引入NLog库,选择引入Dapper库;同时希望可以选择用户权限认证方式,这里假设是三种:无,固定角色,自定义策略;还可以在创建项目时,输入文本信息(比如作者信息),上面这些输入项,都是通过模板参数来实现的。
其实仔细分析一下,是三类参数:1、判断类,就是用不用这个三方库;2、选择类,三种授权方式中选一种;3、输入文本类。
同时在上一篇文章中,我们是直接用源码生成模板的,问题来了,不可能让大家都用源码来生成本地模板,这里如果能打成个包,大家使用,就简单多了,确实微信把模板项目生成一个nupkg包,可以上传到nuget.org上,供其他人使用。
那接来看实现步骤吧。
为了大家有直观的感受,我先把创建项目时,需要用户录入的参数展示出来:
这次先看模板文件
1、template.json,在项目文件夹下的.template.config目录下
{
  "$schema": "http://json.schemastore.org/template",
  "author": "桂素伟",
  "classifications": [ "Common", "桂素伟模板", "WebAPI", "C#9" ],
  "identity": "GSW  Nuget",
  "name": "GSW  Nuget",
  "shortName": "GSWNuget",
  "tags": {
    "language": "C#",
    "type": "project"
  },
  "sourceName": "GSWNuget",
  "symbols": {
    "Author": {
      "type": "parameter",
      "datatype": "text",
      "defaultValue": "",
      "replaces": "author",
      "description": "作者"
    },
    "UseNLog": {
      "type": "parameter",
      "datatype": "bool",
      "defaultValue": "true",
      "description": "是否使用NLog"
    },
    "UseDapper": {
      "type": "parameter",
      "datatype": "bool",
      "defaultValue": "true",
      "description": "是否使用Dapper"
    },
    "AuthType": {
      "type": "parameter",
      "datatype": "choice",
      "defaultValue": "None",
      "choices": [
        {
          "choice": "None",
          "description": "None"
        },
        {
          "choice": "Role",
          "description": "Role"
        },
        {
          "choice": "policy",
          "description": "Policy"
        }
      ]
    },
    "None": {
      "type": "computed",
      "value": "(AuthType == \"None\")"
    },
    "Role": {
      "type": "computed",
      "value": "(AuthType == \"Role\")"
    },
    "Policy": {
      "type": "computed",
      "value": "(AuthType == \"Policy\")"
    }
  },
  "sources": [
    {
      "modifiers": [
        {
          "condition": "(!UseNLog)",
          "exclude": [ "NLog.config" ]
        }
      ]
    }
  ]
}
"sourceName": "GSWNuget",是项目名称。
"symbols"下是配置模板参数:
UseDapper,UseNLog是bool类型 ,让创建项目的人员来选择是否引入这些三方包。
Author是输入文本类型,其中的replate是要把项目文件中的所有author换成用户输入项目,所以这个名称最好命名的不要那么通用。
AuthType是选择权限的验证规划,这里还在下面增加了三个选择项的运算结果项,bool类型 :None,Role,Policy,是通过用户的选择来决定具体的值。
UseNLog,虽然是个bool类型,但是他的用途特殊,在了json文件的后面,有个sources,这个的作用是决定NLog.config文件,显示不显示在用户的项目中,决定文件的存留与否。
2、ide.host.json,为了在IDE中显示这些值,供用户输入,还需要在template.json同目录下创建一个ide.host.json文件,这个文件的作用就是在ide中把用户录入项友好的提示给用户,同时准备了一个icon.png,来给这个项目模板来充当图标,它的存放位置与ide.host.json在同一级。
{
  "$schema": "http://json.schemastore.org/vs-2017.3.host",
  "icon": "icon.png",
  "symbolInfo": [
    {
      "id": "UseNLog",
      "name": {
        "text": "Use NLog"
      },
      "isVisible": "true"
    },
    {
      "id": "Author",
      "name": {
        "text": "Author"
      },
      "isVisible": "true"
    },
    {
      "id": "UseDapper",
      "name": {
        "text": "Use Dapper"
      },
      "isVisible": "true"
    },
    {
      "id": "AuthType",
      "isVisible": "true"
    }
  ]
}
3、创建web api项目GSWNuget,围绕着上面三个需求展开,先看program.cs文件:
/********************************
 *作者:author
 ********************************/
using Microsoft.AspNetCore.Hosting;
using Microsoft.Extensions.Configuration;
using Microsoft.Extensions.Hosting;
using Microsoft.Extensions.Logging;
using System;
using System.Collections.Generic;
using System.Linq;
using System.Threading.Tasks;
#if (UseNLog)
using NLog.Web;
#endif

namespace GSWNuget
{
    public class Program
    {

#if (UseNLog)
        public static void Main(string[] args)
        {
            var logger = NLogBuilder.ConfigureNLog("nlog.config").GetCurrentClassLogger();
            try
            {
                logger.Debug("init main");
                CreateHostBuilder(args).Build().Run();
            }
            catch (Exception exception)
            {
                logger.Error(exception, "Stopped program because of exception");
                throw;
            }
            finally
            {
                NLog.LogManager.Shutdown();
            }
        }

        public static IHostBuilder CreateHostBuilder(string[] args) =>
            Host.CreateDefaultBuilder(args)
                .ConfigureWebHostDefaults(webBuilder =>
                {
                    webBuilder.UseStartup<Startup>();
                })
                .ConfigureLogging(logging =>
                {
                    //  logging.ClearProviders();
                    //  logging.SetMinimumLevel(LogLevel.Trace);
                })
                .UseNLog();
#else
        public static void Main(string[] args)
        {
            CreateHostBuilder(args).Build().Run();
        }

        public static IHostBuilder CreateHostBuilder(string[] args) =>
            Host.CreateDefaultBuilder(args)
                .ConfigureWebHostDefaults(webBuilder =>
                {
                    webBuilder.UseStartup<Startup>();
                });
#endif
    }
}
#if #endif 是判断用户的输入,决定用户项目走的分支,这里是NLog的引入与不引入的分类,其实不有一个点,NLog的库要不要restore,这个在项目文件中再说。
再有一个是author,最终会被展示图的GuiSuWei那个文本替换。
再看一下GSWNuget.csproj,同样是#if,但需要在<!-- -->中,毕竟是xml。
<Project Sdk="Microsoft.NET.Sdk.Web">
  <PropertyGroup>
    <TargetFramework>net5.0</TargetFramework>
    <Version>2.0.0</Version>
  </PropertyGroup>
  <ItemGroup>
    <!--#if (UseDapper)
    <PackageReference Include="Dapper" Version="2.0.78" />
    #endif-->
    <PackageReference Include="Swashbuckle.AspNetCore" Version="5.6.3" />
    <PackageReference Include="NLog.Web.AspNetCore" Version="4.12.0" />
  </ItemGroup>
</Project>
再看一下starup.cs
/********************************
 *作者:author
 ********************************/
using Microsoft.AspNetCore.Builder;
using Microsoft.AspNetCore.Hosting;
using Microsoft.AspNetCore.HttpsPolicy;
using Microsoft.AspNetCore.Mvc;
using Microsoft.Extensions.Configuration;
using Microsoft.Extensions.DependencyInjection;
using Microsoft.Extensions.Hosting;
using Microsoft.Extensions.Logging;
using Microsoft.OpenApi.Models;
using System;
using System.Collections.Generic;
using System.Linq;
using System.Threading.Tasks;

namespace GSWNuget
{
    public class Startup
    {
        public Startup(IConfiguration configuration)
        {
            Configuration = configuration;
        }
        public IConfiguration Configuration { get; }

        public void ConfigureServices(IServiceCollection services)
        {

#if None
            var authType = "None";
#endif
#if Role
            var authType = "Role";
#endif
#if Ploy
            var authType = "Ploy";
#endif
            services.AddControllers();
            services.AddSwaggerGen(c =>
            {
                c.SwaggerDoc("v1", new OpenApiInfo { Title = "GSWNuget", Version = "v1" });
            });
        }

        public void Configure(IApplicationBuilder app, IWebHostEnvironment env)
        {
            if (env.IsDevelopment())
            {
                app.UseDeveloperExceptionPage();
                app.UseSwagger();
                app.UseSwaggerUI(c => c.SwaggerEndpoint("/swagger/v1/swagger.json", "GSWNuget v1"));
            }

            app.UseHttpsRedirection();
            app.UseRouting();
            app.UseAuthorization();
            app.UseEndpoints(endpoints =>
            {
                endpoints.MapControllers();
            });
        }
    }
}
其中的 #if None ,#if Role,#if Policy是选择后结果的分支对应。
再看一下appsettings.json,在appsettings中是在//后用#if
{
  ////#if(UseDapper)
  //"Dapper": "dapper config",
  ////#endif

  ////#if(UseNLog)
  //"LogConfig": "log config",
  ////#endif
  "Logging": {
    "LogLevel": {
      "Default": "Information",
      "Microsoft": "Warning",
      "Microsoft.Hosting.Lifetime": "Warning"
    }
  },
  "AllowedHosts": "*"
}
到这里,项目基本准备完毕,接下来就要打包成nupkg,这里要用到nuget.exe(这里下载 https://www.nuget.org/downloads),通过命令把模板项目GSWNuget生成nupkg,nuget.exe生成nupkg时需要一个配置文件,GSWNuget.nuspec,这个文件与GSWNuget项目目录在同一级别。
<?xml version="1.0" encoding="utf-8"?>
<package xmlns="http://schemas.microsoft.com/packaging/2012/06/nuspec.xsd">
  <metadata>
    <id>GSWNuget</id>
    <version>0.0.1</version>
    <description>
     这是我用来生成Nuget格式的Templage。
    </description>
    <authors>桂素伟</authors>
    <license type="expression">MIT</license>
    <packageTypes>
      <packageType name="Template" />
    </packageTypes>
  </metadata>
  <files>
    <file src="GSWNuget\**\*.*" exclude="GSWNuget\**\bin\**\*.*;GSWNuget\**\obj\**\*.*" target="Content" />
  </files>
</package>
接下来执行命令:
> .\nuget.exe pack .\GSWNuget.nuspec -OutputDirectory .\nupkg
会在nupkg下生成GSWNuget.1.0.0.nupkg文件
安装GSWNuget项目模板:
> dotnet new -i GSWNuget.1.0.0.nupkg
这里,在我们的项目模板中会增加一个GSWNuget类型的项目模板。
接下来是享受成果的时候了,打开vs,新建项目,搜索GSW,就可以新建自己模板的项目了。
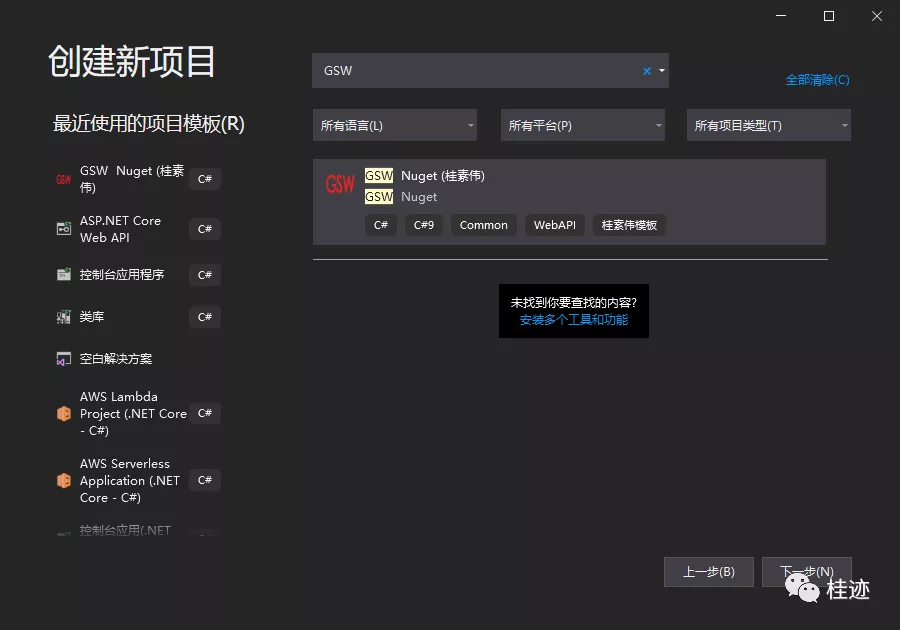
这里可以测试一下不同的选择,生成的是不是想要的结果
找时间做一个自己真正项目模板,再分享给大家。
