生命周期,钩子函数:
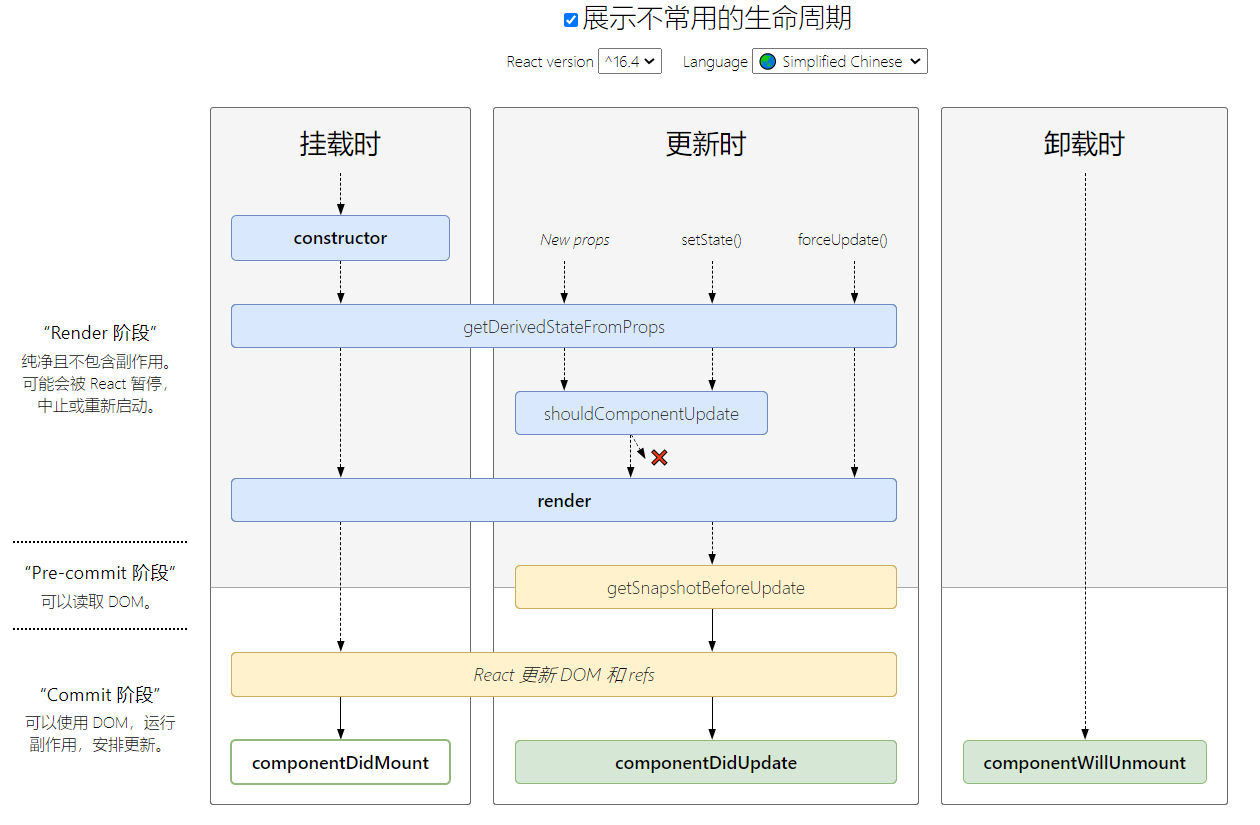
挂载阶段:
一、constructor (第一个执行)
1.可以初始化组件状态
2.可以给一些事件函数绑定this
注意:不能再内部调用setState()
constructor(){
  super()
  this.state={
    n:1
  }
  //不能在内部调用setState()
  //this.setState({n:2})
  this.handleClick = this.handleClick.bind(this)   //2.用来绑定this
}
 handleClick(){   //不是用的箭头函数的话,就需要用到constructor这个函数。
   console.log(this)
 }
render(){
    return (
      <div>
        app
       {<button onClick = {this.handleClick}>点我哦</button>}
        <button>点我哦</button>
      </div>
    )
  }
二、static getDerivedStateFromProps(){} 类的函数 (真实属于第二次执行的)
执行时机:
- 初始化执行
- props | setState | forceUpdate 都会执行
一旦组件里面的状态依靠属性的变化而变化,那么你就用到此钩子函数
这个钩子函数属于类,前面需要加static修饰
子组件在constructor直接拿传过来的属性是拿不到的,除非在constructor传入属性props
让组件内部的派生状态始终区别于外部传入的属性的值,只有外部传入的属性改变了,自身的状态才会发生变化
必须要有返回值,返回什么state里面就变成什么?
在这个钩子函数里面,所以内部是不能访问this的
在父组件定义一个状态。
constructor(){
  super()
  this.state={
    n:1  //定义了一个状态
  }
}
 render(){
    return (
      <div>
        <button onClick={()=>{this.setState({n:this.state.n+1})}}>点我哦</button>
        <One n={this.state.n}/>
      </div>
    )
  }
在子组件接收,使用的时候,如果仅想外部控制外部传递过来的属性,就需要加上该钩子函数即:
如果你的组件的某个状态就想由外部传入的属性进行关联控制,希望属性改变了,组件内部的状态也发生变化,那么 就把这个状态变成派生状态,使用此钩子函数即可。一旦组件里面的状态依靠属性的变化而变化,那么你就用到此钩子函数
接收子组件状态:
constructor(props){
        super(props)
        console.log("one-construcotr1",props.n)
        this.state={
            oneN:props.n
        }
    }

    static getDerivedStateFromProps(props){//外面可以传入数据,
       console.log("getDerivedStateFromProps") //内部是不能访问this的
       return{   //必须要返回一个东西,null都是可以的
         oneN:props.n//返回什么,就把定义的状态变成什么
       }
   }
   render() {
        return (
            <div>
                <button onClick={()=>{this.setState({oneN:1000})}}>更改自身状态</button>   //加上上面的函数,该按钮就没有作用了,不能内部执行。
                one --- {this.state.oneN}
            </div>
        )
    }
三、render 可执行多次 (第三个执行)
1.初始化立即执行(constructor)
2.render钩子函数什么时候执行?
(1)初始化的时候执行一次
(2)组件内部调用setState | 外部传入Props改变(New props) | forceUpdate(强制更新)
四、componentDIdMount 只执行一次, (第四个执行)
组件挂载完以后,只执行一次,
即将过期的函数。
17.x版本中不推荐使用的钩子函数
UNSAFE_componentWillMount 不建议用,可以会出现bug,不能初始化因为会受到React16.xFiber的协调算法,函数会执行多次,如果把异步请求放到该钩子函数中,异步请求可能也会执行多次。
UNSAFE_componentWillReceiveProps
UNSAFE_componentWillUpdate
componentWillMount vs componentDidMount (在哪个钩子函数里面进行异步请求?)
子父组件的时候,会按照上面的顺序,执行顺序为
父组件constructor ->父组件render->子组件constructor ->子组件render->子组件componentDIdMount->父组件componentDIdMount
父组件:
constructor(){
    super()
    console.log("App-constructor")
    this.state = {
      n:1
    }
  }

  componentDidMount(){
  	 console.log("App-componentDidMount")
  }

  render(){
  	console.log("App-render")
    return (
      <div>
        <button onClick={()=>{this.setState({n:this.state.n+1})}}>点我哦</button>
        <One n={this.state.n}/>
      </div>
    )
  }
子组件:
constructor(){
    super()
    console.log("one-constructor")
  }

  componentDidMount(){
  	 console.log("one-componentDidMount")
  }

  render(){
  	console.log("one-render")
    return (
      <div>
        one
      </div>
    )
  }
卸载时
componentWillUnmount
消除定时器相关的操作。
//卸载时
componentWillUnmount(){
    console.log("组件被卸载了....")
    clearInterval(this.timer)
  }
//设置定时器
componentDidMount(){
    this.timer = setInterval(() => {
      console.log("timer....")
      this.setState({
        a:this.state.a+1
      })
    }, 2000);
  }
  //
render(){
    return (
      <div>
        <button onClick={()=>{ReactDOM.unmountComponentAtNode(document.getElementById("root"))}}>卸载组件</button>
        app --- {this.state.a}
      </div>
    )
  }
更新时的钩子函数
getDerivedStateFromProps 在挂载阶段已经讲过。
shouldComponentUpdate
render 在挂载阶段已经讲过。
getSnapshotBeforeUpdate
componentDidUpdate
shouldComponentUpdate钩子函数
注意:
shouldComponentUpdate 是可以用来提升react性能的钩子函数! 可以减少一些render的执行次数
PureComponent 纯组件,内部帮助实现了shouldComponentUpdate,相当于 Component+shouldComponentUpdate
内部采用了浅层比较:
如果基本类型,值不一样,才会执行render渲染。
如果引用类型,地址不一样,才会执行render渲染。
/*
询问组件是否进行更新操作,默认true,就会执行组件的更新操作。
可以用来提升react的性能
注:内部通过this.props.flag获取的是之前的flag值,
如果想要获取最新的,从参数里面获取props.flag
这个钩子函数可以根据返回true或者返回false来去提升react性能
根据外部传入的属性或者内部的状态进行判断,满足某个条件下才去执行render渲染。
*/
shouldComponentUpdate(props,state){
        // console.log("shouldComponentUpdate",props.flag,this.props.flag)
        if(props.flag !== this.props.flag){
            return true
        }else{
            return false
        }
    }
PureComponent 纯组件
/**
* PureComponent 纯组件 内部不能再去写shouldComponentUpdate !!! (Component+shouldComponentUpdate)
* 纯组件内部进行了浅层比较?
* 基本类型: 根据外部传入的数据,新的数据与旧的数据是否一致,如果一致的话,render就不会执行。
* 引用类型: 根据外部传入的数据,新的数据与旧的数据地址是否一致,如果一致的话,render也不会执行。
*/
export default class One extends PureComponent {
}
PureComponent 要依靠class才能使用。而React.memo()可以和functional component一起使用。
用法就是,直接把函数直接放到React.memo()里面就行了
getSnapshotBeforeUpdate --->目的是:返回快照作为componentDidUpdate第三个参数
在更新之前拿到之前的某些值,然后传到 componentDidUpdate
可以返回一个快照作为componentDidUpdate的第三个参数使用即可。
使用方式:
getSnapshotBeforeUpdate(prevProps, prevState){

  console.log("getSnapshotBeforeUpdate...")

  return this.container.scrollHeight  //返回的数据被下面的snapshot接收(这是传的是滚动高度。)

 }


 componentDidUpdate(prevProps, prevState, snapshot){

  console.log("componentDidUpdate...",snapshot)

  let dis = this.container.scrollHeight - snapshot; //生成新的数据 差值=新的高度-旧的高度

  this.container.scrollTop = this.container.scrollTop + dis;

 }
componentDidUpdate
可以结合swiper学习:查看版本:npm view swiper versions (6版本的有bug)
下载合适的版本:yarn add swiper@5.2.0
正常情况下在componentDidMount里面实例化的话会出现无法滑动轮播图的情况,所以可以在componentDidUpdate判断、实例化,这样就可以解决这个问题。