转载自:https://blog.csdn.net/qq_41737716/article/details/85596817
关于更多Spring深度分析的文章,可以 点击这里访问。
在往期文章中我没有提到在Spring中是如何将Bean注入到构造器,其实这个过程发生在 实例化Bean时期,由 AbstractAutowireCapableBeanFactory的 createBeanInstance方法来做的。
若想快速得到结论,可以参照最后一节的总结。
1. 示例
先来看一个例子,看看什么是构造器注入。
这里我写了一个类,分别有两个构造器,一个是注入一个Bean的构造器,一个是注入两个Bean的构造器:
public class ConstructorAutowiredTest {

    private User user;
    private Role role;

    public ConstructorAutowiredTest() {
    }

    public ConstructorAutowiredTest(User user) {
        this.user = user;
    }

    public ConstructorAutowiredTest(User user, Role role) {
        this.user = user;
        this.role = role;
    }

    public void test(){
        System.out.println("user: "+user);
        System.out.println("role: "+role);
    }
}
Model类User与Role我就不贴代码了,分别是有两个变量,一个id,一个name。
然后就是Spring的配置文件context.xml:
<?xml version="1.0" encoding="UTF-8" ?>
<beans xmlns="http://www.springframework.org/schema/beans"
       xmlns:xsi="http://www.w3.org/2001/XMLSchema-instance"
       xmlns:context="http://www.springframework.org/schema/context"
       xsi:schemaLocation="http://www.springframework.org/schema/beans
       http://www.springframework.org/schema/beans/spring-beans-2.0.xsd
       http://www.springframework.org/schema/context
        http://www.springframework.org/schema/context/spring-context-4.0.xsd ">

    <!-- 使Spring关注Annotation -->
    <context:annotation-config/>

    <bean class="com.mytest.demo.model.Role" id="role">
        <property name="name" value="testRole"/>
        <property name="id" value="2"/>
    </bean>

    <bean class="com.mytest.demo.model.User" id="user">
        <property name="id" value="1"/>
        <property name="name" value="testUser"/>
    </bean>

    <bean class="com.mytest.demo.autowired.ConstructorAutowiredTest" id="test"/>

</beans>
注意,如果需要使用构造器注入,需要 <context:annotation-config /> 此自定义标签开启(关于自定义标签,在本人往期的Spring系列中有详细介绍),具体作用后面再作分析。
那么,该类三个构造器,Spring会使用哪个构造器初始化ConstructorAutowiredTest这个Bean呢?写个测试便知:
public class TestBeanAutowiredConstructor {

    public static void main(String[] args) {
        ClassPathXmlApplicationContext context = new ClassPathXmlApplicationContext();
        context.setConfigLocation("context.xml");
        context.refresh();

        ConstructorAutowiredTest test = (ConstructorAutowiredTest) context.getBean("test");
        test.test();
    }
}
执行test方法,控制台打印:
从这里我们可以看出来,此时三个构造器中Spring使用了无参构造器。
我们换一个方式,将无参构造器注释掉,看看Spring到底会使用哪个构造器呢?同样执行test方法测试,控制台打印:
此时控制台报错,大致意思是Bean的实例化失败了,没有无参的构造器方法调用。此时有个疑问,明明构造器中的参数都是Bean,为什么不能初始化,一定要使用无参的构造器呢?是否是因为有两个构造器的原因?此时我们再注释掉任意一个构造函数,使测试类只有一个带参构造函数:
//    public ConstructorAutowiredTest() {
//    }

    public ConstructorAutowiredTest(User user) {
        this.user = user;
    }

//    public ConstructorAutowiredTest(User user, Role role) {
//        this.user = user;
//        this.role = role;
//    }
再次运行测试类,控制台打印:
如果是注释掉第二个构造函数,则结果是两个对象都有。从这里我们可以看出,如果只有一个构造器,且参数为IOC容器中的Bean,将会执行自动注入。这里又有一个疑问,这也太不科学了吧,强制用户一定只能写一个构造器?这时我们猜想@Autowired注解是否能解决这种问题?来试试吧。我们将构造器全部解除注释,将第三个构造器打上@Autowired注解:
public ConstructorAutowiredTest() {
}

public ConstructorAutowiredTest(User user) {
    this.user = user;
}

@Autowired
public ConstructorAutowiredTest(User user, Role role) {
    this.user = user;
    this.role = role;
}
运行测试,控制台打印:
不出所料,@Autowired注解可以解决这种问题,此时Spring将使用有注解的构造函数进行Bean的初始化。那么,如果有两个@Autowired注解呢?结果肯定是报错,因为@Autowired的默认属性required是为true的,也就是说两个required=true的构造器,Spring不知道使用哪一个。但如果是这样写的话:
public ConstructorAutowiredTest() {
}

@Autowired(required = false)
public ConstructorAutowiredTest(User user) {
    this.user = user;
}

@Autowired(required = false)
public ConstructorAutowiredTest(User user, Role role) {
    this.user = user;
    this.role = role;
}
结果是怎样的呢?看看控制台打印:
使用参数最多的那一个构造器来初始化Bean。又如果两个有参构造器顺序调换又是怎样的呢?一个required为false一个为true,结果又是怎样的呢?这里直接给出答案,顺序调换依然使用多参数构造器,并且required只要有一个true就会报错。有兴趣的读者可以自己试试,下面将深入源码分析构造器注入的过程,相信上述所有疑问都能得到解答。
疑问点小结
从现象看本质,我们从上面的例子中,大致可以得到以下几个疑问:
- 为什么写三个构造器(含有无参构造器),并且没有@Autowired注解,Spring总是使用无参构造器实例化Bean?
- 为什么注释掉两个构造器,留下一个有参构造器,并且没有@Autowired注解,Spring将会使用构造器注入Bean的方式初始化Bean?
- 为什么写三个构造器,并且在其中一个构造器上打上**@Autowired注解,就可以正常注入构造器?并且两个@Autowired注解就会报错**,一定需要在所有@Autowired中的required都加上false即可正常初始化等等?
或许有一些没有提到的疑问点,但大致就这么多吧,举多了也没用,因为在下面深入源码的分析中读者若是可以理解,关于此类的一系列问题都将可以自己思考得出结果,得到可以举一反三的能力。
2. 依赖注入伊始
在开头,我们有提到,如果需要构造器注入的功能的话,我们需要在xml配置中写下这样一段代码:
<!-- 使Spring关注Annotation -->
<context:annotation-config/>
如果有看过本人自定义标签或是有自定义标签的基础的读者,第一反应应该是先看自定义标签的context对应的命名空间是哪个:
xmlns:context="http://www.springframework.org/schema/context"我们全局搜索此命名空间(http后需要加一个斜杆符号)得到一个spring.handlers文件:
http://www.springframework.org/schema/context=org.springframework.context.config.ContextNamespaceHandler这里说明了此命名空间对应的NamespaceHandler,进入此类看看其init方法:
public void init() {
    registerBeanDefinitionParser("property-placeholder", new PropertyPlaceholderBeanDefinitionParser());
    registerBeanDefinitionParser("property-override", new PropertyOverrideBeanDefinitionParser());
    registerBeanDefinitionParser("annotation-config", new AnnotationConfigBeanDefinitionParser());
    registerBeanDefinitionParser("component-scan", new ComponentScanBeanDefinitionParser());
    registerBeanDefinitionParser("load-time-weaver", new LoadTimeWeaverBeanDefinitionParser());
    registerBeanDefinitionParser("spring-configured", new SpringConfiguredBeanDefinitionParser());
    registerBeanDefinitionParser("mbean-export", new MBeanExportBeanDefinitionParser());
    registerBeanDefinitionParser("mbean-server", new MBeanServerBeanDefinitionParser());
}
我们的自定义标签是叫作 “annotation-config" ,所以对应的解析器是AnnotationConfigBeanDefinitionParser这个类,进入这个类的parse方法:
public BeanDefinition parse(Element element, ParserContext parserContext) {
    Object source = parserContext.extractSource(element);

    // Obtain bean definitions for all relevant BeanPostProcessors.
    //定义一系列BeanDefinition,放入一个Set集合中
    Set<BeanDefinitionHolder> processorDefinitions =
        AnnotationConfigUtils.registerAnnotationConfigProcessors(parserContext.getRegistry(), source);

   //注册一系列BeanDefinition,此处略过..
}
这里只需要关注registerAnnotationConfigProcessors方法,看看到底需要注册哪些Bean:
public static Set<BeanDefinitionHolder> registerAnnotationConfigProcessors(
    BeanDefinitionRegistry registry, @Nullable Object source) {

    //将registry对象转型成beanFactroy
    DefaultListableBeanFactory beanFactory = unwrapDefaultListableBeanFactory(registry);

    Set<BeanDefinitionHolder> beanDefs = new LinkedHashSet<>(8);

    //判断容器中是否已经存在名为AUTOWIRED_ANNOTATION_PROCESSOR_BEAN_NAME的Bean
    if (!registry.containsBeanDefinition(AUTOWIRED_ANNOTATION_PROCESSOR_BEAN_NAME)) {
        //若是不存在,创建一个
        RootBeanDefinition def = new RootBeanDefinition(AutowiredAnnotationBeanPostProcessor.class);
        def.setSource(source);
        beanDefs.add(registerPostProcessor(registry, def, AUTOWIRED_ANNOTATION_PROCESSOR_BEAN_NAME));
    }

    //中途还添加了一系列BeanDefinition,不是本文讨论范围,略过...

    return beanDefs;
}到这里我们可以知道,此自定义标签注册了一个AutowiredAnnotationBeanPostProcessor类的Bean到IOC容器。那么此类是干什么用的呢?
3. 初始化Bean
我们将思路转到IOC容器初始化Bean的流程中来,在getBean方法获取一个Bean的时候,IOC容器才开始将Bean进行初始化,此时会先实例化一个Bean,然后再对Bean进行依赖注入,然后执行一系列初始化的方法,完成Bean的整个初始化过程。而本文讨论的构造器注入,则是在实例化Bean的过程中进行的。在AbstractAutowireCapableBeanFactory类中的doCreateBean方法获取Bean的开始,将调用createBeanInstance方法进行Bean的实例化(选择Bean使用哪个构造器实例化):
protected BeanWrapper createBeanInstance(String beanName, RootBeanDefinition mbd, @Nullable Object[] args) {

    //略过一些与本文无关的其他实例化的方式的代码...

    // Candidate constructors for autowiring?
    // 查找是否存在候选的自动注入构造器
    Constructor<?>[] ctors = determineConstructorsFromBeanPostProcessors(beanClass, beanName);
    if (ctors != null || mbd.getResolvedAutowireMode() == AUTOWIRE_CONSTRUCTOR ||
        mbd.hasConstructorArgumentValues() || !ObjectUtils.isEmpty(args)) {
        //使用注入的方式调用构造器实例化
        return autowireConstructor(beanName, mbd, ctors, args);
    }

    // No special handling: simply use no-arg constructor.
    //使用无参构造器实例化(利用反射newInstance)
    return instantiateBean(beanName, mbd);
}
到这里我们可以知道,determineConstructorsFromBeanPostProcessors方法将选择是否有适合的自动注入构造器,如果没有,将使用无参构造器实例化,关键就在这个方法中,是如何判断哪些构造器使用自动注入的呢:
protected Constructor<?>[] determineConstructorsFromBeanPostProcessors(@Nullable Class<?> beanClass, String beanName)
    throws BeansException {

    //容器中若存在InstantiationAwareBeanPostProcessors
    if (beanClass != null && hasInstantiationAwareBeanPostProcessors()) {
        //遍历此BeanPostProcessors
        for (BeanPostProcessor bp : getBeanPostProcessors()) {
            //只使用SmartInstantiationAwareBeanPostProcessor类型
            if (bp instanceof SmartInstantiationAwareBeanPostProcessor) {
                SmartInstantiationAwareBeanPostProcessor ibp = (SmartInstantiationAwareBeanPostProcessor) bp;
                Constructor<?>[] ctors = ibp.determineCandidateConstructors(beanClass, beanName);
                if (ctors != null) {
                    return ctors;
                }
            }
        }
    }
    return null;
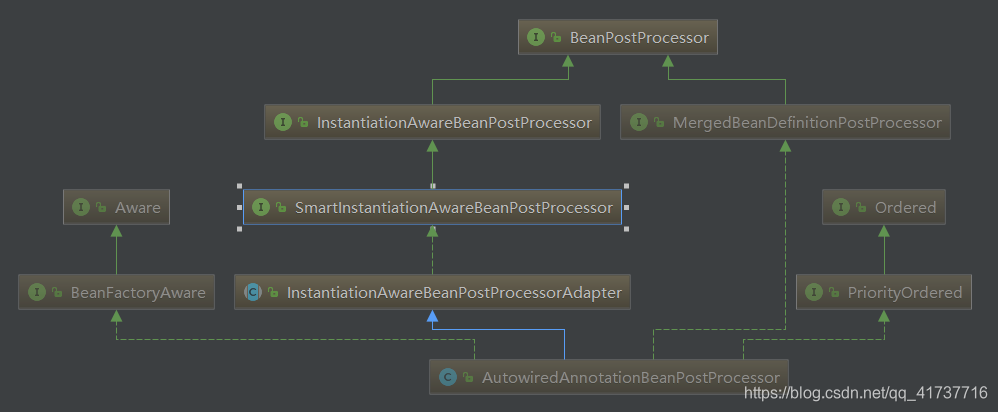
}这段代码告诉我们,这里会使用SmartInstantiationAwareBeanPostProcessor类型的BeanPostProcessor进行判断,我们回顾一下上面的依赖注入伊始的时候我们说的自定义标签注册的类的结构:
有看过本人关于Sprng扩展篇的文章或是有Spring扩展点基础的读者,应该可以知道,若是注册一个BeanPostProcessor到IOC容器中,在AbstractApplicationContext中的refresh方法会对这些类型的Bean进行处理,存放在一个集合,此时getBeanPostProcessors方法就可以获取到所有BeanPostProcessor集合,遍历集合,便可以调用到我们自定义标签中注册的这个类型的Bean。当然,SmartInstantiationAwareBeanPostProcessor类型的Bean有很多,但依赖注入是使用上述这个Bean来完成的。回到主线,下面会调用它的determineCandidateConstructors方法进行查找对应构造器(核心方法):
public Constructor<?>[] determineCandidateConstructors(Class<?> beanClass, final String beanName)
    throws BeanCreationException {

    //略..

    // Quick check on the concurrent map first, with minimal locking.
    //先查找缓存
    Constructor<?>[] candidateConstructors = this.candidateConstructorsCache.get(beanClass);
    //若是缓存中没有
    if (candidateConstructors == null) {
        // Fully synchronized resolution now...
        //同步此方法
        synchronized (this.candidateConstructorsCache) {
            candidateConstructors = this.candidateConstructorsCache.get(beanClass);
            //双重判断,避免多线程并发问题
            if (candidateConstructors == null) {
                Constructor<?>[] rawCandidates;
                try {
                    //获取此Bean的所有构造器
                    rawCandidates = beanClass.getDeclaredConstructors();
                }
                catch (Throwable ex) {
                    throw new BeanCreationException(beanName,
                                                    "Resolution of declared constructors on bean Class [" + beanClass.getName() +
                                                    "] from ClassLoader [" + beanClass.getClassLoader() + "] failed", ex);
                }
                //最终适用的构造器集合
                List<Constructor<?>> candidates = new ArrayList<>(rawCandidates.length);
                //存放依赖注入的required=true的构造器
                Constructor<?> requiredConstructor = null;
                //存放默认构造器
                Constructor<?> defaultConstructor = null;
                Constructor<?> primaryConstructor = BeanUtils.findPrimaryConstructor(beanClass);
                int nonSyntheticConstructors = 0;
                for (Constructor<?> candidate : rawCandidates) {
                    if (!candidate.isSynthetic()) {
                        nonSyntheticConstructors++;
                    }
                    else if (primaryConstructor != null) {
                        continue;
                    }
                    //查找当前构造器上的注解
                    AnnotationAttributes ann = findAutowiredAnnotation(candidate);
                    //若没有注解
                    if (ann == null) {
                        Class<?> userClass = ClassUtils.getUserClass(beanClass);
                        if (userClass != beanClass) {
                            try {
                                Constructor<?> superCtor =
                                    userClass.getDeclaredConstructor(candidate.getParameterTypes());
                                ann = findAutowiredAnnotation(superCtor);
                            }
                            catch (NoSuchMethodException ex) {
                                // Simply proceed, no equivalent superclass constructor found...
                            }
                        }
                    }
                    //若有注解
                    if (ann != null) {
                        //已经存在一个required=true的构造器了,抛出异常
                        if (requiredConstructor != null) {
                            throw new BeanCreationException(beanName