布局
在Android中存在着六大布局,分别是:
- LinearLayout (线性布局)
- RelativeLayout(相对布局)
- TableLayout(表格布局)
- FrameLayout(帧布局)
- AbsoluteLayout(绝对布局)
- GridLayout(网格布局)
下面我们重点总结线性和相对两大布局吧
LinearLayout (线性布局)
1.线性布局学习图
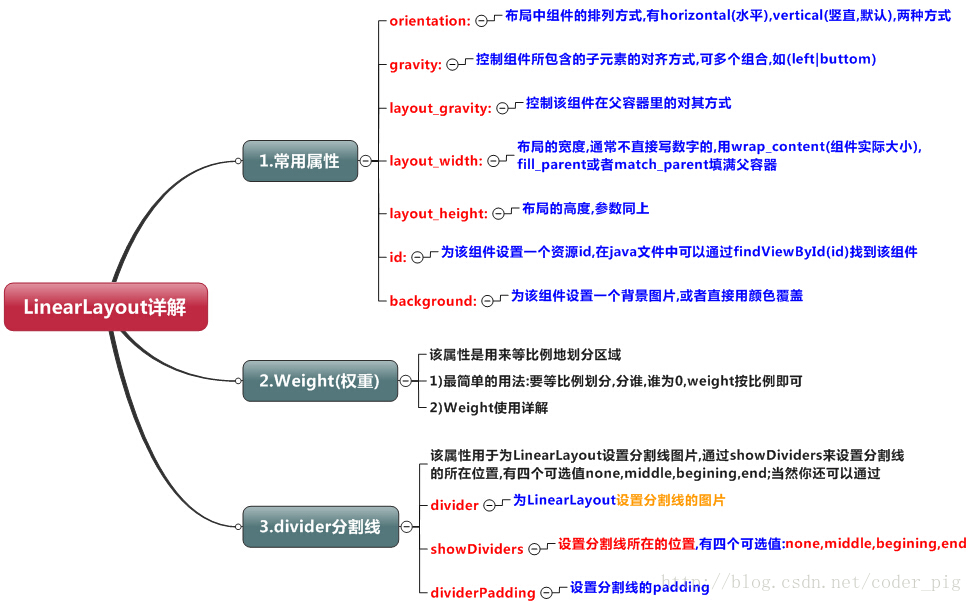
2.weight属性
<LinearLayout xmlns:android="http://schemas.android.com/apk/res/android"
    xmlns:tools="http://schemas.android.com/tools"
    android:id="@+id/LinearLayout1"
    android:layout_width="match_parent"
    android:layout_height="match_parent"
    android:orientation="horizontal">

    <LinearLayout
        android:layout_width="0dp"
        android:layout_height="fill_parent"
        android:background="#ADFF2F"
        android:layout_weight="1"/>

    <LinearLayout
        android:layout_width="0dp"
        android:layout_height="fill_parent"
        android:background="#DA70D6"
        android:layout_weight="2"/>

</LinearLayout>
要实现第一个的1:1的效果,只需要分别把两个LinearLayout的weight改成1和1就可以了 用法归纳: 按比例划分水平方向:将涉及到的View的android:width属性设置为0dp,然后设置为android weight属性设置比例即可;类推,竖直方向,只需设android:height为0dp,然后设weight属性即可!当然,如果我们不适用上述那种设置为0dp的方式,直接用wrap_content和match_parent的话, 则要接着解析weight属性了,分为两种情况,wrap_content与match_parent!另外还要看 LinearLayout的orientation是水平还是竖直,这个决定哪个方向等比例划分:
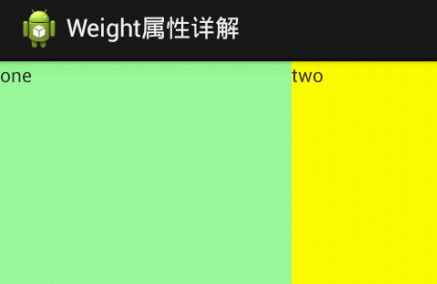
- 1 wrap_content
<LinearLayout xmlns:android="http://schemas.android.com/apk/res/android"
    xmlns:tools="http://schemas.android.com/tools"
    android:id="@+id/LinearLayout1"
    android:layout_width="match_parent"
    android:layout_height="match_parent"
    android:orientation="horizontal" >

    <TextView
        android:layout_weight="1"
        android:layout_width="wrap_content"
        android:layout_height="fill_parent"
        android:text="one"
        android:background="#98FB98"
     />
     <TextView
        android:layout_weight="2"
        android:layout_width="wrap_content"
        android:layout_height="fill_parent"
        android:text="two"
        android:background="#FFFF00"
     />
     <TextView
        android:layout_weight="3"
        android:layout_width="wrap_content"
        android:layout_height="fill_parent"
        android:text="three"
        android:background="#FF00FF"
     />

</LinearLayout>

- 2 match_parent
<LinearLayout xmlns:android="http://schemas.android.com/apk/res/android"
    xmlns:tools="http://schemas.android.com/tools"
    android:id="@+id/LinearLayout1"
    android:layout_width="match_parent"
    android:layout_height="match_parent" >

    <TextView
        android:layout_weight="1"
        android:layout_width="fill_parent"
        android:layout_height="fill_parent"
        android:text="one"
        android:background="#98FB98"
     />
     <TextView
        android:layout_weight="2"
        android:layout_width="fill_parent"
        android:layout_height="fill_parent"
        android:text="two"
        android:background="#FFFF00"
     />
     <TextView
        android:layout_weight="3"
        android:layout_width="fill_parent"
        android:layout_height="fill_parent"
        android:text="three"
        android:background="#FF00FF"
     />

</LinearLayout>
3.为LinearLayout设置分割线
- 1 使用view
<View
    android:layout_width="match_parent"
    android:layout_height="1px"
    android:background="#000000" />
效果:

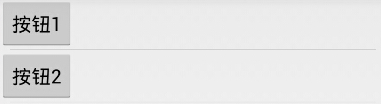
- 2 使用divider
<LinearLayout xmlns:android="http://schemas.android.com/apk/res/android"
    xmlns:tools="http://schemas.android.com/tools"
    android:id="@+id/LinearLayout1"
    android:layout_width="match_parent"
    android:layout_height="match_parent"
    android:divider="@drawable/ktv_line_div"
    android:orientation="vertical"
    android:showDividers="middle"
    android:dividerPadding="10dp"
    tools:context="com.jay.example.linearlayoutdemo.MainActivity" >

    <Button
        android:layout_width="wrap_content"
        android:layout_height="wrap_content"
        android:text="按钮1" />

    <Button
        android:layout_width="wrap_content"
        android:layout_height="wrap_content"
        android:text="按钮2" />

</LinearLayout>
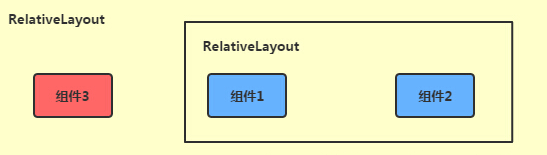
RelativeLayout(相对布局)
在使用LinearLayout的时候有一个问题,就是当界面比较复杂的时候,需要嵌套多层的 LinearLayout,这样就会降低UI Render的效率(渲染速度),而且如果是listview或者GridView上的 item,效率会更低,另外太多层LinearLayout嵌套会占用更多的系统资源,还有可能引发stackoverflow; 但是如果我们使用RelativeLayout的话,可能仅仅需要一层就可以完成了,以父容器或者兄弟组件参考+margin +padding就可以设置组件的显示位置,是比较方便的!当然,也不是绝对的,具体问题具体分析吧! 总结就是:尽量使用RelativeLayout + LinearLayout的weight属性搭配使用。
1.核心属性图
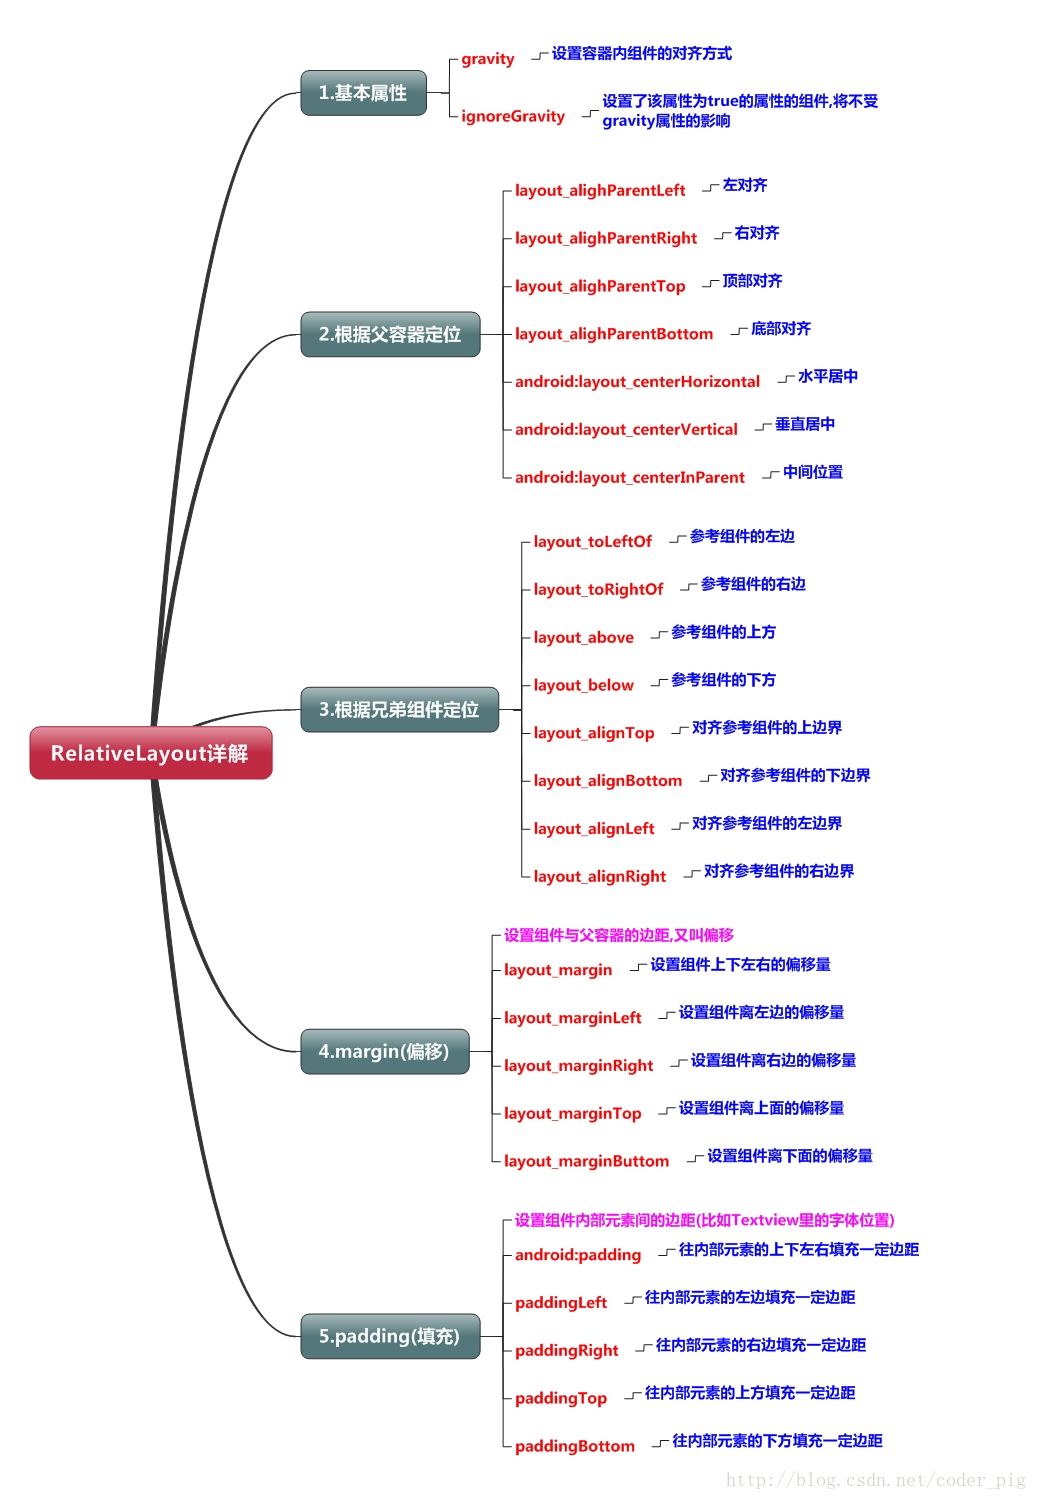
2.父容器定位属性示意图

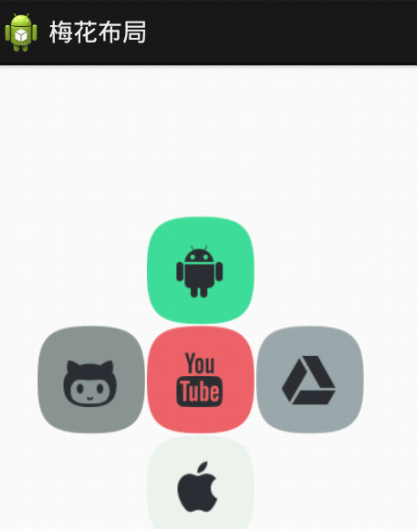
3.根据兄弟组件定位
<RelativeLayout xmlns:android="http://schemas.android.com/apk/res/android"
    xmlns:tools="http://schemas.android.com/tools"
    android:id="@+id/RelativeLayout1"
    android:layout_width="match_parent"
    android:layout_height="match_parent" >

    <!-- 这个是在容器中央的 -->

    <ImageView
        android:id="@+id/img1"
        android:layout_width="80dp"
        android:layout_height="80dp"
        android:layout_centerInParent="true"
        android:src="@drawable/pic1"/>

    <!-- 在中间图片的左边 -->
    <ImageView
        android:id="@+id/img2"
        android:layout_width="80dp"
        android:layout_height="80dp"
        android:layout_toLeftOf="@id/img1"
        android:layout_centerVertical="true"
        android:src="@drawable/pic2"/>

    <!-- 在中间图片的右边 -->
    <ImageView
        android:id="@+id/img3"
        android:layout_width="80dp"
        android:layout_height="80dp"
        android:layout_toRightOf="@id/img1"
        android:layout_centerVertical="true"
        android:src="@drawable/pic3"/>

    <!-- 在中间图片的上面-->
    <ImageView
        android:id="@+id/img4"
        android:layout_width="80dp"
        android:layout_height="80dp"
        android:layout_above="@id/img1"
        android:layout_centerHorizontal="true"
        android:src="@drawable/pic4"/>

    <!-- 在中间图片的下面 -->
    <ImageView
        android:id="@+id/img5"
        android:layout_width="80dp"
        android:layout_height="80dp"
        android:layout_below="@id/img1"
        android:layout_centerHorizontal="true"
        android:src="@drawable/pic5"/>

</RelativeLayout>
效果图:
监听
1. 使用匿名内部类的方式实现监听事件
使用方法:
-
首先为要实现监听的对象绑定监听器,例如为一个Button对象绑定一个监听器botton.setOnClickListener();。
-
然后在setOnClickListener()方法中定义一个OnClickListener的匿名内部类,然后重写内部类中的onClick方法。
-
最后在onClick方法中实现监听事件要实现的逻辑即可。
优点有: -
1.可以在当前类中复用该监听器类
-
2.可以自由访问外部类的所有界面组件
b1.setOnClickListener(new OnClickListener(){
            @Override
            public void onClick(View v) {
                // TODO Auto-generated method stub
                Intent intet = new Intent(MainActivity.this,seekbar.class);
                startActivity(intet);
                //finish();
            }
        });
2. 使用外部类的方式实现监听事件
使用方法:
-
首先要自定义一个外部类,实现OnClickListener接口,并重写onClick方法,在onClick方法中可以定义这个外部类想实现的处理逻辑,那么调用这个外部类实现监听事件时,都可以用super来调用这个类中的处理逻辑。这也是使用外部类实现监听事件的优势所在:可以将不同监听事件中大量重复的处理逻辑定义在这个类中,然后使用这个外部类实现监听事件时都可以使用super关键字来直接调用,而不用重复定义,减少重复代码,提高代码质量。
-
为要实现监听的对象绑定监听器,然后在setOnClickListener()方法中使用我们自定义的外部类来实现监听事件。
-
重写onClick方法,并根据需要来决定是否需要使用super调用父类处理逻辑,并在onClick方法中定义自己的处理逻辑。
比较少见,其中优点为: -
1.当某个事件监听器被多个GUI界面共享,且主要是完成某种业务逻辑的实现
其中缺点为:
-
1.不利于提高程序的内聚性
-
2.不能自由访问创建GUI界面类的组件,编程不够简洁
这个类很简单,实现OnClickListener并复写onClick方法即可,外部类监听点击事件实际中用的不多,但如果以后做到好几十个按钮点下
去要产生相同的动画效果,就可以把动画效果放到外部内里面
Button buttonup=(Button)findViewById(R.id.btn_signup);
buttonin.setOnClickListener(new MyOnClicklistener() {
    public void onClick(View v) {
            //noinspection ConstantConditions
                super.onClick(v);
                Toast.makeText(MainActivity.this,"点击了登录",Toast.LENGTH_LONG).show();


            }
        });

buttonup.setOnClickListener(new MyOnClicklistener() {
    public void onClick(View v) {
                //noinspection ConstantConditions
                super.onClick(v);
          Toast.makeText(MainActivity.this,"点击了注册",Toast.LENGTH_LONG).show();
            }
        });

class MyOnClicklistener implements View.OnClickListener {
        public void onClick(View v) {
            //让所有使用当前外部类的点击事件的按钮都要做出一个动作,改变button本身
            v.setAlpha(0.5f);
        }
3. 使用接口方式实现监听事件
可以直接在Activity中定义事件处理方法
其中优点为:非常简洁
缺点为:
-
1.这种形式可能造成程序结构混乱。Activity的主要职责应该是完成界面初始化;但此时还需包含事件处理器方法,从而引起混乱
-
2.如果activity界面类需要实现监听器接口,让人感觉比较怪异
public class ActivityListener extends Activity implements OnClickListener {
    private EditText show;
    private Button bn;

    @Override
    protected void onCreate(Bundle savedInstanceState) {
        super.onCreate(savedInstanceState);
        setContentView(R.layout.main);
        show = (EditText)findViewById(R.id.show);
        bn = (Button)findViewById(R.id.bn);
        bn.setOnClickListener(this);
    }

    @Override
    public void onClick(View v) {
        // TODO Auto-generated method stub
        show.setText("按钮被单击了!");
    }
4.直接绑定到标签
在布局中要发送事件源中定义一个:
Android:onClick="clickHandler"
然后在该布局对应的Activity定义一个 void clickHandler(void source)方法