Talk is cheap, Show the code
·
在完成npm和vue的环境安装,并了解了基本的目录和文件结构以后,直接写一个带登录和首页的demo做示例,快速了解一个vue工程的创建和基本的页面跳转
第一步创建工程
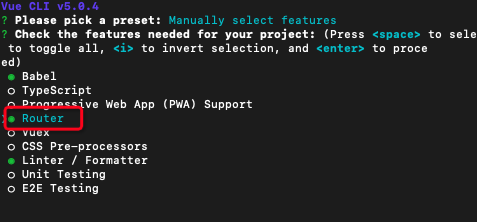
1、选择手动模式创建工程
npm create app-demo

2、添加router到工程中
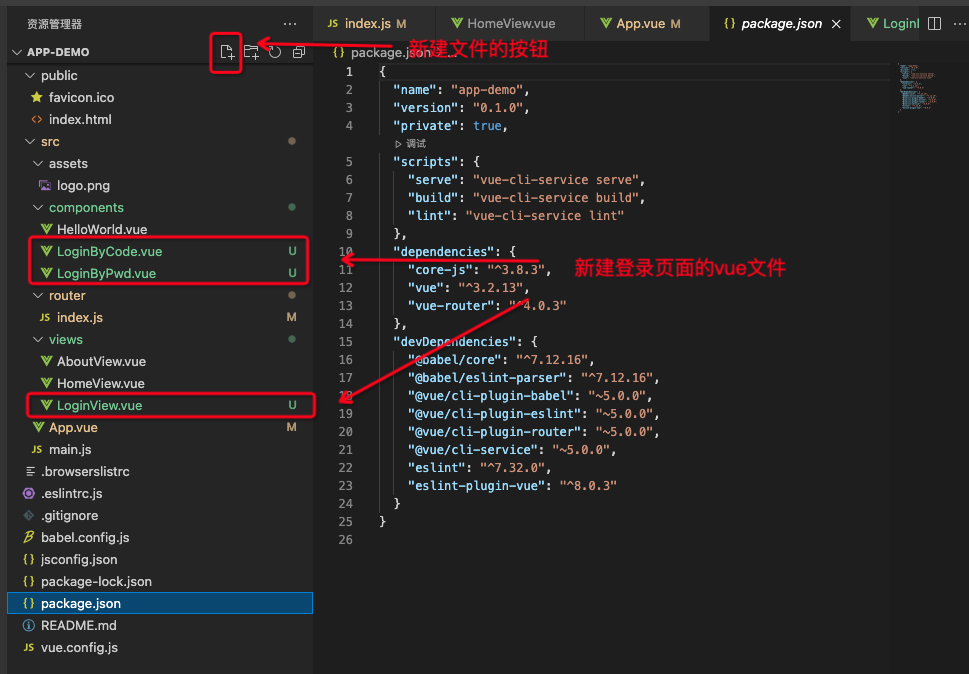
第二步:创建登录页面
1、新建文件
2、文件代码
LoginByCode.vue
<template>
    <div class="login-code">
        <input placeholder="请输入手机号"/>
        <br/>
        <input placeholder="请输入手机验证码"/>
    </div>
</template>

<script>
export default {
    name: 'LoginByCode'
}
</script>

<style scoped>
.login-code {
    position:relative;
}
</style>
LoginByPwd.vue
<template>
    <div>
        <input placeholder="请输入手机号或账号"/>
        <br/>
        <input placeholder="请输入密码"/>
    </div>
</template>

<script>
export default {
    name: 'LoginByPwd'
}
</script>
LoginView.vue
<template>
  <div class="login-containt">
    <img class="logo" src="../assets/logo.png" />
    <login-by-code v-show="logonType === 'code'"></login-by-code>
    <login-by-pwd v-show="logonType === 'pwd'">></login-by-pwd>
    <button class="login-button" v-on:click="onSubmit">登录</button>
    <br />
    <div class="login-bottom-containt">
      <button
        class="change-login-type"
        @click="onChangeLoginType"
        v-show="logonType === 'pwd'"
      >
        验证码登录
      </button>
      <button
        class="change-login-type"
        @click="onChangeLoginType"
        v-show="logonType === 'code'"
      >
        密码登录
      </button>
    </div>
  </div>
</template>

<script>
import LoginByCode from "../components/LoginByCode.vue";
import LoginByPwd from "../components/LoginByPwd.vue";

export default {
  components: { LoginByCode, LoginByPwd },
  name: "LoginView",
  data() {
    return {
      logonType: "pwd",
    };
  },
  methods: {
    onSubmit() {
      this.$router.push('/homePage');
      if (this.$data.logonType === "pwd") {
        // 密码登录
        console.log("密码登录");
      } else {
        // 验证码登录
        console.log("验证码登录");
      }
    },
    onChangeLoginType() {
      if (this.$data.logonType === "pwd") {
        this.$data.logonType = "code";
      } else {
        this.$data.logonType = "pwd";
      }
      console.log("切换登录方式");
    },
  },
};
</script>

<style  scoped>
.login-containt {
  text-align: center;
}

.logo {
  margin-top: 40%;
   100px;
  height: 100px;
}
.login-bottom-containt {
  text-align: center;
}
.login-button {
  margin-top: 40px;
}
.change-login-type {
  text-align: right;
  margin-top: 40px;
}
</style>
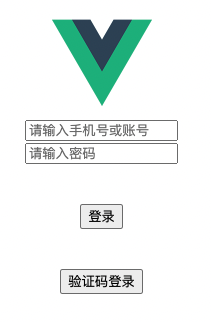
3、效果图
第三步:修改路由
修改router/index.js文件
router/index.js
import { createRouter, createWebHashHistory } from 'vue-router'
import LoginView from '../views/LoginView.vue'
import HomeView from '../views/HomeView.vue'

const routes = [
  {
    path: '/',
    redirect: 'login'
  },
  {
    path: '/login',
    name: 'login',
    component: LoginView
  },
  {
    path: '/homePage',
    name: 'homePage',
    component: HomeView
  },
  {
    path: '/about',
    name: 'about',
    // route level code-splitting
    // this generates a separate chunk (about.[hash].js) for this route
    // which is lazy-loaded when the route is visited.
    component: () => import(/* webpackChunkName: "about" */ '../views/AboutView.vue')
  }
]

const router = createRouter({
  history: createWebHashHistory(),
  routes
})

router.beforeEach((to,from,next)=>{
  const toPath = to.path;
  const fromPath = from.path;
  console.log(fromPath)
  console.log(toPath)
  next()
});

router.onError((err) => {
  console.log(err)
})


export default router
2、修改App.vue文件
App.vue
<template>
  <div id="app" class="app-containt">
    <router-view class="router-containt"></router-view>
  </div>
</template>

<script>

export default {
  name: 'App',
}
</script>

<style>
</style>
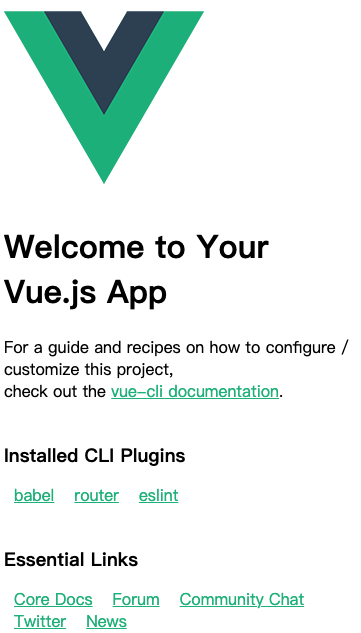
3、点击登录按钮后跳转到首页
Vue-Router是如何工作的
1、index.js的route定义是前提
const routes = [
    // 通过redirect实现重定向,可以在用户访问默认的url时跳转到指定的登录页面
  {
    path: '/',
    redirect: 'login'
  },
  // 通过component组件方式注册,path是路径,跳转时使用path跳转
  {
    path: '/login',
    name: 'login',
    component: LoginView
  },
  // 通过chunk方式注册,可以实现延迟加载
  {
    path: '/about',
    name: 'about',
    // route level code-splitting
    // this generates a separate chunk (about.[hash].js) for this route
    // which is lazy-loaded when the route is visited.
    component: () => import(/* webpackChunkName: "about" */ '../views/AboutView.vue')
  }
]

// 创建route对象
const router = createRouter({
  history: createWebHashHistory(),
  routes
})

// 通过export default 暴露router对象给外部使用
export default router
2、想要使用必须在main.js挂载
因为使用手动创建模式,vue-cli已经自动将router对象挂在到App对象
import { createApp } from 'vue'
import App from './App.vue'
import router from './router'

createApp(App).use(router).mount('#app')
3、想要跳转必须在最外层的App.vue定义
router是一个栈结构,router-view相当于路由的rootview,必须预先放在最外层的div里,系统也会默认往router-view注入第一个栈顶vue页面
<template>
  <div id="app" class="app-containt">
    <router-view class="router-containt"></router-view>
  </div>
</template>
push、replace和go的使用区别
this.$router.push('/homePage')
往栈中压入homePage页面,浏览器历史增加一条浏览记录
this.$router.replace('/homePage')
用homePage替换栈顶的vue页面,浏览器历史不变
this.$router.go(-1)
推出一个栈顶元素,回到上一个页面