ansible 和 saltstack
都是为了同时在多台主机上执行相同的命令, 但是 salt配置麻烦,ansible基本不用配置, ansible 通过ssh来连接并控制被控节点
1. 安装
第一步: 下载epel源
wget -O /etc/yum.repos.d/epel.repo http://mirrors.aliyun.com/repo/epel-7.repo
yum install -y ansible
2. 管控主机秘钥登录被控主机
ssh 秘钥登录
ssh-keygen # 用来生成ssh的密钥对
ssh-copy-id 192.168.107.131 # 复制秘钥到远程主机
3. ansible 命令格式

-a MODULE_ARGS, --args=MODULE_ARGS   # 模块的参数
-C, --check                          # 检查
-f FORKS, --forks=FORKS              #用来做高并发的
--list-hosts                         #列出主机列表
-m MODULE_NAME                       #模块名称
--syntax-check                       # 语法检查
4. ansible hosts
查看ansible 生成的文件

ansible/hosts 文件
# This is the default ansible 'hosts' file.
#
# It should live in /etc/ansible/hosts
#
#   - Comments begin with the '#' character # 用#来表示注释
#   - Blank lines are ignored # 空白行被忽略
#   - Groups of hosts are delimited by [header] elements # 主机组 需要在【】下面
#   - You can enter hostnames or ip addresses #可以写主机名或者ip地址
#   - A hostname/ip can be a member of multiple groups # 一台主机可以在多个组里面
[web]
192.168.181.133
192.168.181.134
[db]
192.168.181.134
192.168.181.135
5. 模块
ansible-doc 查看文档
 ansible-doc [-l|-F|-s] [options] [-t <plugin type> ] [plugin]
 -j           #以json的方式返回ansible的所有模块
 -l, --list   #列出所有的ansible的模块
 -s           #以片段式显示ansible的帮助信息

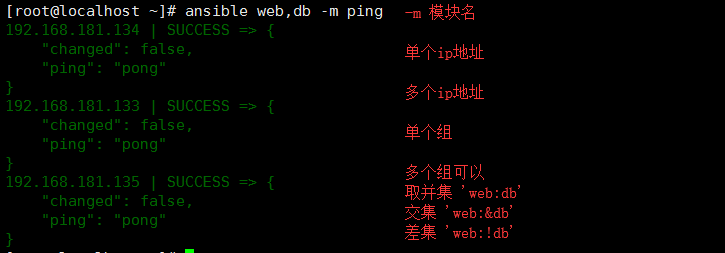
1. ping模块
host-pattern格式
2. 系统默认模块 command, 可以不指定-m
第一个command命令

ansible web -a 'chdir=/tmp pwd'    # 切换目录执行命令,使用场景是编译安装时使用
ansible web -a 'creates=/tmp pwd'  # 用来判断/tmp目录是否存在,存在就不执行操作
ansible web -a 'creates=/data pwd' # 因为data不存在,所有才会执行pwd命令
ansible web -a 'removes=/tmp pwd'  # 用来判断tmp目录是否存在,存在就执行操作
ansible web -a 'removes=/data pwd' # 因为data不存在,所有才不会执行
如果命令里包含特殊符号, 需要同shell模块 : $ < > | will not work use shell module
3. shell 执行远程文件
ansible web -m shell -a 'echo "123" | passwd --stdin alex'   # 批量创建密码
ansible 192.168.107.131 -m shell -a 'bash a.sh'              # 执行远程文件方式一
ansible 192.168.107.131 -m shell -a '/root/a.sh'             # 执行远程文件方式二,文件必须有执行权限, 需要 chmod +x
ansible 192.168.107.131 -m shell -a '/root/a.py'             # 执行远端的Python脚本
被管控机192.168.107.131

管控机就会创建 bulijngbuling2文件夹
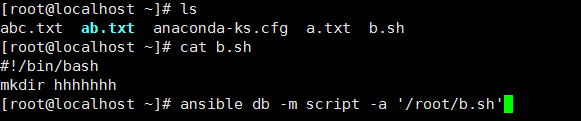
4.script 执行本地文件
ansible web -m script -a '/root/m.sh'                # 执行本地的文件,即管控机上的脚本
ansible web -m script -a 'removes=/root/m.sh /root/m.sh'    # 用来判断被管控机上是不是存在文件,如果存在,存在就执行,不存在就不执行
ansible web -m script -a 'creates=/root/a.sh /root/m.sh'    #用来判断被管控机上是不是存在文件,如果存在,就不执行
管控机
db组群 就会创建 hhhhhh文件夹
5. copy :
ansible-doc -s copy:
backup     # 备份,以时间戳结尾
src           # 源文件
dest       # 目的地址
group      # 文件的属组
mode      # 文件的权限 r 4 w 2 x 1
owner      #文件的属主

# 通过md5码来判断是否需要复制
ansible web -m copy -a 'src=/root/m.sh dest=/tmp/a.sh'               # 复制本地文件的到远程主机
ansible web -m copy -a 'src=/root/m.sh dest=/tmp/a.sh mode=755'          # 修改文件的权限
ansible web -m copy -a 'src=/root/m.sh dest=/tmp/a.sh mode=755 owner=ryan'   # 修改文件的属主
ansible web -m copy -a 'src=/etc/init.d dest=/tmp/ mode=755 owner=ryan'      # 复制本地目录到远程主机,如果改变文件的属性,则文件夹内的文件也会被改变
ansible web -m copy -a 'src=/etc/init.d/ dest=/tmp/ mode=755 owner=ryan'       # 复制本地目录内的所有文件到远程主机
ansible web -m copy -a "content='白云深处有人家
' dest=/tmp/b.txt"         # 直接将文本内容注入到远程主机的文件中
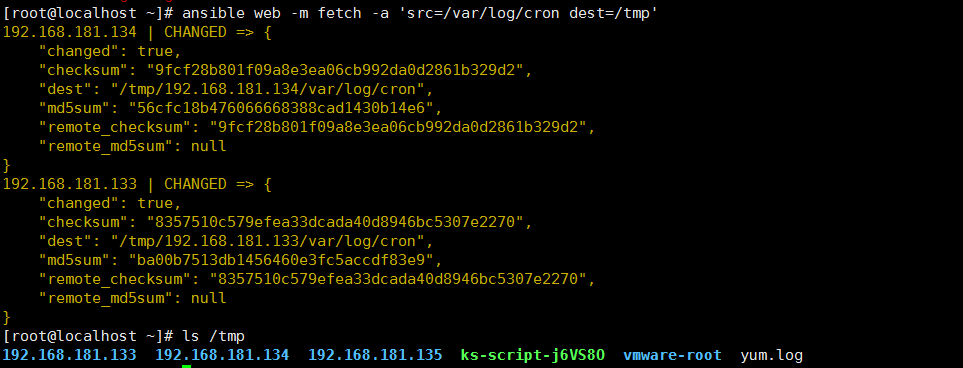
6. fetch : Fetches a file from remote nodes 把远程文件传到管控机, 如各机的log日志等, 与copy相反
dest        # 目的地址 (required) A directory to save the file into
src         # 源地址 (required) The file on the remote system to fetch,This `must' be a file, not a directory
ansible web -m fetch -a 'src=/var/log/cron dest=/tmp'    # 下载被控节点的文件,在管控机/tmp目录下以每台机器ip为名创建一个文件夹,并保留原来的目录结构
7. file
path:  # (required) Path to the file being managed.
src:   # path of the file to link to (applies only to `state=link' and `state=hard')
state: # directory  touch  link absent
owner: # chown'
ansible db -m file -a 'path=/lzmly2  state=directory'       #在远程机器上创建文件夹
ansible db -m file -a 'path=/root/q.txt  state=touch'       #用来在远程机器上创建文件
ansible db -m file -a 'path=/tmp/f src=/etc/fstab state=link'   #创建软连接src是源地址,path是目标地址
ansible db -m file -a 'path=/tmp/f state=absent'          #用来删除文件或者文件夹
gruop /owner /mode
8. yum
yum和rpm 的区别: yum解决依赖关系
rpm -q 包 查询是否安装
yum 安装包组
yum grouplist    # 查看包组信息
yum groupinstall # 安装包组
ansible 语法
disablerepo     # 禁用源
enablerepo      # 启用源
name         # 包名
state        # install (`present' or `installed', `latest'), or remove (`absent' or `removed')


ansible web -m yum -a 'name=wget'                 # 安装wget
ansible web -m yum -a 'name=python2-pip'          # 安装python2-pip
ansible web -m yum -a 'name=wget state=absent'    # 卸载软件包
ansible web -m yum -a 'name="@Development Tools"' # 安装包组
9. pip
pip install           # 安装包
pip freeze > a.txt    # 将python的环境打包到文件中
pip install -r a.txt  # 安装文件中的包
pip list              # 查看所有的以安装成功的包
ansible 语法
requirements   # The path to a pip requirements file, which should be local to the remote system. 就是pip install -r 指定文件安装
name        # 名

ansible web -m pip -a 'name=flask' # 安装flask模块
10. service
systemctl start nginx   # centos7 启动nginx
service nginx start     # centos6
systemctl enabled nginx   # centos7 开机自启动
chkconfig nginx on     # centos6 开机自启动
ansible:
enabled  # Whether the service should start on boot. 开机启动
name     # (required) Name of the service
state    # started stopped restarted reloaded

ansible web -m service -a 'name=nginx state=started enabled=yes' # 启动nginx, 开机启动nginx
ansible web -m service -a 'name=nginx state=stopped' # 关闭nginx
11. cron 计划任务
*  *  * * *   job
分 时 日 月 周  任务
0 */2 *  * *  job         每隔两个小时
0 12,13 * * * job         12点和13点
0 12-17 * * * job         12点到17点
0 12-17/2 * * 1,3,6,0     周1,周3,周6,周7 12点到17点每隔两个小时
crontab -e         # 编辑计划任务
crontab -l         # 查看计划任务
crontab -r         # 删除计划任务
ansible
minute      # 分钟
hour       # 小时
day       # 天
month      # 月
weekday    # 周
name      # 任务名字
job       # 任务
disabled    # 禁用

ansible db -m cron -a 'minute=26 job="touch /tmp/xzmly.txt" name=touchfile'          # 新建一个计划任务
ansible db -m cron -a 'name=touchfile state=absent'                         # 删除一个计划任务
ansible db -m cron -a 'minute=26 job="touch /tmp/xzmly.txt" name=touchfile disabled=yes'  # 禁用计划任务,以#表示禁用
ansible web -m cron -a 'name=synchronus minute=00 job="ntpdate time.window.com"'       # 每小时同步window时间
12 user
用户:
    管理员  root 0
    普通用户
        系统用户  不能登录  1-999 centos7 1-499 centos6
        登录用户  可以登录  1000-65535 centos7 500-65535 centos6
用户组:
    管理员组 root 0
    系统用户组 1-999 centos7 1-499 centos6
    登录用户组 1000-65535 centos7 500-65535 centos6

 -d  指定用户的家目录
 -g  指定用户的组
 -G  执行用户的附加组
 -s  指定登录后使用的shell
 -r  创建一个系统组
 -p  password
 useradd -r  ryan            # 创建系统用户, 从999倒序
 useradd -s /sbin/nologin may     # 创建的是普通用户,从1000开始升序
 useradd -d /opt/shey shey      # 创建用户时指定用户的家目录
 useradd -u 3000 sheldon       # 创建用户并指定用户的uid
 userdel  sheldon            # 删除用户
 userdel -r shey            # 删除用户并删除用户的家目录
ansible
group    # 组
groups   # 附加组
home     # 家目录
name     # 用户名
password # 密码
remove   # 只有当state=absent 起作用, 删除用户家目录
shell    # 用户登录后使用的shell
system   # 创建一个系统用户
uid      # 用来指定用户的id
state   # 状态
ansible db -m user -a 'name=ryan uid=4000 home=/opt/wulaoshi groups=root shell=/sbin/nologin' #创建一个用户,并指定用户的id,用户的家目录,用户的附加组,用户的shell
ansible db -m user -a 'name=ryan1 state=absent' #删除用户但是不删除用户的家目录
ansible db -m user -a 'name=ryan2 state=absent remove=yes' # 删除用户并删除用户的家目录
13 group
gid      # 组的id
name    # 组名
system   # 系统组
state
ansible db -m group -a 'name=ryan3 system=yes' #创建系统组
ansible db -m group -a 'name=ryan4 state=absent' # 删除组
其他模块遇到的时候再补充