*参考优质文档: https://www.cnblogs.com/xrq730/p/4919025.html
一.简介
aop(Aspect Oriented Programming)是面向切面编程,即将一个方法插入到n个对象方法的指定位置
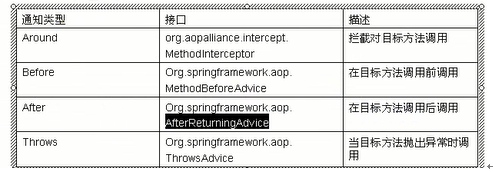
aop分为五种织入通知方式:前置,后置,环绕,异常,引入(只需要修改配置文件)
前置:在方法前执行
后置:在方法后执行
环绕:进入方法后,可以在所有语句前执行或者在所有语句后执行
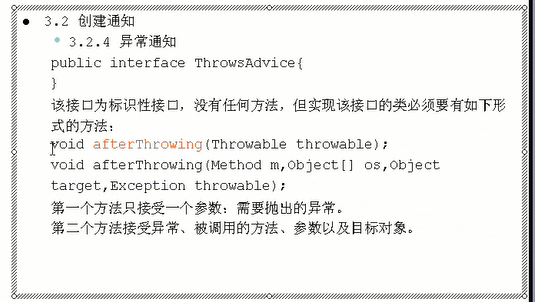
异常:如果方法内有语句错误,则进入异常处理方法

引入:只修改配置文件,操作前几种织入方法,用于配置某个对象织入什么方法
实现对应接口的类即可作为通知类

二.AOP核心概念
1、横切关注点
对哪些方法进行拦截,拦截后怎么处理,这些关注点称之为横切关注点
2、切面(aspect)
类是对物体特征的抽象,切面就是对横切关注点的抽象
3、连接点(joinpoint)
被拦截到的点,因为Spring只支持方法类型的连接点,所以在Spring中连接点指的就是被拦截到的方法,实际上连接点还可以是字段或者构造器
4、切入点(pointcut)
对连接点进行拦截的定义
5、通知(advice)
所谓通知指的就是指拦截到连接点之后要执行的代码,通知分为前置、后置、异常、最终、环绕通知五类
6、目标对象
代理的目标对象
7、织入(weave)
将切面应用到目标对象并导致代理对象创建的过程
8、引入(introduction)
在不修改代码的前提下,引入可以在运行期为类动态地添加一些方法或字段
三. 织入通知方法实现步骤
- 定义接口
- 编写对象(被代理对象=目标对象)
- 编写通知(前置通知目标方法前调用)
- 在beans.xml文件
4.1配置被代理对象=目标对象
4.2配置通知
4.3配置代理对象,是ProxyFactoryBean对象实例
4.3.1配置代理接口集
4.3.2织入通知
4.3.3配置被代理对象
四.案例(前置)
1.定义接口TestService
package com.ahd.aop;

public interface TestService {
    public void sayHello();
}
2.实现类Test1Service

package com.ahd.aop;

public class Test1Service implements TestService {
    private String name;
    @Override
    public void sayHello() {
        // TODO Auto-generated method stub
        System.out.println("******执行方法sayHello test1"+name+"******");

    }
    public String getName() {
        return name;
    }
    public void setName(String name) {
        this.name = name;
    }
}
3.前置织入类

package com.ahd.aop;

import java.lang.reflect.Method;

import org.springframework.aop.MethodBeforeAdvice;


public class MyMethodBeforeAdvice implements MethodBeforeAdvice {

    @Override
    public void before(Method method, Object[] args, Object target)
            throws Throwable {
        // TODO Auto-generated method stub
        System.out.println("前置通知,在方法执行前执行,写入日志,"+method.getName());
    }
}
4.beans.xml配置文件
<?xml version="1.0" encoding="UTF-8"?>

<beans xmlns="http://www.springframework.org/schema/beans"
        xmlns:xsi="http://www.w3.org/2001/XMLSchema-instance"
        xmlns:context="http://www.springframework.org/schema/context"
        xmlns:tx="http://www.springframework.org/schema/tx"
        xsi:schemaLocation="http://www.springframework.org/schema/beans http://www.springframework.org/schema/beans/spring-beans-2.5.xsd
                http://www.springframework.org/schema/context http://www.springframework.org/schema/context/spring-context-2.5.xsd
                http://www.springframework.org/schema/tx http://www.springframework.org/schema/tx/spring-tx-2.5.xsd">
    <!-- 配置被代理对象,即正常配置类 -->
    <bean id="test1Service" class="com.ahd.aop.Test1Service">
        <property name="name" value="爱华顿"></property>
    </bean>
    <!-- 配置前置通知 -->
    <bean id="myMethodBeforeAdvice" class="com.ahd.aop.MyMethodBeforeAdvice">
    </bean>
    <!-- 配置代理对象 -->
    <bean id="proxyFactoryBean" class="org.springframework.aop.framework.ProxyFactoryBean">

        <!-- 配置代理接口集 -->
        <property name="proxyInterfaces">
            <list>
                <value>com.ahd.aop.TestService</value>
            </list>
        </property>
        <!-- 织入通知 -->
        <property name="interceptorNames">
            <list>
                <value>myMethodBeforeAdvice</value>
            </list>
        </property>
        <!-- 配置被代理对象,可以指定 -->
        <property name="target" ref="test1Service"/>
    </bean>

</beans>
5.测试文件

package com.ahd.aop;

import org.springframework.aop.framework.ProxyFactoryBean;
import org.springframework.context.ApplicationContext;
import org.springframework.context.support.ClassPathXmlApplicationContext;

public class App1 {

    public static void main(String[] args) {
        // TODO Auto-generated method stub
        ApplicationContext ac=new ClassPathXmlApplicationContext("com/ahd/aop/beans.xml");
        TestService ts=(TestService) ac.getBean("proxyFactoryBean");
        ts.sayHello();

        System.out.println("***********************************");
        ((TestService2)ts).sayBye();
    }

}
五.引入通知案例(在上面案例的基础上,修改配置文件)
<?xml version="1.0" encoding="UTF-8"?>

<beans xmlns="http://www.springframework.org/schema/beans"
        xmlns:xsi="http://www.w3.org/2001/XMLSchema-instance"
        xmlns:context="http://www.springframework.org/schema/context"
        xmlns:tx="http://www.springframework.org/schema/tx"
        xsi:schemaLocation="http://www.springframework.org/schema/beans http://www.springframework.org/schema/beans/spring-beans-2.5.xsd
                http://www.springframework.org/schema/context http://www.springframework.org/schema/context/spring-context-2.5.xsd
                http://www.springframework.org/schema/tx http://www.springframework.org/schema/tx/spring-tx-2.5.xsd">
    <!-- 配置被代理对象,即正常配置类 -->
    <bean id="test1Service" class="com.ahd.aop.Test1Service">
        <property name="name" value="爱华顿"></property>
    </bean>
    <!-- 配置前置通知 -->
    <bean id="myMethodBeforeAdvice" class="com.ahd.aop.MyMethodBeforeAdvice">
    <!-- 配置后置通知 -->
    <bean id="myBeforeReturningAdvice" class="com.ahd.aop.MyBeforeReturningAdvice"></bean>

    <!-- 配置环绕通知 -->
    <bean id="myMethodInterceptor" class="com.ahd.aop.MyMethodInterceptor"></bean>

    <!-- 配置异常通知 -->
    <bean id="myThrowsAdvice" class="com.ahd.aop.MyThrowsAdvice"></bean>
    </bean>
    <!-- 配置引入,配置接入点 -->
    <bean id="myMethodBeforeAdviceFilter" class="org.springframework.aop.support.NameMatchMethodPointcutAdvisor">
        <property name="advice" ref="myMethodBeforeAdvice"></property>
        <property name="mappedNames">
            <list>
                <value>sayHello</value>
            </list>
        </property>
    </bean>

    <!-- 配置代理对象 -->
    <bean id="proxyFactoryBean" class="org.springframework.aop.framework.ProxyFactoryBean">

        <!-- 配置代理接口集 -->
        <property name="proxyInterfaces">
            <list>
                <value>com.ahd.aop.TestService</value>
                <value>com.ahd.aop.TestService2</value>
            </list>
        </property>
        <!-- 织入通知 -->
        <property name="interceptorNames">
            <list>
                <value>myMethodBeforeAdviceFilter</value>
                <value>myBeforeReturningAdvice</value>
                <value>myMethodInterceptor</value>
                <value>myThrowsAdvice</value>
            </list>
        </property>
        <!-- 配置被代理对象,可以指定 -->
        <property name="target" ref="test1Service"/>
    </bean>


</beans>
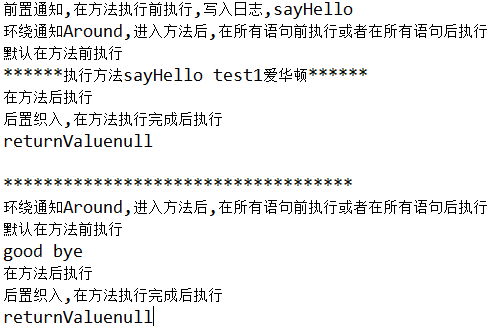
实现效果:

======================================================================================
我们都一样,我们都不一样!
=======================================================================================
