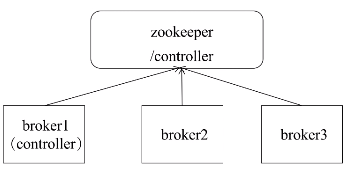
一、基本结构
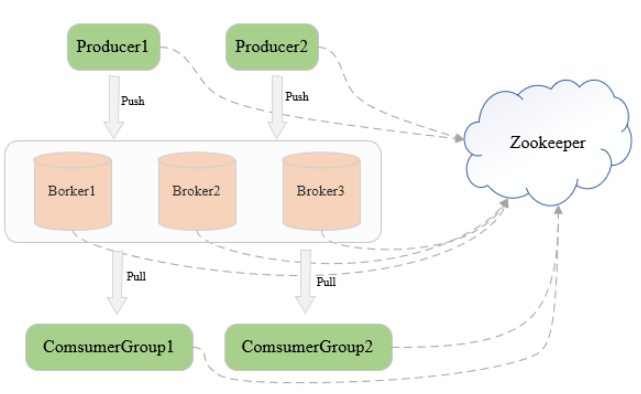
三台机器组成的Kafka集群,每台机器启动一个Kafka进程,即Broker
向broker发送消息的客户端是Producer,拉取消息的客户端是Consumer
Producer和Consumer都是用户实现的
broker只负责数据存储,不保存任何Producer和Consumer的信息
Kfaka通过zookeeper管理集群
broker和集群的一些信息,即元信息都保存在zookeeper中
一个ConsumerGroup可以包含一个或多个Consumer
同一个消费者组里的不同消费者是互斥的,在一个消费者组里,一条消息运行被一个Consumer消费,不会出现同一条消息被一个消费者组多次消费的情况
Topic与Partition
Kafka集群由多个实例组成,每个节点称为Broker,对消息保存时根据Topic进行归类
一个Topoic可以被划分为多个Partition
每个Partition可以有多个副本,多副本冗余存储可以保证某个副本的机器出现故障,其他副本可正常使用,副本尽量分布到不同的broker上,分区的每个副本都有一个leader,负责读写请求,其他副本只从leader中同步数据,leader挂掉会从follower中选举新的leader
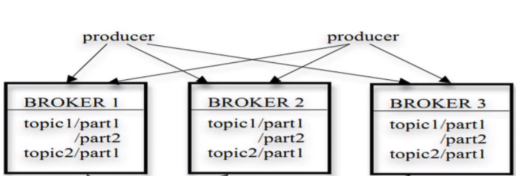
一个topic可看成数据库中的一个表
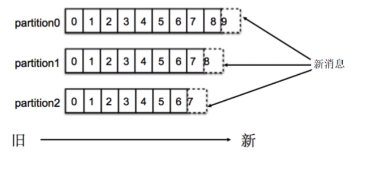
消费者可以并行处理Partition中的数据
Partition内顺序存储,写入新消息采用追加的方式,消费消息采用FIFO的方式顺序拉取消息
一个Topic可以有多个分区,Kafka只保证同一个分区内有序,不保证Topic整体(多个分区之间)有序
ConsumerGroup
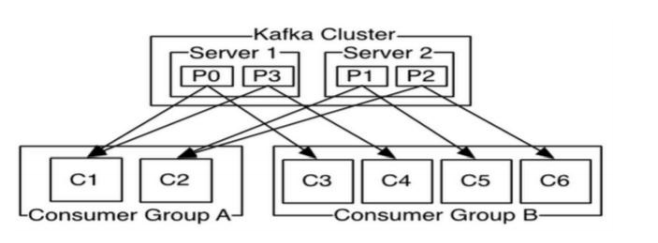
CG,为了加速读取速度,多个consumer可以划分为一个组,并行消费一个Topic
一个Topic可以由多个CG订阅,多个CG之间是平等的,同一个CG内可以有一个或多个consumer,同一个CG内的consumer之间是竞争关系,一个消息在一个CG内的只能被一个consumer消费
核心概念总结:
- Broker:启动Kafka的一个实例就是一个broker,一个kafka集群可以启动多个broker
- Topic:相当于数据库中的表,productor将消息写入的一个topic中,consumer从同一个topic消费消息
- Partiton:一个topic可以设置多个分区,相当于把一个数据集分成多份分别放到不同的分区中存储,一个topic可以有一个或者多个分区,分区内消息有序
- Replication:副本,一个Partition可以设置一个或多个副本,副本主要保证系统能够持续不丢失的对外提供服务,提高系统的容错能力
- Producer:消费生产者,负责向Kafka中发布消息
- Consumer Group:消费者所属组,一个Consumer Group可以包含一个或多个consumer,当一个topic被一个Consumer Group消费的时候,Consumer Group内只能有一个consumer消费同一条消息,不会出现同一个Consumer Group多个consumer同时消费一条消息造成一个消息被一个Consumer Group消费多次的情况
- Consumer:消息消费者,consumer从kafka指定的主题中拉取消息
- Zookeeper:Zookeeper在Kafka集群中主要用于协调管理,Kafka将元数据信息保存在zookeeper中,通过zookeeper管理和维护整个Kafka集群的动态扩展、各个Broker负载均衡、Partition leader选举等
二、Kafka存储
每个topic可以有多个分区,每个分区在物理磁盘上就是一个文件夹(目录)
蓝色前本部分是所属topic的名称,后面的数字是分区的编号

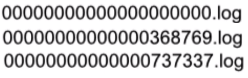
在每个分区里有多个segment文件
Segment:段文件,Kafka中最小存储单位,一个partition包含多个segment文件,每个segment是以message在partition中的起始偏移量命名以log结尾的文件
Offset:消息在分区中的偏移量,用来在分区中唯一的标识一条信息
索引文件
Kafka为了提高写入、查询速度,在partition文件夹下每一个segment log文件都有同名的索引文件,在Kafka0.10以后的版本中会存在两个索引文件
- 一个是以index结尾的偏移量索引文件
- 另一个是以timeinde结尾的时间戳索引文件

偏移量索引文件
以偏移量作为名称,index为后缀
索引内容格式:offset,position
采用稀疏存储方式
通过log.index.interval.bytes设置索引跨度
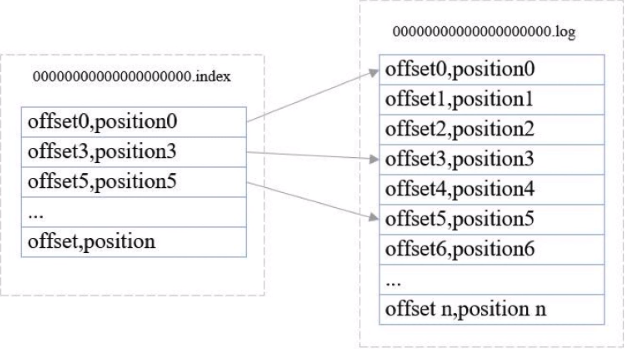
比如查找offset4的消息
consumer首先确定在哪个数据文件和索引文件中
通过偏移量索引文件查找小于等于指定偏移量最大的偏移量,上面再索引文件中找到offset3
根据offset3指向的数据文件里面对应的地方往下找,找到offset4
时间戳索引文件
以时间戳为名称,以timeindex为后缀
索引内容格式:timestamp,offset
采用稀疏存储方式
通过log.index.interval.tytes设置索引跨度
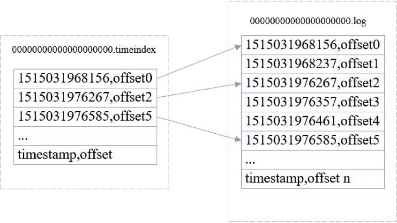
查找过程同偏移量索引
三、高可用的实现
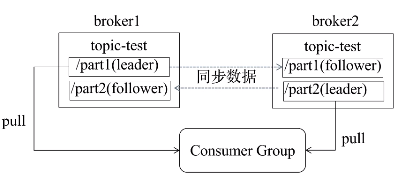
多分区多副本
- 一个topic可以有多个分区,每个分区可以有多个副本
- 0.8以前没有Replication,一旦某台broker宕机,其上partition数据便丢失
- 同一个partition的不同副本分不到不同的broker
- 一个分区的多个副本选举一个leader,由leader负责读写,其他副本作为follower从leader同步消息
Kafka Controller选举
- 从集群中的broker选举出一个Broker作为Controller控制节点
- 负责整个集群的管理,如Broker管理、Topic管理、Partition Leader选举等
- 选举过程所有的Broker向Zookeeper发起创建临时znode的请求,成功创建znode的Broker胜出作为Controller,未被选中的Broker监听Controller的znode,等待下次选举
Kafka Partition Leader选举
- Controller负责分区Leader选举
- ISR列表 在zookeeper中
Follower批量从Leader拖取数据
Leader跟踪保持同步的flower列表ISR(In Sync Replica),ISR作为下次选主的候选列表
Follower心跳超时或者消息落后太多,将被移除出ISR
- Leader失败后,从ISR列表中选择一个Follower作为新的Leader
四、Kafka集群部属
1.集群规划
    使用3台机器部署,分别是node01、node02、node03
2.下载Kafka安装包
    下载地址http://kafka.apache.org/downloads,选择Kafka版本kafka_2.11-0.10.2.1.tgz
3.安装kafka
    将安装包上传到其中一台机器node01上,并解压到/bigdata目录下:tar -zxvf kafka_2.11-0.10.2.1.tgz
    创建软连接:ln -s /bigdata/kafka_2.11-0.10.2.1 /usr/local/kafka
4.添加到环境变量:vim /etc/profile
    添加内容:export KAFKA_HOME=/usr/local/kafka
            export PATH=$PATH:${KAFKA_HOME}/bin
    刷新环境变量:source /etc/profile
5.修改配置文件
    cd /usr/local/kafka/config
    vim server.properties
6.在/usr/local/kafka中创建kafka-logs文件夹
    mkdir /usr/local/kafka/kafka-logs
7.使用scp将配置好的kafka安装包拷贝到node02和node03两个节点
    scp -r /bigdata/kafka_2.11-0.10.2.1 root@node02:/bigdata/
    scp -r /bigdata/kafka_2.11-0.10.2.1 root@node03:/bigdata/
8.分别修改node02和node03的配置文件server.properties 具体文件在下面
    8.1 node02的server.properties修改项
    broker.id=1
    host.name=node02
    8.2 node03的server.properties修改项
    broker.id=2
    host.name=node03
9.分别在node01、node02、node03启动kafka
    cd /usr/local/kafka
    启动的时候使用-daemon选项,则kafka将以守护进程的方式启动
    bin/kafka-server-start.sh -daemon config/server.properties
10.日志目录
    默认在kafka安装路径生成的logs文件夹中
server.properties
############################# Server Basics #############################

#每个borker的id是唯一的,多个broker要设置不同的id
broker.id=0

#访问端口号
port=9092

#访问地址
host.name=node01

#允许删除topic
delete.topic.enable=true


# The number of threads handling network requests
num.network.threads=3

# The number of threads doing disk I/O
num.io.threads=8

# The send buffer (SO_SNDBUF) used by the socket server
socket.send.buffer.bytes=102400

# The receive buffer (SO_RCVBUF) used by the socket server
socket.receive.buffer.bytes=102400

# The maximum size of a request that the socket server will accept (protection against OOM)
socket.request.max.bytes=104857600


############################# Log Basics #############################

#存储数据路径,默认是在/tmp目录下,需要修改
log.dirs=/usr/local/kafka/kafka-logs

#创建topic默认分区数
num.partitions=1

# The number of threads per data directory to be used for log recovery at startup and flushing at shutdown.
# This value is recommended to be increased for installations with data dirs located in RAID array.
num.recovery.threads.per.data.dir=1

############################# Log Flush Policy #############################

# Messages are immediately written to the filesystem but by default we only fsync() to sync
# the OS cache lazily. The following configurations control the flush of data to disk.
# There are a few important trade-offs here:
#    1. Durability: Unflushed data may be lost if you are not using replication.
#    2. Latency: Very large flush intervals may lead to latency spikes when the flush does occur as there will be a lot of data to flush.
#    3. Throughput: The flush is generally the most expensive operation, and a small flush interval may lead to exceessive seeks.
# The settings below allow one to configure the flush policy to flush data after a period of time or
# every N messages (or both). This can be done globally and overridden on a per-topic basis.

# The number of messages to accept before forcing a flush of data to disk
#log.flush.interval.messages=10000

# The maximum amount of time a message can sit in a log before we force a flush
#log.flush.interval.ms=1000

############################# Log Retention Policy #############################

# The following configurations control the disposal of log segments. The policy can
# be set to delete segments after a period of time, or after a given size has accumulated.
# A segment will be deleted whenever *either* of these criteria are met. Deletion always happens
# from the end of the log.

#数据保存时间,默认7天,单位小时
log.retention.hours=168

# A size-based retention policy for logs. Segments are pruned from the log as long as the remaining
# segments don't drop below log.retention.bytes. Functions independently of log.retention.hours.
#log.retention.bytes=1073741824

# The maximum size of a log segment file. When this size is reached a new log segment will be created.
log.segment.bytes=1073741824

# The interval at which log segments are checked to see if they can be deleted according
# to the retention policies
log.retention.check.interval.ms=300000

############################# Zookeeper #############################

#zookeeper地址,多个地址用逗号隔开
zookeeper.connect=node01:2181,node02:2181,node03:2181

# Timeout in ms for connecting to zookeeper
zookeeper.connection.timeout.ms=6000
五、主题管理
创建主题
bin/kafka-topics.sh --create --zookeeper node01:2181 --topic topic1 --replication-factor 2 --partitions 2
查看主题信息
bin/kafka-topics.sh --describe --zookeeper node01:2181 --topic topic1
查看kafka中已经创建的主题列表
bin/kafka-topics.sh --list --zookeeper node01:2181
使用kafka自带的生产者客户端脚本
bin/kafka-console-producer.sh --broker-list node01:9092,node02:9092,node03:9092 --topic topic1
使用kafka自带的消费者客户端脚本
bin/kafka-console-consumer.sh --zookeeper node01:2181 --from-beginning --topic topic1
删除topic:
bin/kafka-topics.sh --delete --zookeeper node01:2181 --topic topic1
增加分区
bin/kafka-topics.sh --alter --zookeeper node01:2181 --topic topic1 --partitions 3
六、Java API
Producer
关键:
- 配置
- 新建Producer
- 发送消息
public class Producer extends Thread
{
  private final kafka.javaapi.producer.Producer<Integer, String> producer;
  private final String topic;
  private final Properties props = new Properties();

  public Producer(String topic)
  {
    props.put("serializer.class", "kafka.serializer.StringEncoder"); // 定义message的类型为字符串
   props.put("metadata.broker.list", KafkaProperties.broker_list);
    // Use random partitioner. Don't need the key type. Just set it to Integer.
    // The message is of type String.
    producer = new kafka.javaapi.producer.Producer<Integer, String>(new ProducerConfig(props));
    this.topic = topic;
  }

  public void run() {
    int messageNo = 1;
    while(true)
    {
      String messageStr = new String("Message_" + messageNo);
      producer.send(new KeyedMessage<Integer, String>(topic, messageStr));
      System.out.println("已生成数据: " + messageStr);
      messageNo++;
    }
  }

  public static void main(String[] args) {
    Producer producerThread = new Producer(KafkaProperties.TestTopic);
    producerThread.start();
  }
}
Consumer
public class Consumer extends Thread
{
  private final ConsumerConnector consumer;
  private final String topic;

  public Consumer(String topic)
  {
    consumer = kafka.consumer.Consumer.createJavaConsumerConnector(
            createConsumerConfig());
    this.topic = topic;
  }

  private static ConsumerConfig createConsumerConfig()
  {
    Properties props = new Properties();
    props.put("zookeeper.connect", KafkaProperties.zkConnect);
    props.put("group.id", KafkaProperties.groupId);
    props.put("zookeeper.session.timeout.ms", "400");
    props.put("zookeeper.sync.time.ms", "200");
    props.put("auto.commit.interval.ms", "1000"); // 多久更新一次offset

    return new ConsumerConfig(props);

  }

  public void run() {
    Map<String, Integer> topicCountMap = new HashMap<String, Integer>();
    topicCountMap.put(topic, new Integer(1));
    Map<String, List<KafkaStream<byte[], byte[]>>> consumerMap = consumer.createMessageStreams(topicCountMap);
   KafkaStream<byte[], byte[]> stream =  consumerMap.get(topic).get(0);
    ConsumerIterator<byte[], byte[]> it = stream.iterator();
    while(it.hasNext())
      System.out.println(new String(it.next().message()));
  }

  public static void main(String[] args) {
    Consumer consumerThread = new Consumer(KafkaProperties.topic);
    consumerThread.start();
  }
}