Maven
官网: https://maven.apache.org/repository/index.html
一、配置github
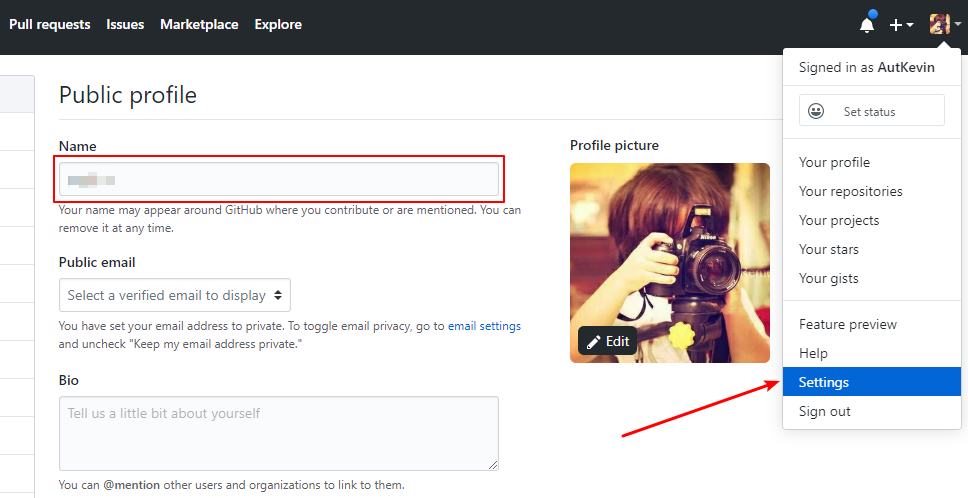
设置登录名name
在github的个人设置中,设置好自己的姓名 。这个环节很重要,若不设置姓名,会出现一些一些意想不到的错误。maven的setting中的配置文件用户名都用这个。
二、生成maven包到本地
修改pom文件发布到本地仓库
在需要发布的项目中的pom文件中的build -> pluginManagement -> plugins标签下加入以下插件:
<!--编译本地仓库包插件,生成target/mvn-repo下面-->
<plugin>
    <artifactId>maven-deploy-plugin</artifactId>
    <version>2.8.1</version>
    <configuration>
        <altDeploymentRepository>internal.repo::default::file://${project.build.directory}/mvn-repo</altDeploymentRepository>
    </configuration>
</plugin>

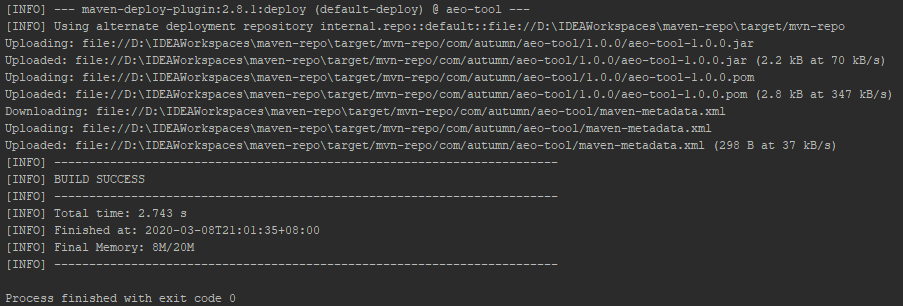
然后运行 mvn clean deploy 命令,即可在对应项目中的target/mvn-repo目录下找到本地的jar。
三、发布到github(失效)
修改mvn配置文件settings.xml
Win+R输入%MAVEN_HOME%打开maven安装目录,修改本地maven的配置文件settings.xml,找到其中的servers 标签,加入如下 配置:
<server>
    <id>github</id>
    <username>github登录名</username>
    <password>github登录密码</password>
</server>
修改pom文件properties中添加下列属性
关联setting.xml中使用哪个github的server。
<github.global.server>github</github.global.server>
添加远程发布插件
            <!--发布到服务器插件,需要依赖上面的部分-->
            <!--查看aliyun的仓库https://maven.aliyun.com/mvn/search,发现需要依赖包-->
            <plugin>
                <groupId>com.github.github</groupId>
                <artifactId>site-maven-plugin</artifactId>
                <version >0.9</version>
                <configuration>
                    <message >Maven artifacts for ${project.version}</message>
                    <noJekyll>true</noJekyll>
                    <outputDirectory>${project.build.directory}/mvn-repo</outputDirectory><!--本地jar地址-->
                    <branch>refs/heads/master</branch><!--branch必须是refs/heads/开头的,后边跟分支名称-->
                    <merge>true</merge>
                    <includes>
                        <include>**/*</include>
                    </includes>
                    <repositoryName>maven-repo</repositoryName> <!--对应github上创建的仓库名-->
                    <repositoryOwner>your setting name</repositoryOwner> <!--github仓库所有者setting中的name-->
                </configuration>
                <executions>
                    <execution>
                        <goals>
                            <goal>site</goal>
                        </goals>
                        <phase>deploy</phase>
                    </execution>
                </executions>
            </plugin>
依赖插件
        <!-- 发布到服务器插件的依赖包 -->
        <dependency>
            <groupId>com.github.github</groupId>
            <artifactId>site-maven-plugin</artifactId>
            <version>0.9</version>
            <type>maven-plugin</type>
        </dependency>
mvn clean deploy运行结果
手动上传到github
发现github上并没有上传文件,于是新建了一个branch并上传。
### 在项目根目录上面
cd ./target/mvn-repo   #进入mvn包目录
git init   #初始化本地仓库
git add .   #添加文件
git status   #查看状态
git commit -m "maven仓库"  #提交到本地
#关联到服务器,并没命名仓库为origin
git remote add origin https://github.com/AutKevin/maven-repo.git
git branch repo    #创建repo分支
git branch -a    #查看所有分支
git checkout repo    #切换到repo分支
git push origin repo    #推送到origin远程仓库的repo分支
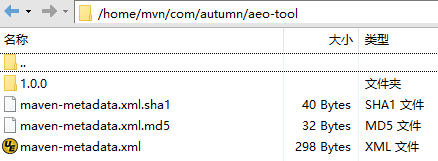
maven包上传到服务器格式如下,在maven-repo仓库下的repo分支中。依然读取不到。

四、发布到ftp服务器(能发不能读,需和http服务器联用)
通过插件
官网: https://maven.apache.org/plugins/maven-deploy-plugin/examples/deploy-ftp.html
pom.xml中添加
<project>
  ...
  <distributionManagement>
    <repository>
      <id>ftp-repository</id>
      <url>ftp://repository.mycompany.com/repository</url>
    </repository>
  </distributionManagement>

  <build>
    <extensions>
      <!-- Enabling the use of FTP -->
      <extension>
        <groupId>org.apache.maven.wagon</groupId>
         <artifactId>wagon-ftp</artifactId>
         <version>1.0-beta-6</version>
      </extension>
    </extensions>
  </build>
  ...
</project>
setting.xml文件中配置
<settings>
  ...
  <servers>
    <server>
      <id>ftp-repository</id>
      <username>user</username>
      <password>pass</password>
    </server>
  </servers>
  ...
</settings>
然后执行mvn deploy
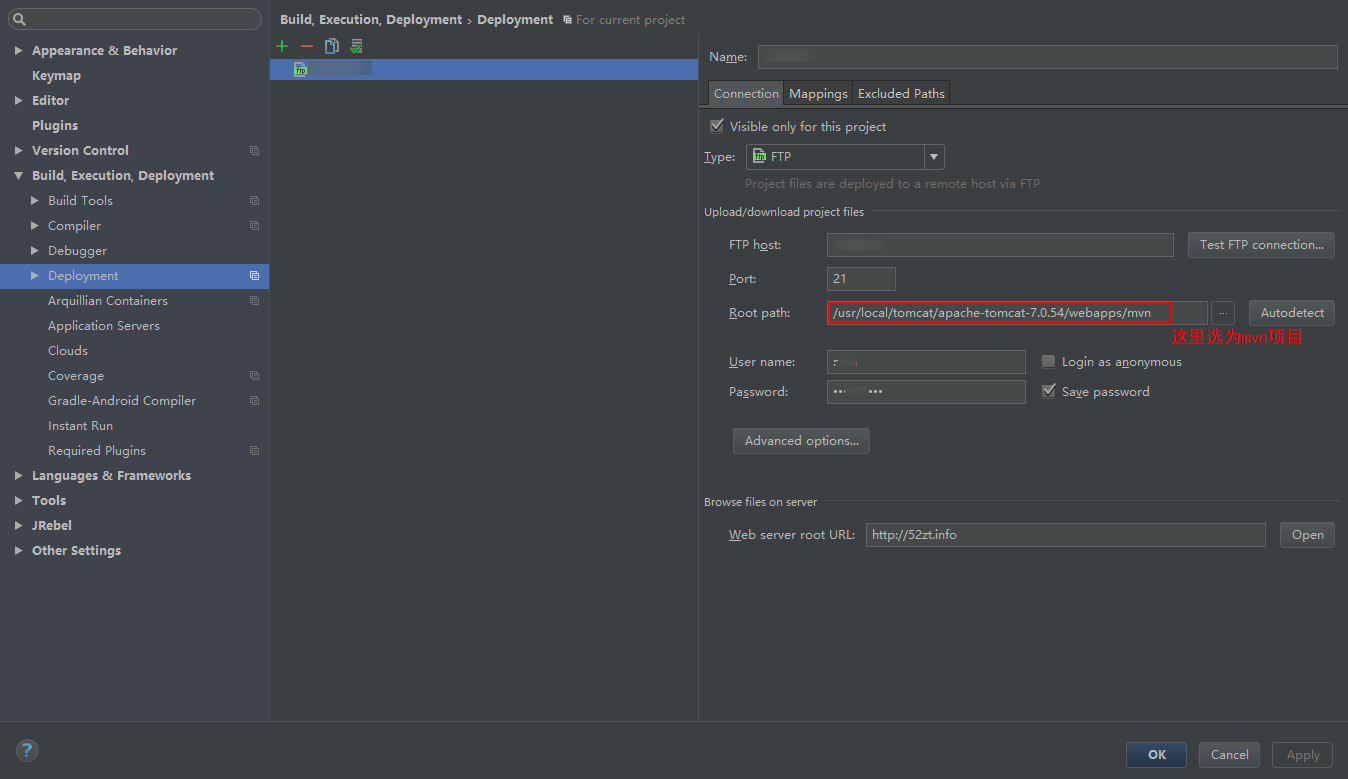
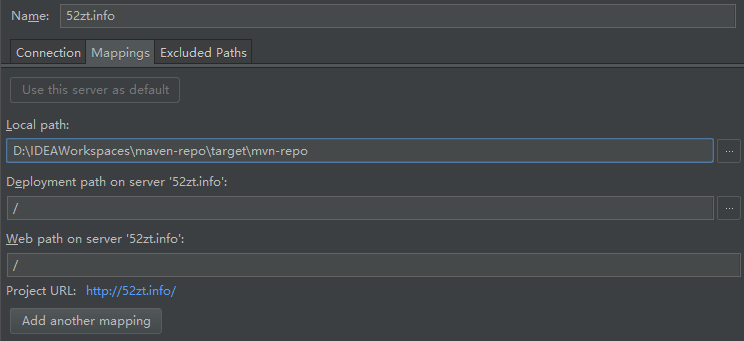
通过idea的Deployment
Setting -> Build,Execution,Deployment -> Deployment
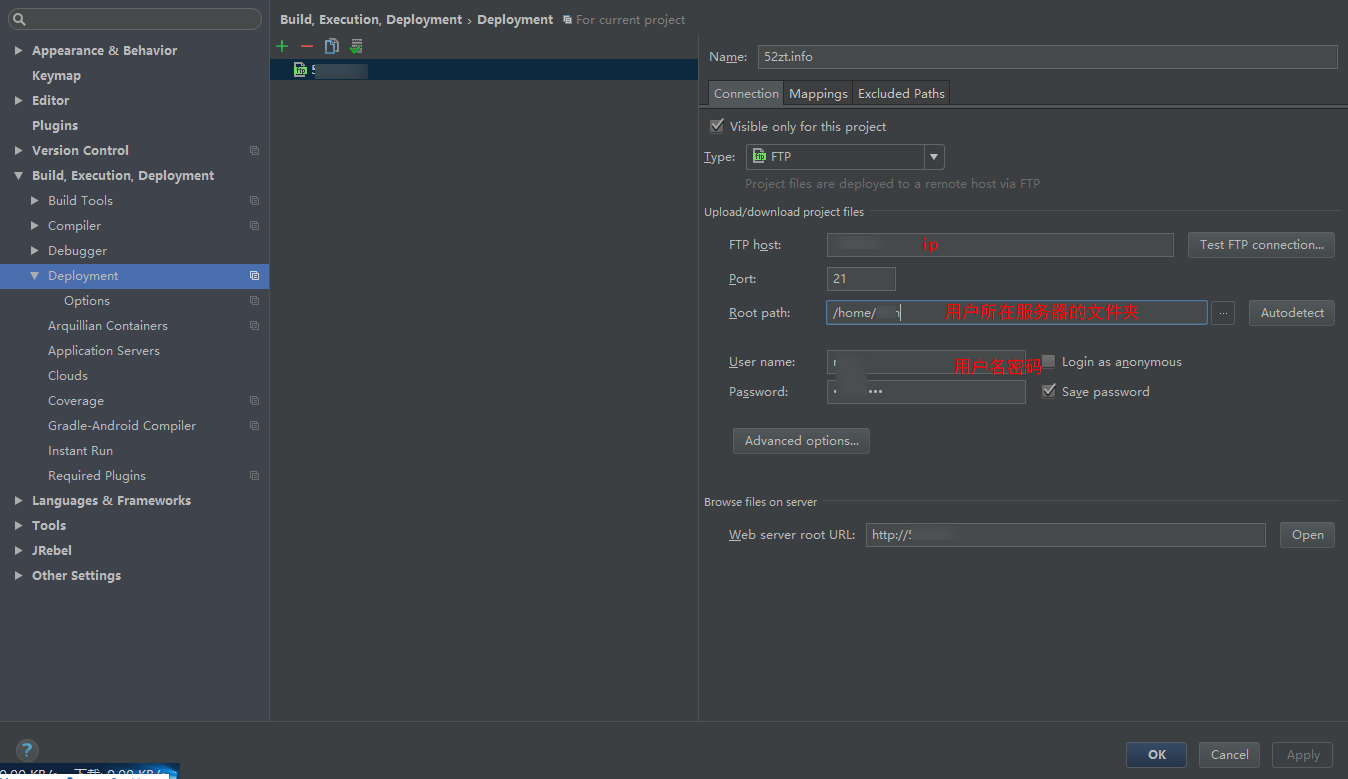
设置好要上传的文件夹

上传成功如下:
报错500 Illegal PORT command
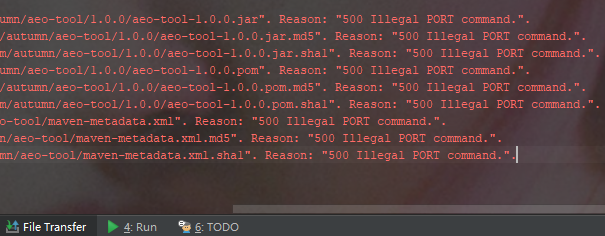
点击Advanced Options,勾上Passive mode
modprobe ip_nat_ftp
modprobe ip_conntrack_ftp
使用ftp发现能上传成功却不能读取。找不到原因。。。欢迎指教~

五、通过tomcat发布
在webapp下面新建一个mvn文件夹,把项目发布到mvn项目下即可。
手动部署
在项目的pom.xml中添加:
<distributionManagement>
    <repository>
        <id>file-repository</id>
        <url>file://D:mvn-rpo</url>
    </repository>
</distributionManagement>
运行mvn deploy命令可以看到在D:abc目录下生成了目录和各种文件。将整个目录上传到Tomcat的webapps/mvn下面。
ssh自动部署
官方文档:https://maven.apache.org/plugins/maven-deploy-plugin/examples/deploy-ssh-external.html
<distributionManagement>
    <repository>
        <id>ssh-server</id>
        <url>scp://ip/home/java/apache-tomcat-8.5.5/webapps/mvn</url>
    </repository>
</distributionManagement>

<build>
    <extensions>
        <extension>
            <groupId>org.apache.maven.wagon</groupId>
            <artifactId>wagon-ssh-external</artifactId>
            <version>1.0-beta-6</version>
        </extension>
    </extensions>
</build>
新建一个用户:https://www.cnblogs.com/aeolian/p/12449679.html
Maven的settings.xml中配置服务器的SSH用户名和密码:
<server>
    <id>ssh-server</id>
    <username>root</username>
    <password>your-password</password>
</server>
执行mvn deploy
idea的Deployment(推荐)
使用idea的ftp发布,首先要建一个ftp用户并给用户指定文件夹赋予权限。
#进入到webapp目录
cd /usr/local/tomcat/apache-tomcat-7.0.54/webapps
#新建mvn文件夹
mkdir mvn
#给mvn文件夹赋给ftp用户mvn
chown mvn:mvn mvn
然后用mvn用户名登录
点击Tools -> Deployment -> Browse Remote Host,进行upload。
六、GitHub Package
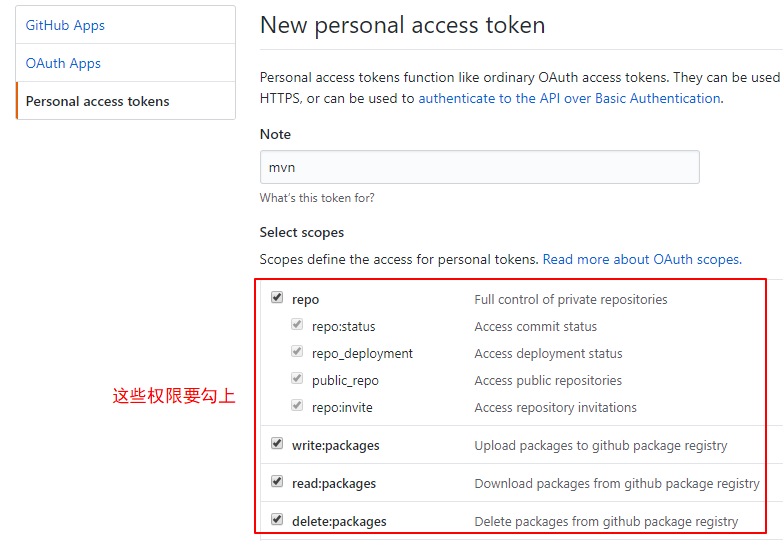
生成Token
点击右上角头像,点击Setting -》 Developer settings -》Personal access tokens,写上备注,勾上权限。点击生成后一定要先复制Token,下次就不显示Token了。
Maven的Setting配置
<settings xmlns="http://maven.apache.org/SETTINGS/1.0.0"
  xmlns:xsi="http://www.w3.org/2001/XMLSchema-instance"
  xsi:schemaLocation="http://maven.apache.org/SETTINGS/1.0.0
                      http://maven.apache.org/xsd/settings-1.0.0.xsd">

  <!-- 读取mvn库用,选择要激活的profile -->
  <activeProfiles>
    <activeProfile>github</activeProfile>
  </activeProfiles>
  <!-- 读取mvn库用,配置一系列profile,一定要写到具体仓库 -->
  <profiles>
    <profile>
      <id>github</id>
      <repositories>
        <repository>
          <id>github</id>
          <name>GitHub OWNER Apache Maven Packages</name>
          <url>https://maven.pkg.github.com/OWNER/REPOSITORY</url>
        </repository>
      </repositories>
    </profile>
  </profiles>
  <!-- 上面两项也可以不配置,只不过每次都要在pom.xml文件中配置,这里配置可以一劳永逸 -->

  <!-- 发布读取都要用到 -->
  <servers>
    <server>
      <id>github</id>
      <username>USERNAME</username>
      <password>TOKEN,注意这里是Token不是你的密码啊啊啊啊啊啊啊</password>
    </server>
  </servers>
</settings>
Pom.xml
<distributionManagement>
   <repository>
     <id>github</id>
     <name>GitHub OWNER Apache Maven Packages</name>
     <url>https://maven.pkg.github.com/OWNER/REPOSITORY</url>
   </repository>
</distributionManagement>
执行mvn deploy,注意!!!一定要把maven-deploy-plugin这个插件给注释掉,不然只会发布到本地,不会执行发布到远程服务器。
如果报错,可以使用mvn -e deploy或者mvn -X deploy查看详情。

一直报Return code is: 401, ReasonPhrase: Unauthorized,检查了setting中的server配置的用户名密码正确,一天后发现password需要填的不是密码是token。
七、使用仓库
github package
在需要使用jar包项目的pom文件中添加github仓库,也可以在maven的setting中配置profile。无论哪种一定要用server的用户名和token。
    <!--引入仓库-->
    <repositories>
            <repository>
                <id>github</id>
                <name>GitHub autumn Apache Maven Packages</name>
                <url>https://maven.pkg.github.com/AutKevin/maven-repo/</url>
                <snapshots>
                    <enabled>true</enabled>
                    <updatePolicy>always</updatePolicy>
                </snapshots>
            </repository>
    </repositories>
然后执行mvn install。
tomcat
tomcat的端口/项目名
        <repository>
            <id>tomcat-repository</id>
            <url>http://52zt.info:88/mvn</url>
        </repository>
添加依赖
<dependency>
    <groupId>com.autumn</groupId>
    <artifactId>aeo-tool</artifactId>
    <version>1.0.0</version>
</dependency>