前言
根据上一节中http://www.cnblogs.com/aehyok/archive/2013/05/02/3054615.html对多线程的入门了解。本节就来探讨一下简单的使用多线程。
使用多线程
线程用Thread类来创建, 通过ThreadStart委托来指明方法从哪里开始运行,下面是ThreadStart委托如何定义的:
public delegate void ThreadStart();
调用Start方法后,线程开始运行,线程一直到它所调用的方法返回后结束。下面是一个例子,使用了C#的语法创建TheadStart委托:
    class Program
    {
        static void Main(string[] args)
        {
            System.Threading.Thread thread = new System.Threading.Thread(Go);
            thread.Start();
            Go();
            Console.ReadLine();

        }

        static void Go() { Console.WriteLine("hello!"); }
    }
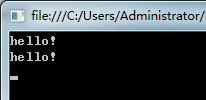
在这个例子中,线程t执行Go()方法,大约与此同时主线程也调用了Go(),结果是两个几乎同时hello被打印出来:

一个线程可以通过C#堆委托简短的语法更便利地创建出来:
              System.Threading.Thread t = new System.Threading.Thread (delegate() { Console.WriteLine ("Hello!"); });
              t.Start();
线程有一个IsAlive属性,在调用Start()之后直到线程结束之前一直为true。一个线程一旦结束便不能重新开始了。
将数据传入ThreadStart中
话又说回来,在上面的例子里,我们想更好地区分开每个线程的输出结果,让其中一个线程输出大写字母。我们传入一个状态字到Go中来完成整个任务,但我们不能使用ThreadStart委托,因为它不接受参数,所幸的是,.NET framework定义了另一个版本的委托叫做ParameterizedThreadStart, 它可以接收一个单独的object类型参数:
namespace System.Threading
{
    // 摘要:
    //     表示在 System.Threading.Thread 上执行的方法。
    //
    // 参数:
    //   obj:
    //     包含该线程过程的数据的对象。
    [ComVisible(false)]
    public delegate void ParameterizedThreadStart(object obj);
}
示例
        static void Main(string[] args)
        {
            System.Threading.Thread thread = new System.Threading.Thread(Go);
            thread.Start(true);
            Go(false);
            Console.ReadLine();
        }

        static void Go(object upperCase)
        {
            bool upper = (bool)upperCase;
            Console.WriteLine(upper ? "HELLO!" : "hello!");
        }

在整个例子中,编译器自动推断出ParameterizedThreadStart委托,因为Go方法接收一个单独的object参数,就像这样写:在整个例子中,编译器自动推断出ParameterizedThreadStart委托,因为Go方法接收一个单独的object参数,就像这样写:
            System.Threading.Thread thread = new System.Threading.Thread(Go);
            thread.Start(true);
ParameterizedThreadStart的特性是在使用之前我们必需对我们想要的类型(这里是bool)进行装箱操作,并且它只能接收一个参数。
一个替代方案是使用一个匿名方法调用一个普通的方法如下:
    class Program
    {
        static void Main()
        {
            System.Threading.Thread t = new System.Threading.Thread(delegate() { WriteText("Hello"); });
            t.Start();
            Console.ReadLine();
        }
        static void WriteText(string text) { Console.WriteLine(text); }
    }
优点是目标方法(这里是WriteText),可以接收任意数量的参数,并且没有装箱操作。不过这需要将一个外部变量放入到匿名方法中,像下面的一样:
    class Program
    {
        static void Main()
        {
            string text = "Before";
            System.Threading.Thread t = new System.Threading.Thread(delegate() { WriteText(text); });
            text = "aehyok";
            t.Start();
            Console.ReadLine();
        }
        static void WriteText(string text) { Console.WriteLine(text); }
    }

匿名方法打开了一种怪异的现象,当外部变量被后来的部分修改了值的时候,可能会透过外部变量进行无意的互动。有意的互动(通常通过字段)被认为是足够了!一旦线程开始运行了,外部变量最好被处理成只读的——除非有人愿意使用适当的锁。
另一种较常见的方式是将对象实例的方法而不是静态方法传入到线程中,对象实例的属性可以告诉线程要做什么,如下列重写了原来的例子:
    class Program
    {
        bool upper;
        static void Main()
        {
            Program instance1 = new Program();

            instance1.upper = true;

            System.Threading.Thread t = new System.Threading.Thread(instance1.Go);
            t.Start();
            Program instance2 = new Program();
            instance2.Go();
            Console.ReadLine();
        }
        void Go() { Console.WriteLine(upper ? "HELLO!" : "hello!"); }
    }

命名线程
线程可以通过它的Name属性进行命名,这非产有利于调试:可以用Console.WriteLine打印出线程的名字,Microsoft Visual Studio可以将线程的名字显示在调试工具栏的位置上。线程的名字可以在被任何时间设置——但只能设置一次,重命名会引发异常。
程序的主线程也可以被命名,下面例子里主线程通过CurrentThread命名:
        static void Main()
        {
            System.Threading.Thread.CurrentThread.Name = "main";
            System.Threading.Thread worker = new System.Threading.Thread(Go);
            worker.Name = "worker";
            worker.Start();
            Go();
            Console.ReadLine();
        }

        static void Go()
        {

            Console.WriteLine("Hello from " + System.Threading.Thread.CurrentThread.Name);

        }

还有几点下节继续。