本篇通过分析郭大的代码深入理解FM
郭大的代码中默认处理的所有的属性都是类别属性,而且只能完成二分类的任务。每个属性的每一个类别的取值都被当作成一个特征。例如在数据集中国家这个属性有中国,美国,俄罗斯,日本等取值,我们把中国,美国等国家当作是一个单独的特征,有点类似one hot编码。
参数
hparam=tf.contrib.training.HParams(
            model='ffm', # 指定使用的模型
            k=16, # FM模型中的超参数k,表示每个特征对应向量的维度
            hash_ids=int(1e5), # 使用了hash技巧,所有的特征经过hash后分散到1e5个桶中
            batch_size=64,
            optimizer="adam", # 指定tensorflow优化器的类型
            learning_rate=0.0002,
            num_display_steps=100,
            num_eval_steps=1000,
            epoch=3,
            metric='auc', # ['auc','logloss']
            init_method='uniform', #['tnormal','uniform','normal','xavier_normal','xavier_uniform','he_normal','he_uniform']
            init_value=0.1,
            feature_nums=len(feats)) # 属性(注意不是特征)的个数
TensorFlow计算图
传入计算图的数据
self.label = tf.placeholder(shape=(None), dtype=tf.float32)
self.features=tf.placeholder(shape=(None,hparams.feature_nums), dtype=tf.int32)
首先说一下数据集的格式,数据集可以是pandas格式。pandas中每个属性可以是原始的string类型(object in pandas),也可以是整数或者浮点数类型,可以不经过LabelEncoder的编码。
self.label中存储的是一个batch_size中的二元标签,[0,1,1,0,1...]
self.features的shape为(batch_size, attribute_nums),[[1,2,1,3,4] , [0,2,3,3,5]...],注意这里一列表示一个属性。
hparams.hash_ids的含义
# src/misc_utils.py
def hash_batch(batch,hparams):
    batch=pd.DataFrame(batch)
    batch=list(batch.values)
    for b in batch: # 这里b就是batch中的一行
        for i in range(len(b)):
            b[i]=abs(hash('key_'+str(i)+' value_'+str(b[i]))) % hparams.hash_ids
    return batch
这段代码把每个属性的每个特征值通过hash函数映射到不同的桶,这里的一个桶相当于是一个特征,这种hash的技巧可以减少参数的个数,把稀疏的模型变得更加紧凑。缺点就是可能发生碰撞,所以桶的个数需要合理的设置。
计算图的参数
self.emb_v1=tf.get_variable(shape=[hparams.hash_ids,1],
                                    initializer=initializer,name='emb_v1')
self.emb_v2=tf.get_variable(shape=[hparams.hash_ids,hparams.k],
                            initializer=initializer,name='emb_v2')
FM的模型可以分为两个部分,前两部分可以看作是一个LR模型,其中的参数也就对应self.emb_v1(忽略了常数项),最后一部分中交叉项特征的参数对应self.emb_v2
计算图的构建
# models/fm.py build_graph()
#lr
emb_inp_v1=tf.gather(self.emb_v1, self.features) # inp : inner product
w1=tf.reduce_sum(emb_inp_v1,[-1,-2])
#FM
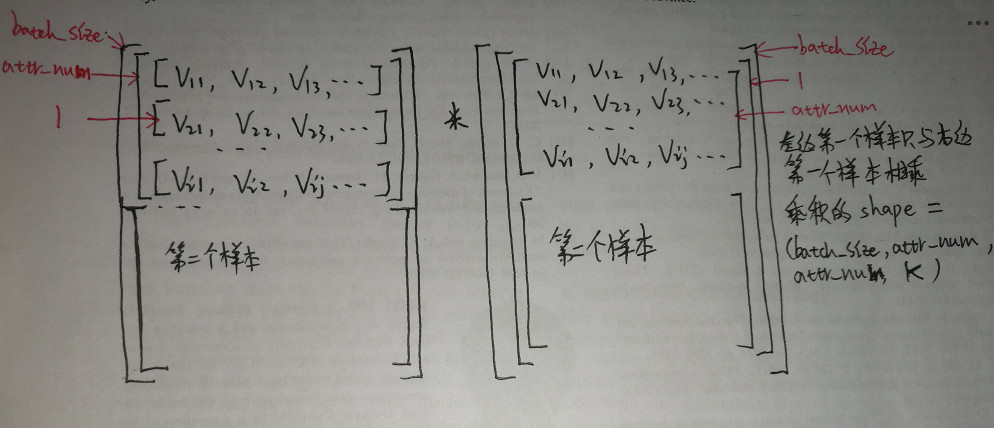
emb_inp_v2=tf.gather(self.emb_v2, self.features) # shape = [batch_size, attr_nums, k]
self.emb_inp_v2=emb_inp_v2
emb_inp_v2=tf.reduce_sum(emb_inp_v2[:,:,None,:]*emb_inp_v2[:,None,:,:],-1)
这里分析emb_inp_v2[:,:,None,:]*emb_inp_v2[:,None,:,:]的具体过程。
前者的shape为(batch_size, attr_nums,1, k),后者的shape为(batch_size, 1, attr_nums, k),多出一个维度是因为None切片的结果。

# models/fm.py build_graph()
ones = tf.ones_like(emb_inp_v2) # shape = (batch_size, attr_nums, attr_nums)
mask_a = tf.matrix_band_part(ones, 0, -1) # Upper triangular matrix of 0s and 1s
mask_b = tf.matrix_band_part(ones, 0, 0)  # Diagonal matrix of 0s and 1s
mask = tf.cast(mask_a - mask_b, dtype=tf.bool) # Make a bool mask

#DNN
mask_input = tf.boolean_mask(emb_inp_v2, mask)
mask_input = tf.reshape(mask_input,[tf.shape(emb_inp_v2)[0],hparams.feature_nums*(hparams.feature_nums-1)//2]) # shape = (batch_size, -1)

w2=tf.reduce_sum(mask_input,-1)


logit=w1+w2
self.prob=tf.sigmoid(logit)
logit_1=tf.log(self.prob+1e-20)
logit_0=tf.log(1-self.prob+1e-20)
self.loss=-tf.reduce_mean(self.label*logit_1+(1-self.label)*logit_0) # log loss
self.cost=-(self.label*logit_1+(1-self.label)*logit_0)
self.saver= tf.train.Saver()
TensorFlow & Numpy中None切片的用法(注解)
# tensorflow和numpy中None切片的用法
# 用None切片会在对应的位置增加一个维度
import tensorflow as tf
import numpy as np

arr = np.arange(16).reshape(4,4)
ten = tf.constant(arr)

with tf.Session() as sess:
    ts = tf.gather(ten, [[0,3],[1,2]])
    print(sess.run(ts))
    print('-'*50)
    res = sess.run(ts[:,:,None,:])
    print(res)
    print(res.shape)
    print('-'*50)
    res2 = sess.run(ts[:,:,:])
    print(res2)
    print(res2.shape)
TensorFlow & Numpy中高维tensor的乘法(注解)
TensorFlow和Numpy中的*都是element-wise product
在tensorflow或者numpy中对高维tensor进行matmul操作,如果a和b的dimention大于2,实际上进行的会是batch_mat_mul,此时进行叉乘的是batch中的每一个切片(slice)
这就要求:
1)a和b除了最后两个维度可以不一致,其他维度要相同(比如上面代码第一维和第二维分别都是1,2)
2)a和b最后两维的维度要符合矩阵乘法的要求(比如a的(3,4)能和b的(4,6)进行矩阵乘法)
在tensorflow或者numpy中对高维tensor进行element-wise乘法,如果a和b的shape相同那么就是直接进行对应元素相乘,最后得到结果的shape和a或者b的shape都是相同的。
但是如果a和b的shape不一致,总的来说会有以下几种情况:
1.行向量和矩阵相乘
row
Out[42]: array([1, 2, 3])
mat
Out[43]:
array([[1, 2, 3],
       [4, 5, 6]])
row*mat # 前后顺序无关,不改变结果
Out[44]:
array([[ 1,  4,  9],
       [ 4, 10, 18]])
# row的长度必须和mat中的列数相同
2.列向量和矩阵相乘
col = np.array([1,2]).reshape(-1,1)
col
Out[47]:
array([[1],
       [2]])
col*mat
Out[48]:
array([[ 1,  2,  3],
       [ 8, 10, 12]])
3.多个行向量与矩阵相乘
arr = np.array([1,2,3,4,5,6]).reshape(2,3)
arr = arr[:,None,:]
arr
Out[52]:
array([[[1, 2, 3]],
       [[4, 5, 6]]])
arr.shape
Out[53]: (2, 1, 3)
mat
Out[54]:
array([[1, 2, 3],
       [4, 5, 6]])
arr*mat
Out[55]:
array([[[ 1,  4,  9],
        [ 4, 10, 18]],
       [[ 4, 10, 18],
        [16, 25, 36]]])
_.shape
Out[56]: (2, 2, 3)
# 把多个行向量分别取出和矩阵进行乘法,然后把结果安装行向量中的shape进行拼接,每个行向量用乘积矩阵替换
问题:没有early_stopping,增加这个功能的思路:epoch中的每一次迭代在训练集上评估一次,如果当前评估值大于记录的最高评估值就更新最高评估值,同时更新最高评估值对应的训练次数,而且还要保存模型(覆盖前面保存的模型)。如果当前训练次数-最高评估值对应的训练次数超过了early_stopping_round就结束训练。在infer的过程中把保存的最新的模型加载进来,然后进行预测。
建议把郭大的代码根据自己的需求重写一遍。