1、参数绑定注解
1》@RequestParam:
用于将指定的请求参数赋值给方法中的指定参数。支持的属性:


2》@PathVariable:可以方便的获得URL中的动态参数,只支持一个属性value,类型为String,表示绑定的名称。
3》@RequestHeader:用于将请求的头信息区数据映射到处理方法的参数上。支持的属性:

4》@CookieValue:将请求的Cookie数据映射到处理方法的参数上。支持的属性有:

举个例子:
@Controller
public class CookieValueController{

    // 测试@CookieValue注解
    // 该方法映射的请求为 /cookieValueTest
    @GetMapping(value="/cookieValueTest")
     public void cookieValueTest(
             @CookieValue(value="JSESSIONID", defaultValue="") String sessionId) {
        System.out.println("通过@CookieValue获得JSESSIONID: " + sessionId);
     }
}
以上配置自动将JSESSIONID值设置到sessionid参数上,defaultValue表示Cookie中没有JSESSIONID时默认为空。
5》@SessionAttributes:只能声明在类上。允许我们有选择的指定Model中的哪些属性需要转存到HttpSession对象中。支持的属性:

6》@ModelAttribute:将请求参数绑定到Model对象。只支持一个属性value,类型为String,表示绑定的属性名称。被@ModelAttribute注释的方法会在Controller每个处理方法执行前被执行。绑定的属性可以在request域被访问到!@ModelAttribute的使用方法:
1>@ModelAttribute(value="attributeName")注释有返回值的方法:将命名为attributeName的属性设置到Model中,而attributeName的属性的值就是该被@ModelAttribute修饰的方法的返回值。被注释方法的参数可以不包含Model类型
2>@ModelAttribute注释void返回值类型的方法:使用model.addAttribute()方法给Model绑定请求参数,前提是被注释方法参数包含Model类型。
3>@ModelAttribute注释返回具体Java Bean类型的方法:没有指定value,即属性名,则具体Java Bean的小写将作为属性名,如被注释方法返回User,则属性名为user。其值即为被注释方法的返回值,在request域可以像访问Java Bean的属性一样访问其内部属性,如request.uesr.username。
4>@ModelAttribute、@RequestMapping同时注释处理方法:@ModelAttribute指定的value的值,则Model的属性名就为该value指定的值,属性的值为被注释方法返回的值;该方法@RequestMapping的value指定的值,作为最后的视图索引,如@RequestMapping("/login"),则被注释方法返回的视图是“/login”。
5>@ModelAttribute注释一个方法的参数:主要实现的是将前端的数据绑定到一个Java Bean,然后将该Java Bean作为处理方法的入参传递参数,现在高版本的spring MVC已经很智能的直接将前端的请求参数对象(如:json对象)对应设置绑定到处理方法的入参中。
@Controller
public class ModelAttribute5Controller{

         @ModelAttribute("user")
         public User userModel(
           @RequestParam("loginname") String loginname,
           @RequestParam("password") String password
         ){
           User user=new User();
           user.setLoginname(loginname);
           user.setPassword(password);
           return user;
         }
        /*
         *  @ModelAttribute注释方法参数,会自动入参(高版本的spring MVC已经
         *  不需要这个参数注解也能自动将参数绑定到参数Java Bean中了)
         *  loginname控件的值会自动入参到User的loginname属性
         *  password控件的值会自动入参到User的password属性
         */
        @RequestMapping(value="/login5")
         public String login5(@ModelAttribute("user") User user) {
            user.setUsername("管理员");
             return "result5";
         }
}
2、信息转换
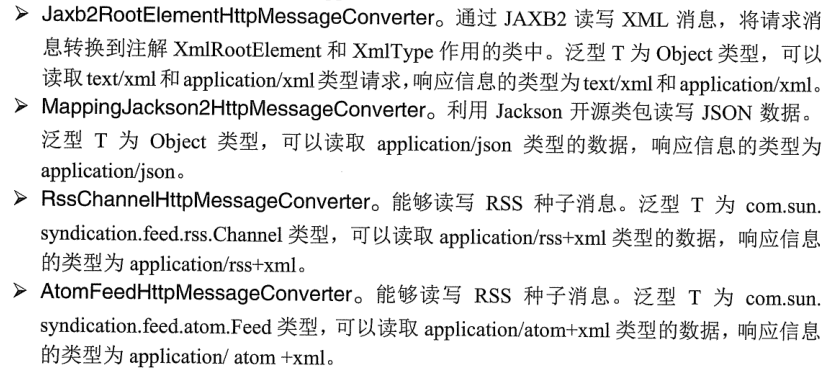
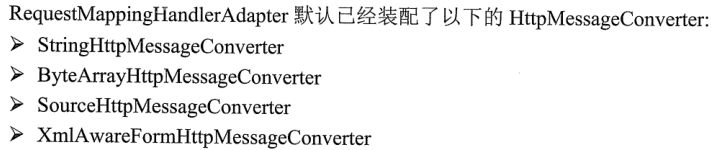
1》HttpMessageConverter<T>接口
该接口主要负责将请求信息转换为一个对象(类型为T),并将对象(类型为T)绑定到请求方法的参数中或输出为响应信息。
DispatcherServlet默认已经装配了RequestMappingHandlerAdapter(注解的适配器)作为HandlerAdapter组件的实现类,即HttpMessageConverter由RequestMappingHandlerAdapter使用,将请求信息转换为对象,或将对象转换为响应信息。
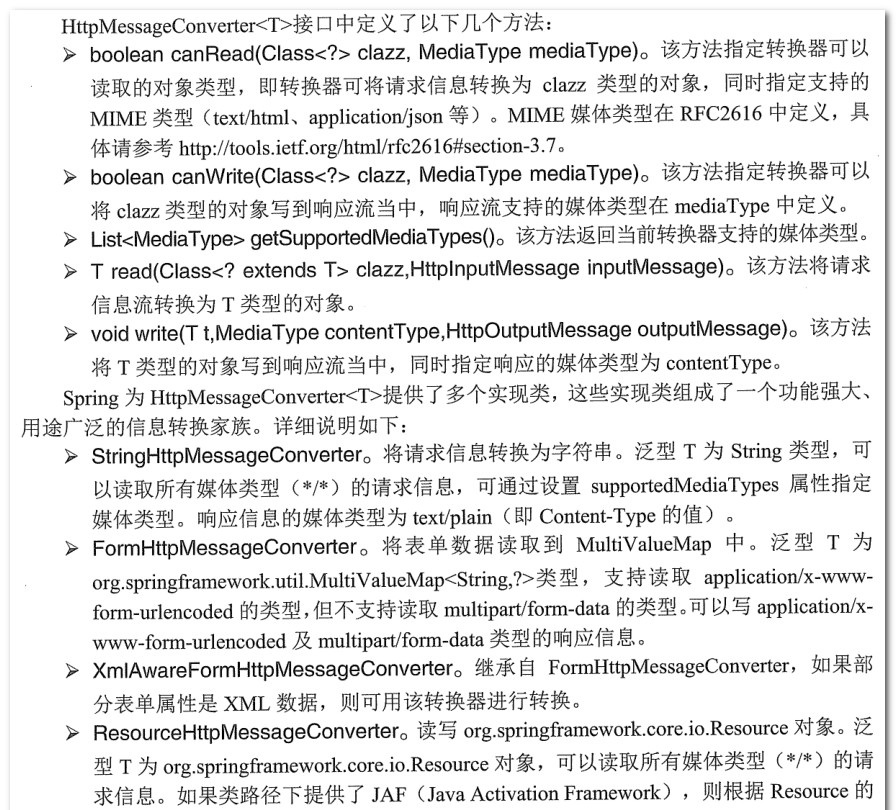
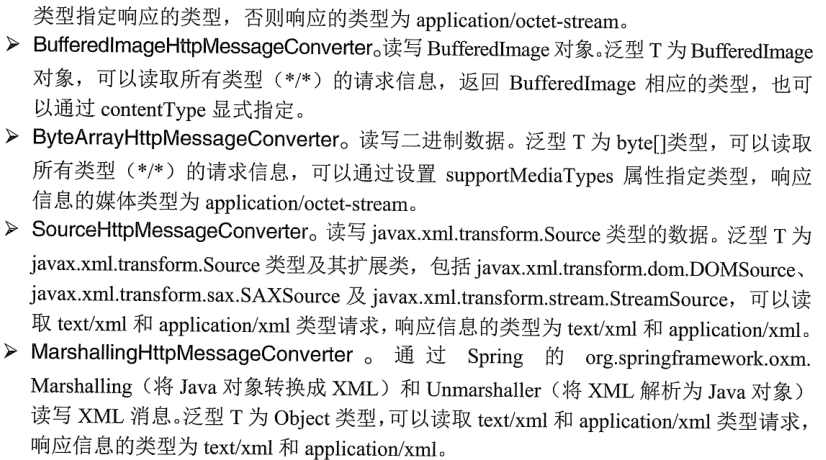
如果需要装配其他类型的HttpMessageConverter,则可在spring的web容器的上下文中自定义一个RequestMappingHandlerAdapter:
<bean class="org.springframework.web.servlet.mvc.method.annotation.RequestMappingHandlerAdapter">
     <property name="messageConverters">
           <list>
            <bean class="org.springframework.http.converter.StringHttpMessageConverter"/>
            <bean class="org.springframework.http.converter.xml.SourceHttpMessageConverter"/>
            <bean class="org.springframework.http.converter.ByteArrayHttpMessageConverter"/>
            <bean class="org.springframework.http.converter.BufferedImageHttpMessageConverter"/>
            <!-- 配置fastjson中实现HttpMessageConverter接口的转换器 -->
            <bean id="fastJsonHttpMessageConverter"
                class="com.alibaba.fastjson.support.spring.FastJsonHttpMessageConverter">
                <!-- 加入支持的媒体类型:返回contentType -->
                <property name="supportedMediaTypes">
                    <list>
                        <!-- 这里顺序不能反,一定先写text/html,不然ie下会出现下载提示 -->
                        <value>text/html;charset=UTF-8</value>
                        <value>application/json;charset=UTF-8</value>
                    </list>
                </property>
            </bean>
           </list>
     </property>
</bean>
如果在spring web容器中显式定义了一个RequestMappingHandlerAdapter,spring MVC的RequestMappingHandlerAdapter默认装配的HttpMessageConverter将不再起作用。
Spring MVC默认使用MappingJeckson2HttpMessageConverter转换Json数据,Jackson开源类包可以非常轻松地将Java对象转换json对象或xml文档,同样也可以将json对象、xml文档转换成Java对象。
2》转换数据。
使用org.springframework.web.bind.annotation.RequestBody注解参数,将request中body的数据转换成json,使用org.springframework.web.bind.annotation.ResponseBody返回json数据。
当前台页面使用GET或POST方式提交数据时,数据编码格式由请求头的ContentType指定,大体的情况分为:

1>使用默认的转换器MappingJacksonHttpMessageConverter。该转换器需要使用Jackson包。
举个例子:
引入的jar包主要是spring框架jar包,jackson-databind-2.9.2.jar、jackson-core-2.9.2.jar、jackson-annotations-2.9.2.jar。
index.jsp
<%@ page language="java" contentType="text/html; charset=UTF-8"
    pageEncoding="UTF-8"%>
<!DOCTYPE html>
<html>
<head>
<meta http-equiv="Content-Type" content="text/html; charset=UTF-8">
<title>测试接收JSON格式的数据</title>
<script type="text/javascript" src="js/jquery-1.11.0.min.js"></script>
<script type="text/javascript" src="js/json2.js"></script>
<script type="text/javascript">
$(document).ready(function(){
    testRequestBody();
});
function testRequestBody(){
    $.ajax("${pageContext.request.contextPath}/json/testRequestBody",// 发送请求的URL字符串。
            {
            dataType : "json", // 预期服务器返回的数据类型。
               type : "post", //  请求方式 POST或GET
           contentType:"application/json", //  发送信息至服务器时的内容编码类型
           // 发送到服务器的数据。
           data:JSON.stringify({id : 1, name : "Spring+MyBatis企业应用实战"}),
           async:  true , // 默认设置下,所有请求均为异步请求。如果设置为false,则发送同步请求
           // 请求成功后的回调函数。
           success :function(data){
               console.log(data);
              $("#id").html(data.id);
              $("#name").html(data.name);
              $("#author").html(data.author);
           },
           // 请求出错时调用的函数
           error:function(){
               alert("数据发送失败");
           }
    });
}
</script>
</head>
<body>
编号:<span id="id"></span><br>
书名:<span id="name"></span><br>
作者:<span id="author"></span><br>
</body>
</html>
web.xml
<?xml version="1.0" encoding="UTF-8"?>
<web-app xmlns:xsi="http://www.w3.org/2001/XMLSchema-instance" xmlns="http://java.sun.com/xml/ns/javaee" xsi:schemaLocation="http://java.sun.com/xml/ns/javaee http://java.sun.com/xml/ns/javaee/web-app_3_0.xsd" id="WebApp_ID" version="3.0">
  <display-name>springMVCJackson2Test-1.0.0</display-name>
  <welcome-file-list>
    <welcome-file>index.html</welcome-file>
    <welcome-file>index.htm</welcome-file>
    <welcome-file>index.jsp</welcome-file>
    <welcome-file>default.html</welcome-file>
    <welcome-file>default.htm</welcome-file>
    <welcome-file>default.jsp</welcome-file>
  </welcome-file-list>

  <!-- 定义Spring MVC的前端控制器 -->
  <servlet>
    <servlet-name>springmvc</servlet-name>
    <servlet-class>
        org.springframework.web.servlet.DispatcherServlet
    </servlet-class>
    <init-param>
      <param-name>contextConfigLocation</param-name>
      <param-value>classpath*:config/spring/springmvc-config.xml</param-value>
    </init-param>
    <load-on-startup>1</load-on-startup>
  </servlet>
  <!-- 让Spring MVC的前端控制器拦截所有请求 -->
  <servlet-mapping>
    <servlet-name>springmvc</servlet-name>
    <url-pattern>/</url-pattern>
  </servlet-mapping>

  <!-- 编码过滤器 -->
  <filter>
        <filter-name>characterEncodingFilter</filter-name>
        <filter-class>org.springframework.web.filter.CharacterEncodingFilter</filter-class>
        <init-param>
            <param-name>encoding</param-name>
            <param-value>UTF-8</param-value>
        </init-param>
        <!--
        <init-param>
            <param-name>forceEncoding</param-name>
            <param-value>true</param-value>
        </init-param> -->
 </filter>
 <filter-mapping>
    <!-- 或者 <filter-name>encodingFilter</filter-name> -->
      <filter-name>characterEncodingFilter</filter-name>
    <url-pattern>/*</url-pattern>
 </filter-mapping>
</web-app>
springmvc-config.xml
<?xml version="1.0" encoding="utf-8"?>
<beans xmlns:xsi="http://www.w3.org/2001/XMLSchema-instance"
       xmlns="http://www.springframework.org/schema/beans"
       xmlns:p="http://www.springframework.org/schema/p"
       xmlns:mvc="http://www.springframework.org/schema/mvc"
       xmlns:context="http://www.springframework.org/schema/context"
       xsi:schemaLocation="
       http://www.springframework.org/schema/beans
       http://www.springframework.org/schema/beans/spring-beans-4.0.xsd
       http://www.springframework.org/schema/context
       http://www.springframework.org/schema/context/spring-context.xsd
       http://www.springframework.org/schema/mvc
       http://www.springframework.org/schema/mvc/spring-mvc.xsd">

      <mvc:default-servlet-handler/>

      <!-- 扫描controller -->
      <context:component-scan base-package="com.lfy.controller"/>

     <!-- 映射器、适配器策略  -->
      <mvc:annotation-driven/>

      <!-- 视图解析器 -->
      <bean class="org.springframework.web.servlet.view.InternalResourceViewResolver"
            p:prefix="/WEB-INF/content/" p:suffix=".jsp" />
</beans>
BookController.java
package com.lfy.controller;

import javax.servlet.http.HttpServletResponse;
import com.lfy.bean.Book;

import org.apache.commons.logging.Log;
import org.apache.commons.logging.LogFactory;
import org.springframework.stereotype.Controller;
import org.springframework.web.bind.annotation.RequestBody;
import org.springframework.web.bind.annotation.RequestMapping;
import com.fasterxml.jackson.databind.ObjectMapper;

@Controller
@RequestMapping("/json")
public class BookController {

    private static final Log log=LogFactory.getLog(BookController.class);
    //@RequestBody根据json数据,转换成对应的Object
    @RequestMapping(value="/testRequestBody")
    public void setJson(@RequestBody Book book,
            HttpServletResponse response) throws Exception{
        //ObjectMapper类是Jackson库的主要类,它提供一些功能将Java Bean转换成json
        ObjectMapper mapper = new ObjectMapper();
        log.info(mapper.writeValueAsString(book));
        book.setAuthor("lfy");
        response.setContentType("text/html;charset=UTF-8");
        //将book对象转换成json写出到客户端
        response.getWriter().println(mapper.writeValueAsString(book));
    }
}
Book.java
package com.lfy.bean;

import java.io.Serializable;

/**
 *
 * @author lfy
 *
 */
public class Book implements Serializable {

    private static final long serialVersionUID = 1L;

    private Integer id;
    private String name;
    private String author;

    public Integer getId() {
        return id;
    }
    public void setId(Integer id) {
        this.id = id;
    }
    public String getName() {
        return name;
    }
    public void setName(String name) {
        this.name = name;
    }

    public String getAuthor() {
        return author;
    }
    public void setAuthor(String author) {
        this.author = author;
    }
    @Override
    public String toString() {
        return "Book [id=" + id + ", name=" + name + ", author=" + author + "]";
    }
}
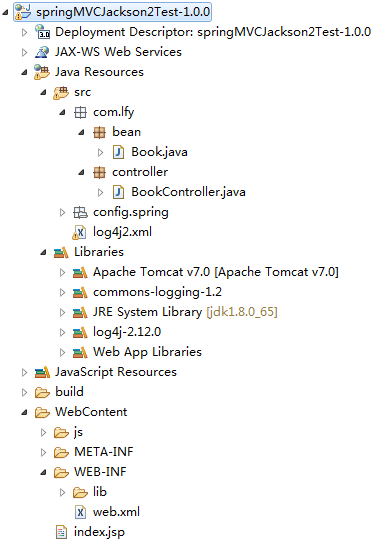
运行结果:

总结:由于RequestMappingHandlerAdapter默认装配MappingJacksonHttpMessageConverter,所以使用Jackson在配置方面比较简单,使用的时候只需要在代码中使用ObjectMapper处理数据转换即可。
2>使用fastjson。
引入fastjson的jar包。
springmvc-config.xml
<?xml version="1.0" encoding="UTF-8"?>
<beans xmlns="http://www.springframework.org/schema/beans"
    xmlns:xsi="http://www.w3.org/2001/XMLSchema-instance"
    xmlns:p="http://www.springframework.org/schema/p"
    xmlns:mvc="http://www.springframework.org/schema/mvc"
    xmlns:util="http://www.springframework.org/schema/util"
    xmlns:context="http://www.springframework.org/schema/context"
    xsi:schemaLocation="
        http://www.springframework.org/schema/beans
        http://www.springframework.org/schema/beans/spring-beans.xsd
        http://www.springframework.org/schema/context
        http://www.springframework.org/schema/context/spring-context.xsd
        http://www.springframework.org/schema/mvc
        http://www.springframework.org/schema/mvc/spring-mvc.xsd
        http://www.springframework.org/schema/util
        http://www.springframework.org/schema/util/spring-util.xsd">

    <mvc:default-servlet-handler/>

    <context:component-scan base-package="org.lfy.controller"/>

    <!-- 设置配置方案mvc:annotation-driven会自动注册ResquestMappingHandlerMaping
                           与MappingHandlerAdapter,这是spring为@Controller分发请求必须的,并提供数据绑定
                           支持  -->
    <mvc:annotation-driven>
        <!-- 设置不使用默认的消息转换器 -->
        <mvc:message-converters register-defaults="false">
            <!-- 配置Spring的转换器 -->
            <bean class="org.springframework.http.converter.StringHttpMessageConverter"/>
            <bean class="org.springframework.http.converter.xml.SourceHttpMessageConverter"/>
            <bean class="org.springframework.http.converter.ByteArrayHttpMessageConverter"/>
            <bean class="org.springframework.http.converter.BufferedImageHttpMessageConverter"/>
            <!-- 配置fastjson中实现HttpMessageConverter接口的转换器 -->
            <bean id="fastJsonHttpMessageConverter"
                class="com.alibaba.fastjson.support.spring.FastJsonHttpMessageConverter">
                <!-- 加入支持的媒体类型:返回contentType -->
                <property name="supportedMediaTypes">
                    <list>
                        <!-- 这里顺序不能反,一定先写text/html,不然ie下会出现下载提示 -->
                        <value>text/html;charset=UTF-8</value>
                        <value>application/json;charset=UTF-8</value>
                    </list>
                </property>
            </bean>
        </mvc:message-converters>
    </mvc:annotation-driven>

     <bean id="viewResolver"
          class="org.springframework.web.servlet.view.InternalResourceViewResolver"
          p:prefix="/WEB-INF/content/" p:suffix=".jsp"/>

</beans>
BookController.java
package org.lfy.controller;

import javax.servlet.http.HttpServletResponse;

import org.springframework.stereotype.Controller;
import org.springframework.web.bind.annotation.RequestBody;
import org.springframework.web.bind.annotation.RequestMapping;

import com.alibaba.fastjson.JSONObject;
import com.lfy.bean.Book;

@Controller
@RequestMapping("/json")
public class BookController {

    /**
     * RequestBody根据JSON数据转换为对应的Object
     * @param book
     * @param response
     * @throws Exception
     */
    @RequestMapping(value="/testRequestBody")
    public void setJson(@RequestBody Book book,
            HttpServletResponse response) throws Exception{
        System.out.println(JSONObject.toJSONString(book));
        book.setAuthor("lfy");
        response.setContentType("text/html;charset=UTF-8");
        response.getWriter().println(JSONObject.toJSONString(book));
    }
}
运行结果:与使用Jackson的结果一致。

总结:使用fastjson,需要引入fastjson的jar包,同时需要配置HttpMessageConverter将其指向fastjson的转换器。在使用的时候使用JSONObject的方法进行数据转换。(注:如果引入fastjson的jar包,但是没有在适配器中配置转换器为fastjson,发送接收json数据会抛一些问题。)
对比jackson和fastjson,可知只是让适配器使用不同的转换器HttpMessageConverter而已。
==>返回json数据例子:使用@ResponseBody注解方法即可
BookController.java
package org.lfy.controller;

import java.util.ArrayList;
import java.util.List;

import org.springframework.stereotype.Controller;
import org.springframework.web.bind.annotation.RequestMapping;
import org.springframework.web.bind.annotation.ResponseBody;
import org.springframework.web.servlet.ModelAndView;

import com.alibaba.fastjson.JSONObject;
import com.lfy.domain.Book;

@Controller
@RequestMapping("/json")
public class BookController {

    /**
     *
     * @param book
     * @param response
     * @throws Exception
     */
    @RequestMapping(value="/testRequestBody")
    @ResponseBody
    public Object getJson(){

        List<Book> list=new ArrayList<Book>();
        list.add(new Book(1,"mmmmmm","lfy"));
        list.add(new Book(2,"nnnnnn","lfy"));
        return list;
    }

    @RequestMapping(value="/DataAndView")
    public ModelAndView setJson(){
        List<Book> list=new ArrayList<Book>();
        list.add(new Book(1,"kkkkkk","lfy"));
        list.add(new Book(2,"llllll","lfy"));
        ModelAndView mv=new ModelAndView();
        mv.addObject("data",JSONObject.toJSONString(list));
        mv.setViewName("welcome");
        return mv;
    }
}
index.jsp读出返回的json数据
<%@ page language="java" contentType="text/html; charset=UTF-8"
    pageEncoding="UTF-8"%>
<!DOCTYPE html>
<html>
<head>
<meta http-equiv="Content-Type" content="text/html; charset=UTF-8">
<title>测试接收JSON格式的数据-jsp</title>
<script type="text/javascript" src="js/jquery-1.11.0.min.js"></script>
<script type="text/javascript" src="js/json2.js"></script>
<script type="text/javascript">
$(document).ready(function(){
    testRequestBody();
});
function testRequestBody(){
    $.post("${pageContext.request.contextPath}/json/testRequestBody",null,
            function(data){
        $.each(data,function(){
            var tr=$("<tr align='center'/>");
            $("<td/>").html(this.id).appendTo(tr);
            $("<td/>").html(this.name).appendTo(tr);
            $("<td/>").html(this.author).appendTo(tr);
            $("#booktable").append(tr);
        })
    },"json");
}
</script>
</head>
<body>
<table id="booktable" border="1" style="border-collapse:collapse;">
  <tr align="center">
     <th>编号</th>
     <th>书名</th>
     <th>作者</th>
   </tr>
</table>
</body>
</html>
3》转换XML。
Spring MVC提供了处理XML格式请求/响应的HttpMessageConverter,如Jaxb2RootElementHttpMessageConverter通过JAXB2读写XML消息,并将请求消息转换到注解XMLRootElement、XmlType作用的类中。
因此只需要在Spring Web容器中为RequestMappingHandlerAdapter装配处理XML的HttpMessageConverter,并在交互中通过请求的Accept指定MIME类型。
Spring MVC默认使用的装换器时Jaxb2RootElementHttpMessageConverter转换XML格式的数据,JAXB(Java Architecture for XML Binding)可以很方便地生成XML,也能很方便的生成JSON,所以交换数据比较方便。
JAXB是一个业界的标准,是一项可以根据XML Schema产生Java类的技术。该过程JAXB提供了将XML实例文档反向生成Java对象的方法,并能将Java对象的内容重新写到XML实例文档中,从而使得Java开发者在Java应用程序中能够很方便的处理XML数据。
JAXB常用的注解包括:@XmlRootElement、@XmlElement等。
举个例子:

引入的jar包为spring、commons-logging。
web.xml比较常规,主要是配置前端控制器,引入springmvc-config.xml
<?xml version="1.0" encoding="utf-8"?>
<beans xmlns:xsi="http://www.w3.org/2001/XMLSchema-instance"
       xmlns="http://www.springframework.org/schema/beans"
       xmlns:p="http://www.springframework.org/schema/p"
       xmlns:mvc="http://www.springframework.org/schema/mvc"
       xmlns:context="http://www.springframework.org/schema/context"
       xsi:schemaLocation="
       http://www.springframework.org/schema/beans
       http://www.springframework.org/schema/beans/spring-beans-4.0.xsd
       http://www.springframework.org/schema/context
       http://www.springframework.org/schema/context/spring-context.xsd
       http://www.springframework.org/schema/mvc
       http://www.springframework.org/schema/mvc/spring-mvc.xsd">

      <mvc:default-servlet-handler/>

      <!-- 扫描controller -->
      <context:component-scan base-package="com.lfy.controller"/>

     <!-- 映射器、适配器策略  -->
      <mvc:annotation-driven/>

      <!-- 视图解析器 -->
      <bean class="org.springframework.web.servlet.view.InternalResourceViewResolver"
            p:prefix="/WEB-INF/content/" p:suffix=".jsp" />
</beans>
sendXml.jsp
<%@ page language="java" contentType="text/html; charset=UTF-8"
    pageEncoding="UTF-8"%>
<!DOCTYPE html>
<html>
<head>
<meta http-equiv="Content-Type" content="text/html; charset=UTF-8">
<title>测试接收XML格式的数据</title>
<script type="text/javascript" src="js/jquery-1.11.0.min.js"></script>
<script type="text/javascript" src="js/json2.js"></script>
<script type="text/javascript">
$(document).ready(function(){
    sendxml();
});

function sendxml(){
    var xmlData = "<?xml version="1.0" encoding="UTF-8" standalone="yes"?><book><id>1</id><name>疯狂Java讲义</name><author>李刚</author></book>";
    $.ajax("${pageContext.request.contextPath}/sendxml",// 发送请求的URL字符串。
            {
               type : "POST", //  请求方式 POST或GET
           contentType:"application/xml", //  发送信息至服务器时的内容编码类型
           // 发送到服务器的数据。
           data: xmlData,
           async:  true , // 默认设置下,所有请求均为异步请求。如果设置为false,则发送同步请求
    });
}
</script>
</head>
<body>

</body>
</html>
Book.java
package com.lfy.bean;

import java.io.Serializable;

import javax.xml.bind.annotation.XmlElement;
import javax.xml.bind.annotation.XmlRootElement;

@XmlRootElement
public class Book implements Serializable {

    private static final long serialVersionUID = 1L;

    private Integer id;
    private String name;
    private String author;

    public Book() {
        super();
    }

    public Book(Integer id, String name, String author) {
        super();
        this.id = id;
        this.name = name;
        this.author = author;
    }

    public Integer getId() {
        return id;
    }
    // 该属性作为xml的element
    @XmlElement
    public void setId(Integer id) {
        this.id = id;
    }

    public String getName() {
        return name;
    }
    @XmlElement
    public void setName(String name) {
        this.name = name;
    }

    public String getAuthor() {
        return author;
    }
    @XmlElement
    public void setAuthor(String author) {
        this.author = author;
    }

    @Override
    public String toString() {
        return "Book [id=" + id + ", name=" + name + ", author=" + author + "]";
    }
}
BookController.java
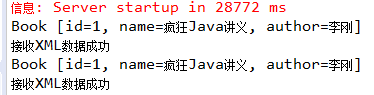
package com.lfy.controller;

import java.io.InputStream;

import javax.xml.bind.JAXBContext;
import javax.xml.bind.Unmarshaller;

import org.springframework.stereotype.Controller;
import org.springframework.web.bind.annotation.RequestBody;
import org.springframework.web.bind.annotation.RequestMapping;
import org.springframework.web.bind.annotation.RequestMethod;
import org.springframework.web.bind.annotation.ResponseBody;

import com.lfy.bean.Book;

@Controller
public class BookController {

         // @RequestBody Book book会将传递的xml数据自动绑定到Book对象
         @RequestMapping(value="/sendxml",method=RequestMethod.POST)
         public void sendxml(@RequestBody Book book) {
             System.out.println(book);
             System.out.println("接收XML数据成功");
         }

        // @ResponseBody 会将Book自动转成XML数据返回
         @RequestMapping(value="/readxml",method=RequestMethod.POST)
         @ResponseBody
         public Book readXml()throws Exception {
             // 通过JAXBContext的newInstance方法,传递一个class就可以获得一个上下文
             JAXBContext context = JAXBContext.newInstance(Book.class);
             // 创建一个Unmarshall对象
             Unmarshaller unmar = context.createUnmarshaller();
             InputStream is = this.getClass().getResourceAsStream("/book.xml");
             // Unmarshall对象的unmarshal方法可以进行xml到Java对象的转换
             Book book = (Book) unmar.unmarshal(is);
             System.out.println(book);
             return book;
         }
}
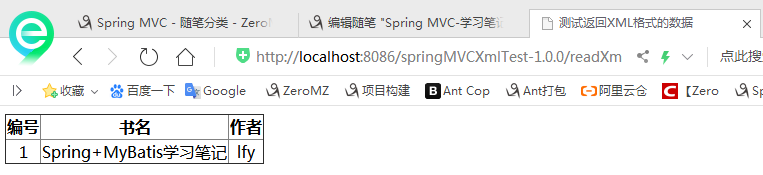
运行结果:
==>返回xml数据例子:
book.xml
<?xml version="1.0" encoding="UTF-8"?>
<book>
    <id>1</id>
    <name>Spring+MyBatis学习笔记</name>
    <author>lfy</author>
</book>
readXml.jsp
<%@ page language="java" contentType="text/html; charset=UTF-8"
    pageEncoding="UTF-8"%>
<!DOCTYPE html>
<html>
<head>
<meta http-equiv="Content-Type" content="text/html; charset=UTF-8">
<title>测试返回XML格式的数据</title>
<script type="text/javascript" src="js/jquery-1.11.0.min.js"></script>
<script type="text/javascript" src="js/json2.js"></script>
<script type="text/javascript">
$(document).ready(function(){
    readxml();
});
function readxml(){
    $.ajax("${pageContext.request.contextPath}/readxml",// 发送请求的URL字符串。
            {
            dataType : "text", // 预期服务器返回的数据类型。
               type : "POST", //  请求方式 POST或GET
            async:  true , // 默认设置下,所有请求均为异步请求。如果设置为false,则发送同步请求
            // 请求成功后的回调函数。
            success :function(xml){
                   // 获得xml数据的id,name,author
                 var id = $("id", xml).text();
                 var name = $("name", xml).text();
                 var author = $("author", xml).text();
                 var tr  = $("<tr align='center'/>");
                $("<td/>").html(id).appendTo(tr);
                $("<td/>").html(name).appendTo(tr);
                $("<td/>").html(author).appendTo(tr);
                $("#booktable").append(tr);
           },
           // 请求出错时调用的函数
           error:function(){
               alert("数据接收失败");
           }
    });
}
</script>
</head>
<body>
<table id="booktable" border="1"  style="border-collapse: collapse;">
    <tr align="center">
      <th>编号</th>
      <th>书名</th>
      <th>作者</th>
    </tr>
</table>
</body>
</html>
运行结果:
总结:使用@XmlRootElement、@XmlElement注解Java Bean,使用JAXBContext解析XML文件。