一、生命周期
生命周期分成三个阶段,下面这些函数中带有will前缀的是在事情发生前调用的,带有did前缀的是在事情发生后调用的。
- Mounting阶段,当一个组件的实例被创建并插入到DOM中时,下面这些函数会被调用:
- constructor()
- componentWillMount:组件即将被渲染到页面上,render之前最后一次修改状态的机会
- render:生成虚拟的DOM节点,只能访问this.props和this.state,只有一个顶层组件,不允许修改状态和DOM输出
- componentDidMount:组件已经渲染到页面上,成功render并渲染完成真实的DOM之后触发,可以修改DOM
- Updating阶段,属性和状态的修改会导致更新,当一个组件被re-render时会调用以下函数:
- componentWillRecieveProps:组件将要接收到属性时调用,父组件修改属性触发,可以修改新属性、修改状态
- shouldComponentUpdate:当组件接受到新属性或新状态时触发,判断组件是否需要更新,返回false会阻止render调用
- componentWillUpdate:组件将要更新,不能修改属性和状态
- render:同上
- componentDidUpdate:组件已经更新,可以修改DOM
- Unmounting阶段,当一个组件被移出DOM时调用
- componentWillUnmount:在删除组件之前进行清理操作,比如计时器和事件监听器
1. render()
render()函数是必须的。当调用render()函数时,会检查this.props和this.state,然后返回一个React element。render()函数也可以返回null或者false,表示不需要渲染任何东西。当返回是null或者false时,ReactDOM.findDOMNode(this)也会返回null。另外render()函数必须是pure的,意味着不能在render()函数中修改组件state,每次调用render时返回同样的结果。并且render()不能直接与浏览器交互,如果需要与浏览器交互,应该将这些交互代码放在componentDidMount()或者其他生命周期方法中。
注意:如果shouldComponentUpdate()返回false则render()不会被调用。
2. constructor(props)
React组件mounted前会调用constructor。当实现constructor函数时,必须在函数的第一行调用super(props)。否则this.props会是undefined。constructor是初始化state,bind函数的地方,如果你的组件不需要初始化state,bind函数,那么可以不需要constructor函数。
根据props初始化state也是可以的,只要你知道怎样实现。下面是一个例子
constructor(props) {
  super(props);
  this.state = {
    color: props.initialColor
  };
}
要谨慎使用这种模式(使用props初始化state),这可能会导致bug,而且你可能会需要实现componentWillReceiveProps(nextProps),来保持props和state同步。相比于同步props到state中,lift state up(将state提升到共同的父组件中)会是更好的办法。
3. componentWillMount()
componentWillMount()函数在mounting即将发生前立即调用。在render()函数之前调用,因此在这个方法中设置state将不会触发re-rendering。Avoid introducing any side-effects or subscriptions in this method.
这是唯一在服务器渲染中调用的生命周期钩子函数。一般来说,建议使用constructor()代替。
4. componentDidMount()
componnetDidMount()函数在组件mount完后立即调用。在这里可以访问DOM元素。如果你需要从远程端点加载数据,这是实例化网络请求的好地方。在这里设置state会触发re-render。如果想和其它 JavaScript 框架集成,使用 setTimeout 或者 setInterval 来设置定时器,或者发送 AJAX 请求,可以在该方法中执行这些操作。
class Box extends React.Component{
  constructor(props){
    super(props);
    this.state={windowWidth:window.innerWidth};
    this.handleResize=this.handleResize.bind(this);
  }
  handleResize(e) {
    this.setState({windowWidth: window.innerWidth});
  }
  componentDidMount() {
    window.addEventListener('resize', this.handleResize);
  }
  componentWillUnmount() {
    window.removeEventListener('resize', this.handleResize);
  }
  render(){
    return <div>Current window  {this.state.windowWidth}</div>;
  }
}
ReactDOM.render(<Box />, document.body);
componentDidMount 会在 component 渲染完成且已经有了 DOM 结构的时候被调用。通常情况下,你可以在这绑定普通的 DOM 事件。
注意,事件的回调被绑定在了 react 组件上,而不是原始的元素上。React 通过一个 autobinding 过程自动将方法绑定到当前的组件实例上。
5.componentWillReceiveProps(nextProps)
当一个装载好的组件接收到新的props时会调用这个函数。如果props变化时你需要更新state(比如重置它),你可以对比props和nextProps,然后执行this.setState()。
注意props没有发生变化时,React也可能会调用这个函数,因此一定要对比props和nextProps来确定是否发生变化。当你的父组件导致组件re-render时,会调用这个函数。
如果你只是调用this.setState()并不会触发componentWillReceiveProps.
对于 state,没有相似的方法: componentWillReceiveState。将要传进来的 prop 可能会引起 state 改变,反之则不然。如果需要在 state 改变的时候执行一些操作,请使用 componentWillUpdate。
6. shouldComponentUpdate(nextProps, nextState)
使用shouldComponentUpdate函数来使得React知道是否现在state或者props的改变影响了组件的输出。默认情况下是,每次state改变都会re-render,而且大多数情况下都应该使用默认行为。
在render之前当接收到新的props或者state时执行shouldComponentUpdate()。函数返回值默认为true。首次render或者当使用了forceUpdate()时这个方法不会执行该函数。当子组件的state改变时,即使返回false也不会阻止子组件re-render。
目前,如果shouldComponentUpdate()返回false,那么componentWillUpdate(),render(),componentDidUpdate()都不会执行。但是在未来,React可能只是将shouldComponentUpdate()作为一个线索而不是一个严格的指令,并且返回false可能仍然使得组件re-render。
你也可以使得你的组件继承React.PureComponent,这样它的shouldComponentUpdate()只会在浅层次比较prop和state。如果你想要自己写这个函数,可以比较this.props和nextProps,nextState和this.state,如果需要跳过这次更新可以返回false。
7.componentWillUpdate(nextProps,nextState)
render之前,当接受到新的props和state时,componentWillUpdate()立即执行。此时可以在更新前做一些准备。首次render时这个函数不会执行。注意在这个函数里面不能调用this.setState()。如果你需要更新state来适应prop的改变,可以在componentWillReceiveProps()中进行。另外,当shouldComponentUpdate()返回false时,这个函数不会执行。
8.componentDidUpdate(prevProps,prevState)
更新完成后立即执行componentDidUpdate函数。首次render时不会执行。
使用该方法可以在组件更新之后操作 DOM 元素。这也是一个执行网络请求的好地方只要你对比了当前props和之前的props(比如当props没有改变时,不需要发起网络请求)。
注意:如果shouldComponentUpdate返回false,则componentDidUpdate将不会执行。
9.componentWillUnmount
组件unmounted并且destroy前执行componentWillUnmount.在这里可以做一些必要的清理,比如取消timer,取消网络请求,或者清理componentDidMount阶段创建的DOM元素。
forceUpdate(callback)
默认情况下,当你的组件state或者props改变了,你的组件就会re-render。如果你的render()方法取决于一些其他的数据,你可以通过调用forceUpdate告诉React组件需要re-render.
调用forceUpdate()将导致组件执行render(),跳过shouldComponentUpdate()。这将会触发子组件的生命周期函数,包括每个子组件的shouldComponentUpdate(). React will still only update the DOM if the markup changes.
通常你应该尽量避免使用forceUpdate(),只在render中读取this.props和this.state
二、 函数的使用
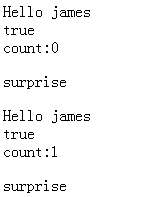
1. Mounting
 var count=0;
    class HelloWorld extends React.Component{
        constructor(props){
            super(props);
            this.state={myCount:count++,ready:false};
        }
        componentWillMount(){
            this.setState({ready:true});
        }
        render(){
            return <p ref="childp">Hello {this.props.name?this.props.name:"World"}<br/>
            {" "+this.state.ready}<br/>count:{this.state.myCount}</p>
        }
        componentDidMount(){
            var para=document.createElement("p");
            para.appendChild(document.createTextNode("surprise"));
            React.findDOMNode(this).appendChild(para);  // React.findDOMNode(this) 找到组件的真实DOM节点
        }
    }
    HelloWorld.defaultProps={name:"james"};
    React.render(<div><HelloWorld/><HelloWorld/></div>,document.body);

2. Updating
  class HelloWorld extends React.Component{
        componentWillReceiveProps(){}
        shouldComponentUpdate(){
            return true;
        }
        componentWillUpdate(){

        }
        render(){
            return <p>Hello,{this.props.name?this.props.name:"World"}</p>;
        }
        componentDidUpdate:function(){}
    }
    class HelloUniverse extends React.Component{
        constructor(props){
            super(props);
            this.hadleChange=this.handleChange.bind(this);
            this.state={name:''};
        }
        handleChange(event){
            this.setState({name:event.target.value});
        }
        render(){
            return <div>
                <HelloWorld name={this.state.name}/>
                <br/>
                <input type="text" onChange={this.handleChange}/>
                </div>
        }
    }

    React.render(<HelloUniverse/>,document.body);
实现像AngularJS一样的双向数据绑定效果

class HelloWorld extends React.Component{
    componentWillReceiveProps(property){ // 收到父组件传入的name属性,传入的是个object
        console.log("componentWillReceiveProps:1==>"+property.name);
        property.name="hehe"+property.name;  // 获得父组件传入的name属性后,先进行处理再传给组件使用
    }
    shouldComponentUpdate(){ // 不常用
        console.log("shouldComponentUpdate:2");
        return true;
    }
    componentWillUpdate(){ // 不常用
        console.log("componentWillUpdate:3");
    },
    render(){
        console.log("render:4");
        return <p>Hello,{this.props.name?this.props.name:"World"}</p>;
    }
    componentDidUpdate(){
        console.log("componentDidUpdate:5");
                var para=document.createElement("p");
                para.appendChild(document.createTextNode("surprise"));
                React.findDOMNode(this).appendChild(para);
    }
}
执行顺序


3. Unmounting
1)在render中将之前有的组件去掉,反映到页面上就是把他删除掉就是unmount掉
var HelloWorld=React.createClass({
        render:function(){
            return <p>Hello,{this.props.name?this.props.name:"World"}</p>;
        },
        componentWillUnmount:function(){
            console.log("componentWillUnmount");
        }
    });
    class HelloUniverse extends React.Component{
        constructor(props){
             super(props);
             this.state={name:''};
             this.handleChange=this.handleChange.bind(this);
        }
        handleChange(event){
            this.setState({name:event.target.value});
        }
        render(){
            if(this.state.name=="123"){
                return <div>123</div>;
            }
            return <div>
                    <HelloWorld name={this.state.name}/>
                    <br/>
                    <input type="text" onChange={this.handleChange}/>
                   </div>
        }
    }
    React.render(<HelloUniverse/>,document.body);

|
====> | 
|
2)使用react提供的函数React.unmountComponentAtNode(装载的节点),这个装载的节点就是React.render(组件,装载的节点)中的第二个参数
<script type="text/jsx">
    var HelloWorld=React.createClass({
        render:function(){
            return <p>Hello,{this.props.name?this.props.name:"World"}</p>;
        },
        componentWillUnmount:function(){
            console.log("componentWillUnmount");
        }
    });
    var HelloUniverse=React.createClass({
        getInitialState:function(){
            return {name:''};
        },
        handleChange:function(event){
            if(event.target.value=="123"){
               React.unmountComponentAtNode(document.body);
               return;
            }
             this.setState({name:event.target.value});
        },
        render:function(){
            return <div>
                <HelloWorld name={this.state.name}/>
                <br/>
                <input type="text" onChange={this.handleChange}/>
                </div>
        }
    });
    React.render(<HelloUniverse/>,document.body);
</script>

|
===> | 
|
直接将HelloUniverse卸载了