一、Redis简介
开源的、C语言编写、基于内存、也可做持久化存储、通过key-value存储的nosql数据库。
使用场景:常用缓存。
二、Redis安装(Linux)
版本:5.0.8
1:安装
使用以下命令下载,提取和编译Redis:
下载:$ wget http://download.redis.io/releases/redis-5.0.8.tar.gz
解压:$ tar xzf redis-5.0.8.tar.gz
移动到 usr/local 目录下:$ mv ./redis-5.0.8 /usr/local/redis
进入目录:$ cd /usr/local/redis
生成 $ make
测试: $ make test

安装过程中出现的问题:
1:进入directory '/usr/local/redis/src'

解决方案:
安装tcl
下载:$ wget http://downloads.sourceforge.net/tcl/tcl8.6.1-src.tar.gz
解压:$ tar xzvf tcl8.6.1-src.tar.gz -C /usr/local/
进入文件夹:$ cd /usr/local/tcl8.6.1/unix/
配置文件:$ ./configure
进行:$ make
安装:$ make install
2:启动
make完后 redis目录下会出现编译后的redis服务程序redis-server,还有用于测试的客户端程序redis-cli,两个程序位于安装目录 src 目录下:

下面启动redis服务.和 客户端
./redis-server ./redis-cli
注意这种方式启动redis
使用的是默认配置。也可以通过启动参数告诉redis使用指定配置文件使用下面命令启动。
$./ redis - server.. / redis.conf
redis.conf是一个默认的配置文件。我们可以根据需要使用自己的配置文件。
三、Redis在python中与django的配合
1:安装redis和django_redis模块
pip install django_redis
pip install redis
2:测试demo

from redis import StrictRedis
from django_redis import get_redis_connection

sr = StrictRedis("39.99.213.203", port=6379, db=1)


def set_redis():
    res = sr.set("name", "zhangsan")
    print(res)


def get_redis():
    res = sr.get("name")
    print(res)


if __name__ == '__main__':
    # 设置值
    set_redis()
    # 获取值
    get_redis()

ps:可能遇到的问题1
redis.exceptions.ResponseError: DENIED Redis is running in protected mode because protected mode is enabled, no bind address was specified, no authentication password is requested to clients. In this mode connections are only accepted from the loopback interface. If you want to connect from external computers to Redis you may adopt one of the following solutions: 1) Just disable protected mode sending the command 'CONFIG SET protected-mode no' from the loopback interface by connecting to Redis from the same host the server is running, however MAKE SURE Redis is not publicly accessible from internet if you do so. Use CONFIG REWRITE to make this change permanent. 2) Alternatively you can just disable the protected mode by editing the Redis configuration file, and setting the protected mode option to 'no', and then restarting the server. 3) If you started the server manually just for testing, restart it with the '--protected-mode no' option. 4) Setup a bind address or an authentication password. NOTE: You only need to do one of the above things in order for the server to start accepting connections from the outside.
问题原因:DENIED Redis is running in protected mode because protected mode is enabled,
处理方法: setting the protected mode option to 'no',
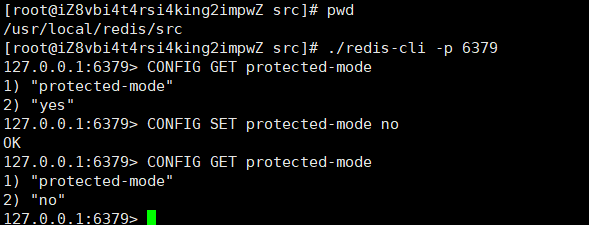
登录 linux系统,复现bug

通过命令,设置成no

再次测试运行

ps:可能遇到的问题2
redis.exceptions.ConnectionError: Error 10060 connecting to 39.99.213.203:6379. 由于连接方在一段时间后没有正确答复或连接的主机没有反应,连接尝试失败。.

问题现象:解决redis远程连接不上的问题,但是127.0.0.1可以使用
问题原因:因为在配置文件中固定了ip,因此需要修改redis.conf(有的版本不是这个文件名,只要找到相对应的conf后缀的文件即可)文件以下几个地方。
处理方法: 1.bind 127.0.0.1改为 #bind 127.0.0.1 (注释掉)
2.protected-mode yes 改为 protected-mode no
3.加入 daemonize no(这个是是否在后台启动不占用一个主程窗口)
redis启动警告问题1:WARNING: The TCP backlog setting of 511 cannot be enforced because /proc/sys/net/core/somaxconn is set to the lower value of 128.
问题原因:原因就是因为128太小了。
处理方法: 1 打开etc/sysctl.conf
2 在这里面添net.core.somaxconn= 1024
3 然后执行sysctl -p
redis启动警告问题2:WARNING overcommit_memory is set to 0! Background save may fail under low memory condition. To fix this issue add 'vm.overcommit_memory = 1' to /etc/sysctl.conf and then reboot or run the command 'sysctl vm.overcommit_memory=1' for this to take effect
问题原因:警告超委托内存设置为0!后台保存可能在低内存条件下失败。
处理方法: 1 打开etc/sysctl.conf
2 在这里面添vm.overcommit_memory = 1
3 然后执行sysctl -p
redis启动警告问题3:WARNING you have Transparent Huge Pages (THP) support enabled in your kernel. This will create latency and memory usage issues with Redis.
问题原因:意思是:你使用的是透明大页,可能导致redis延迟和内存使用问题。执行echo never > /sys/kernel/mm/transparent_hugepage/enabled修复该问题。
处理方法: 1 打开etc/sysctl.conf
2 在这里面添
iftest -f /sys/kernel/mm/redhat_transparent_hugepage/enabled; then
echo never > /sys/kernel/mm/redhat_transparent_hugepage/enabled
fi
如果还有连接问题,一定要考虑阿里云的防火墙,检查防火墙是否开启
四、Redis卸载
1:卸载
1、停止redis服务器
a:找到 ps aux|grep redis
b:杀死
2、删除make的时候生成的几个redisXXX的文件
ll /usr/local/bin
rm -f /usr/local/bin/redis*
3、顺便也删除掉解压后的文件目录和所以文件
rm -rf /usr/local/redis
